Introduction to JavaScript
In this, we are going to study JavaScript Fundamentals, which can be useful to study for frameworks like:
- React
- Node
- Angular
- Django
- Springboot
- .NET
Index
-
Getting Started:
-
Basics
-
Operators
-
Control Flow
-
Objects
-
Arrays
- Introduction
- Adding Elements
- Finding Elements (Primitives)
- Finding Elements (Reference Types)
- Arrow Functions
- Removing Elements
- Emptying an Array
- Combining and Slicing Arrays
- The Spread Operator
- Iterating an Array
- Joining an Array
- Sorting an Array
- Testing the elements of an Array
- Flitering an Array
- Mapping an Array
- Reducing an Array
- Exercises
-
Functions
In this introduction, we are going to understand the four frequently asked questions about JavaScript:
-
What is JavaScript?
-
What can you do with it?
-
Where does JavaScript code run?
-
What is the difference between JavaScript and ECMAScript?
1. What is JavaScript?
-
JavaScript is one of the most popular and widely used programming languages in the world right now. It's growing faster than any other programming languages, and big companies like Netflix, Walmart, and PayPal, build entire applications around JavaScript.
-
The average salary of a JavaScript developer, in the united states is $72,000 a year. It's a great opportunity to get a great job learning JavaScript.
-
You can work as:
-
a front-end developer, or
-
back-end developer, or
-
a full-stack developer (who knows both front-end and back-end)
-
2. What can you do with JavaScript?
-
For a long time, JavaScript was only used in browsers to build interactive web pages. Some developers referred to Javascript as a toy language but those days are gone because of huge community support and investments like large companies like Facebook and Google.
-
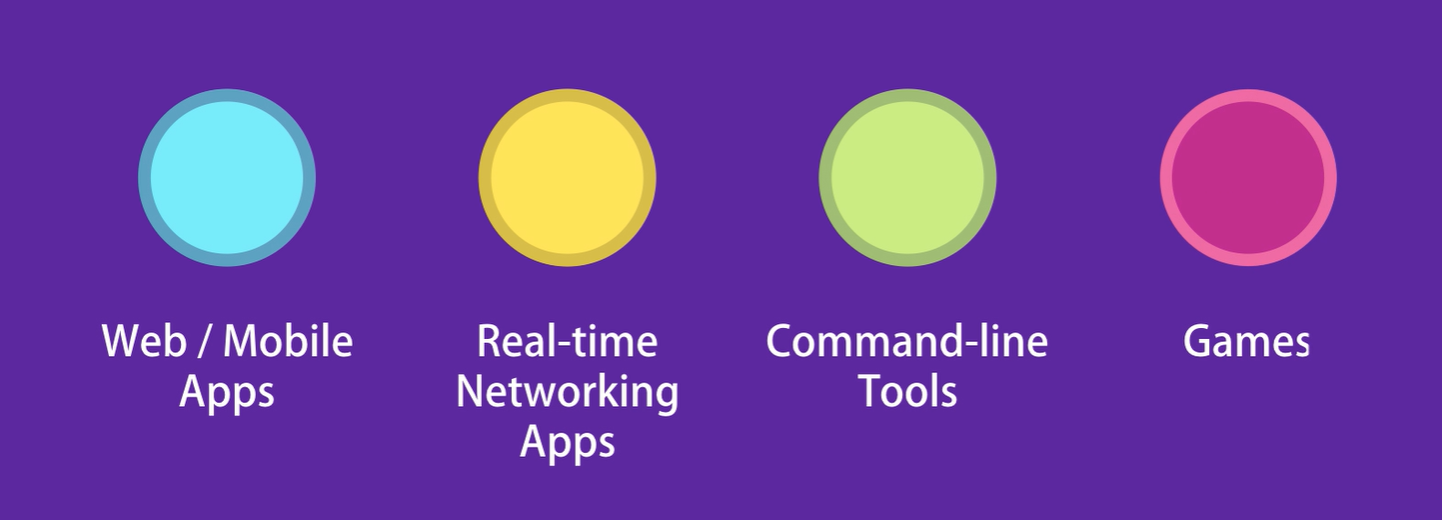
These days you can build full blown web or mobile apps as well as real-time networking apps like chats and video streaming services, command-line tools, or even games.
3. Where does JavaScript code run?
-
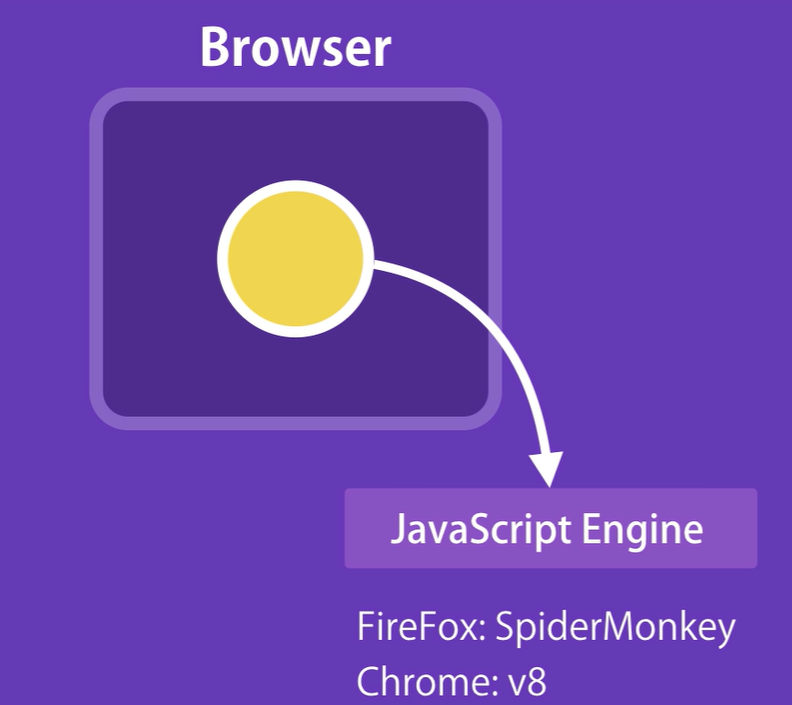
JavaScript was originally designed to run only in browsers.
-
So every browser has what we call a JavaScript Engine that can execute JavaScript code.
-
For example, the JavaScript engines in Firefox and Chrome are SpiderMonkey and V8.
-
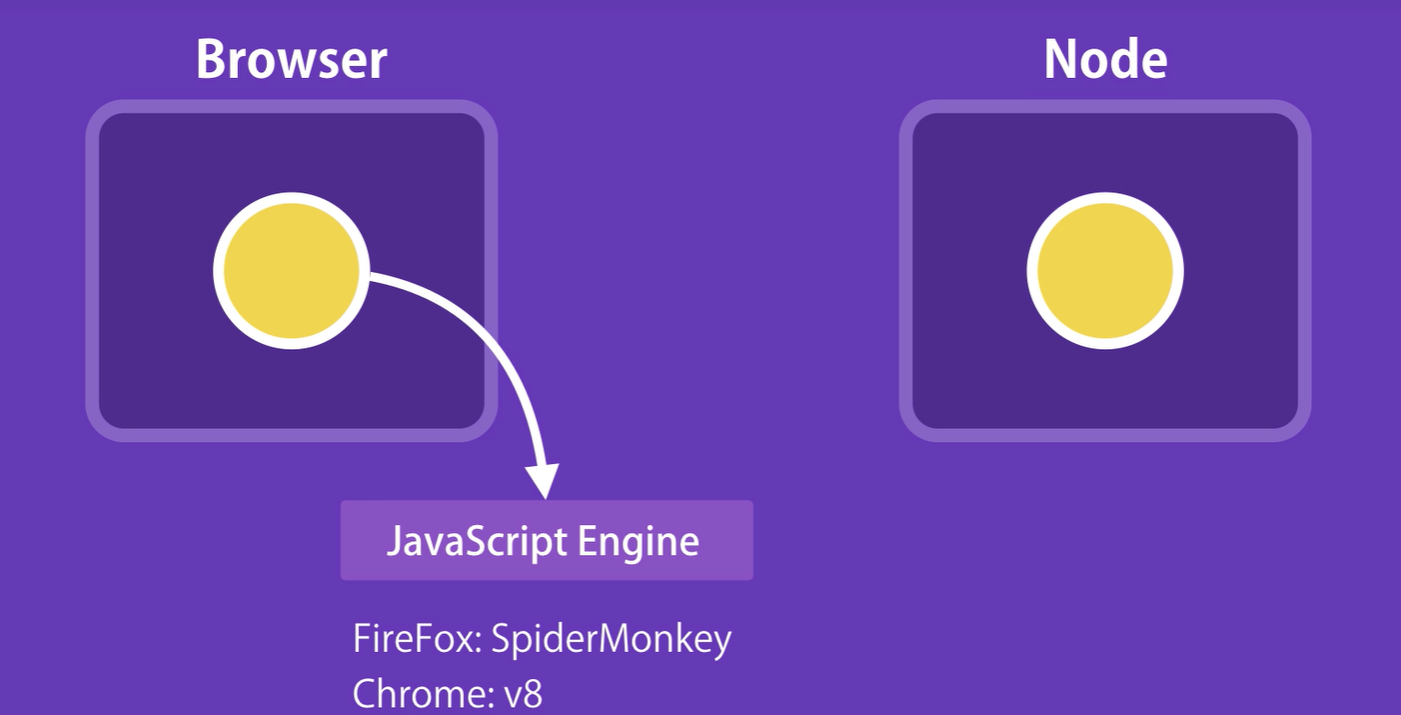
In 2009, a very clever engineer called Brian Doll took the open source JavaScript engine in Chrome, and embedded it inside a C++ program. He called that program Node.
-
So Node is a C++ program, that includes Google's V8 JavaScript engine.
-
Now with this we can run JavaScript code outside of a browser, so we can pass our JavaScript code to Node for execution.
-
This means with JavaScript we can build the back-end for our web and mobile applications.
-
In a nut shell,
-
JavaScript code can be run inside of a browser, or in Node.
-
Browsers and Node provide a runtime environment for our JavaScript code.
-
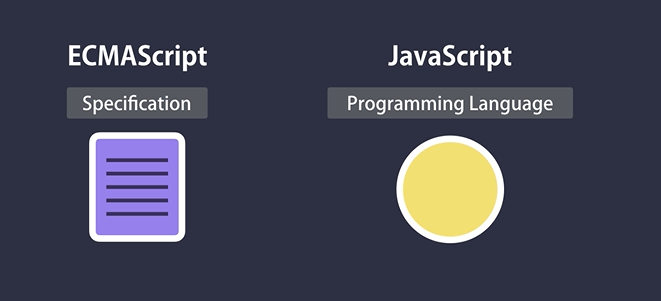
4. What is the difference between JavaScript and ECMA Script?
-
Well, ECMA Script is just a specification, JavaScript is a programming language that confirms to this specification.
-
So, we have this organization called ECMA, which is responsible for defining standards, they take care of this ECMA Script specification.
-
The first version of ECMA Script was released in 1997, then starting in 2015, ECMA
has been working on annual releases of a new specification.
-
In 2015, they released ECMA Script 2015 (which is also called ECMA Script version 6, or ES6 for short).
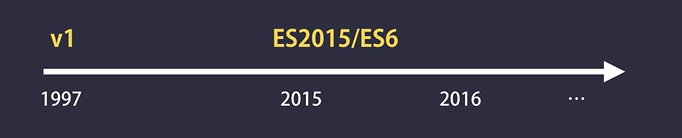
- This specification defined many new features for JavaScript.
Alright, enough theory, let's see JavaScript in action.
-
So every browser has a JavaScript engine, and we can easily write JavaScript code here (in this here refers to the browser) without any additional tools.
-
Of course, this is not how we build real world applications, but this is just for a quick demo for understanding purposes
Demo Part:
- So open up Chrome browser, right click on an empty area of your browser and go to inspect.
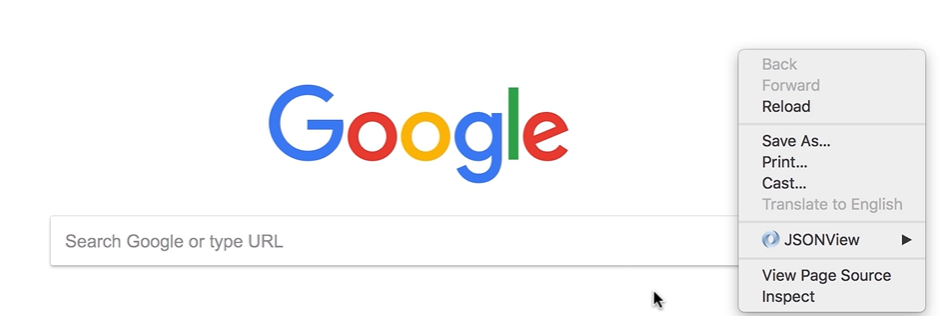
- Now this opens up Chrome developer tools
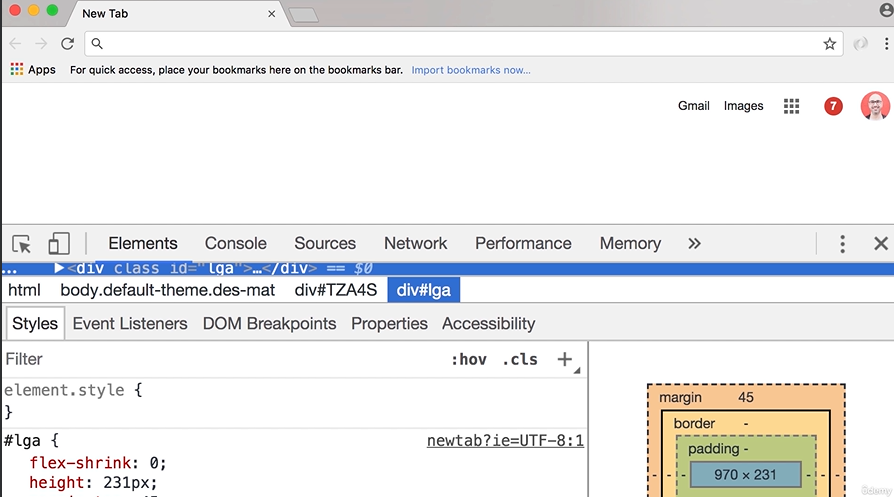
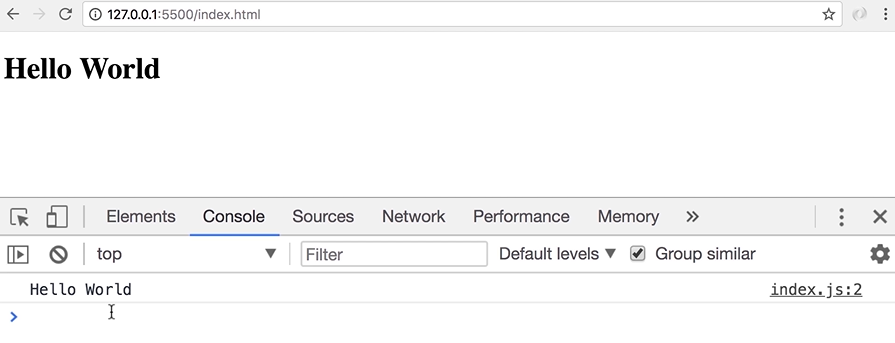
- Here, select the console tab, this is our JavaScript console, and we can write any valid JavaScript code here.

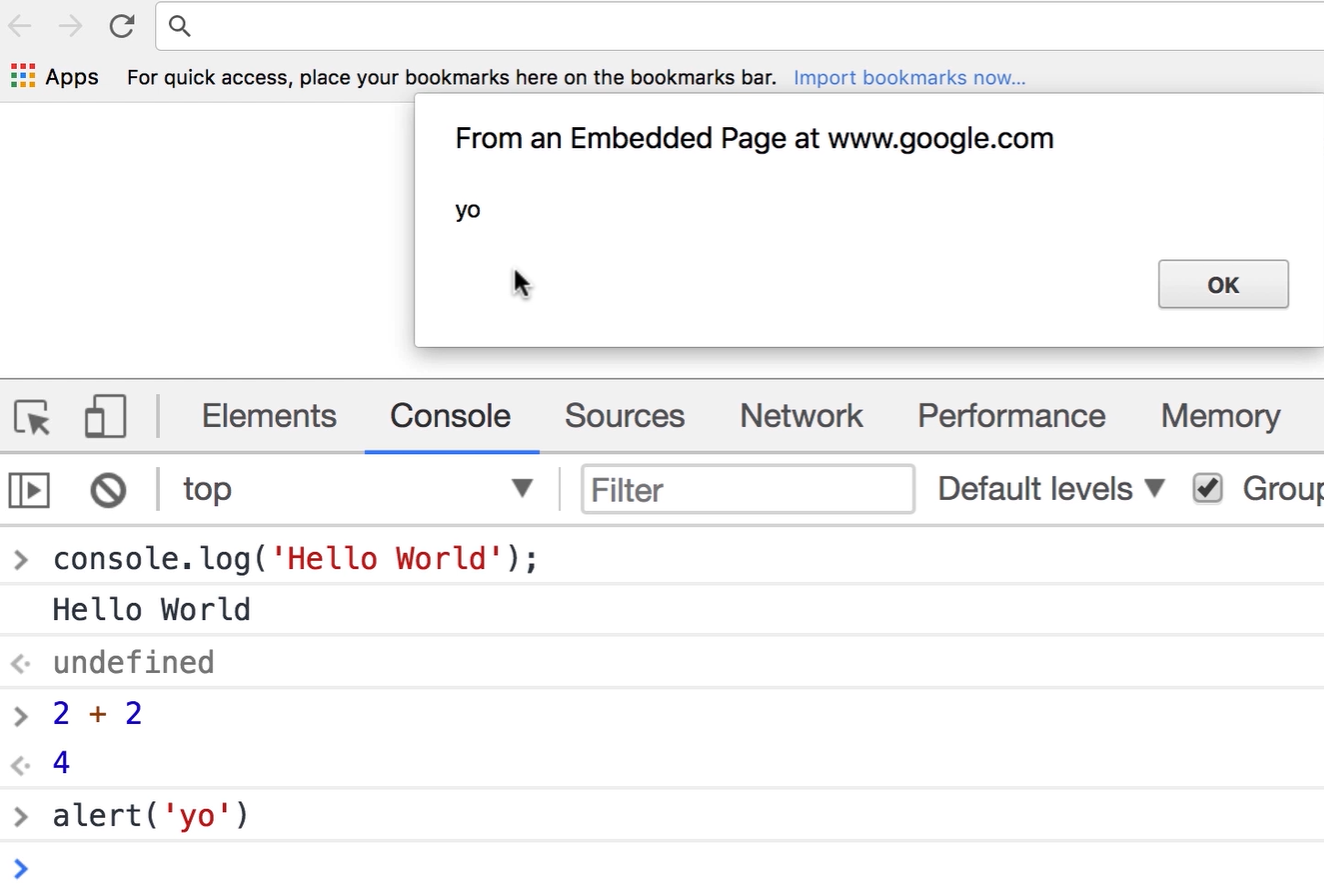
- Type the javascript code:
console.log('Hello World');
-
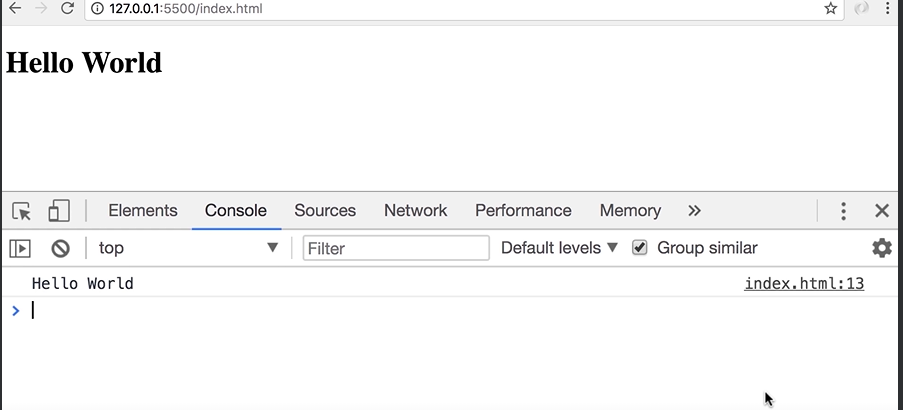
So now, press enter, and you can see the
Hello Worldmessage on the console. -
You can also write mathematical expressions here, For example 2+2 you get 4. Or
we can do something likecreating alert box with message:
alert('yo');
In the next lecture, I'm going to talk about setting up your development environment for writing JavaScript code.
Setting up the JavaScript Environment
Install the IDE which are required to run our javascript code files:
Once you have installed, the IDEs, follow this steps for the setup:
-
Create a folder on Desktop
-
go to searchbar of the file directory and type
cmd


- It will open up the command prompt, type in this command:
C:\Users\mehta\OneDrive\Desktop\New folder>code .
-
this will open up the visual studio code IDE with the project folder
-
Add a new file with
index.html -
Type the
!and presstab, which will automatically generate html boilerplate code. (we don't really care about any of this code here, we're going to use this as ahost for our JavaScript code.)
-
Save the changes, now go to Extensions tab and search for live server.
- So live server is a very light weight web server that we're going to use to serve our web application.
-
When you are done, go to the explorer tab, right-click
index.htmland selectopen with live server.
-
This will open up Chrome, or your default browser
Rendering HTML on Browser:
-
Now currently we have an empty page, to make sure everything is working properly, let's go back to visual studio code
-
Add this code in the body section of the html
<body>
  <h1>Hello World</h1>
</body>
- Now save the changes, back in the browser, you can see this page is refreshed automatically and we've got the Hello World heading. With the live server we have live rendering of the code that we write.

In the next lecture, we're going to write your first JavaScript code.
JavaScript in Browsers
-
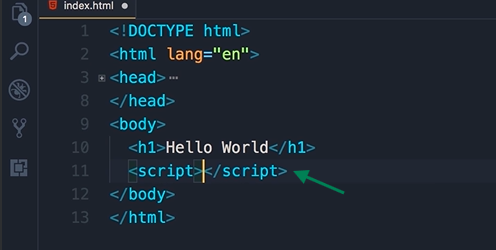
Alright now we're ready to write our first JavaScript code. In order to write JavaScript code in
index.html, we need a script element. -
There are two places, where we can add a script element:
-
in Head section or
-
the body section
-
-
The best practice is to put the script element at the end of the body section after all the existing elements.
-
Now why did I say that as a best practice we should put the script element after existing elements, Well, there are two reasons for that:
-
First reason is that the browser parses this file from top to bottom, so if you put the script element here in the head section. You might have a lot of JavaScript code there, so your browser might get busy parsing and executing that JavaScript code, and it's one thing to be able to render the content of the page.
-
this will create a bad user experience
-
Your user looks at your web page it's white or blank, while your browser is busy parsing and executing your JavaScript code
-
-
The second reason is that almost always the code that we have in between script elements needs to talk to the elements on this web page. For example, we may want to show or hide some elements. So by adding the code here, at the end of the body section, we'll be confident that all these elements are rendered by the browser.
-
-
Now there are exceptions to this rule, sometimes, you might need to include third-party scripts (e.g., analytics, advertisements, or specific libraries) that require being placed in the
<head>section. These scripts might need to load before the rest of the page to function correctly or track the page load events. -
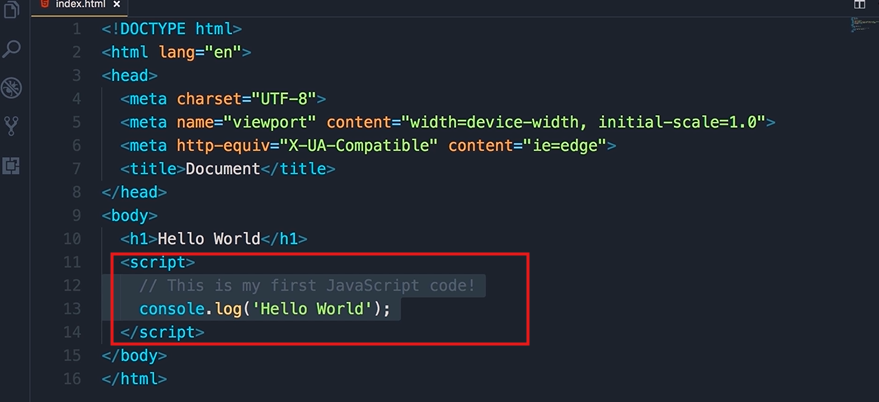
Now we are going to write the same code that we wrote in the last lecture, but in the
index.htmlfile. Here is how the code written:
<!DOCTYPE html>
<html lang="en">
<head>
    <meta charset="UTF-8">
    <meta name="viewport" content="width=device-width, initial-scale=1.0">
    <title>Document</title>
</head>
<body>
    <h1>Hello World</h1>
    <script>
        // this is my first JavaScript code
        console.log('Hello World');
    </script>
</body>
</html>
- what we have here is a statement.
A statement is a piece of code that expresses an action to be carried out.
for example:
console.log('Hello World'); /*This is a Statement*/
- In this case, we want to log a message on the console.
All statements in Javascript should be terminated by a semi colon.
- What we have here in between single quotes, is called a string.
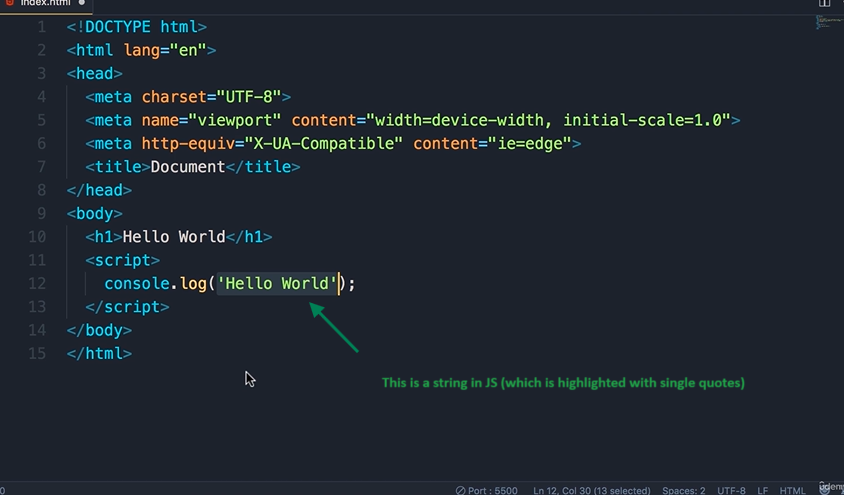
A string is a sequence of characters
- Now in JavaScript we also have this notation, we can add two slashes, and this represents a comment.

-
In the comments, we can add some description to our code and this description is ignored by the JavaScript engine, it's not executed. It's purely for documenting the code, when you want to explain to other developers why you have written this code this way. You don't want to explain what the code does, because that should be clear in itself.
-
So for this demo, I'm just going to add a simple comment,
this is my first JavaScript code. -
Now save the changes, go back in the browser, we need to bring the console back up:
-
Right-click somewhere, --> Click Inspect OR
-
alternatively, you can use a shortcut, that is
alt+cmd+I, on Mac, oralt+ctrl+Ion Windows.
-
-
That brings up the console tab, (click on the console tab if it is not visible to you...)
Separation of Concerns
- Now while we can easily write JavaScript code in between the script element, in a real world application, you have 1000 maybe even a million lines of code, we don't want to write all that code in line here in
index.htmlfile.
-
We want to extract and separate our JavaScript code from our html code.
-
Let me give you a metaphor to understand this better
- Think of your house. In your bedroom you have your bed, and your clothes

-
you don't store your clothes in the kitchen.
-
You will put your clothes in a closet separately. This is what we call separation of concerns
-
You have the same principle in programming
-
So we want to separate html (which is all about content), from JavaScript (which is all about behavior).
What do you mean by behavior?
-
It means that:
-
How should your web page behave, what should happen when we hover our mouse over a given element?
-
Maybe something should pop up maybe something should be hidden,
-
so we use JavaScript to implement behavior.
-
Practical Part:
-
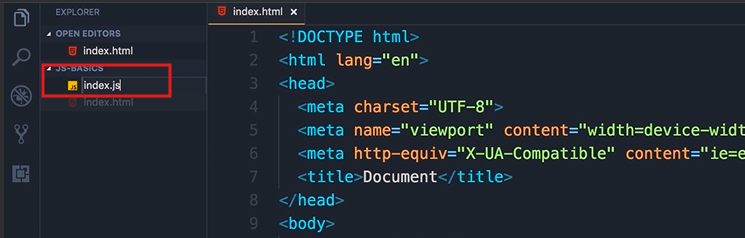
So, open up the explorer window in VScode, and add the new file,
-
call this new file as
index.js.
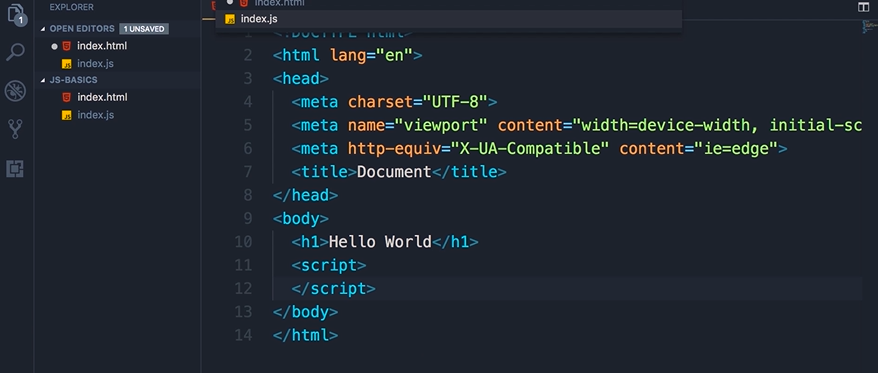
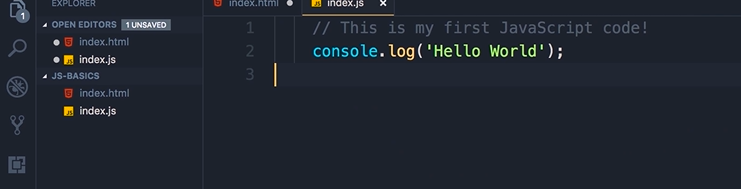
- Now, back in index.html, cut all this JavaScript code below the <script> tags and then paste it in index.js (the highlighted part)
-
Now in this simple application we have a single
index.htmlfile, a single JavaScript fileindex.js. -
In a real world application we have hundreds or even thousands of JavaScript files. Later in the course you will learn how to combine these files into a bundle, and serve that bundle into the client.
-
Now, save the changes (
cltrl+S), go back toindex.htmlfile. Since all our JavaScript code is in a separate file we need to reference that file here inindex.html -
So, let's add an attribute here (see below pic), src, which is short for src, and set it to index.js.

-
This tells the browsers that our JavaScript code is now in index.js
-
Save the changes and run the live server.
-
We can still see the Hello World message in the console of the developer tools and that confirms that our code is still working.
In the next lecture, we're going to execute this code in Node.
JavaScript in the Node
- In the last lecture, we executed this piece of JavaScript code inside of a browser.
// This is my first JavaScript code !
console.log('Hello World');
-
In this lecture, I'm going to show you how to run the same code in Node.
-
So I'm assuming you have installed Node on your machine, if not head over to nodejs.org and download the latest version of Node.
-
Now if you're on Windows, open up command prompt, if you're on Mac, open up terminal, and head over to the folder or directory that you have created earlier.
-
In the terminal, run Node, and pass the name of our JavaScript file, that is index.js.
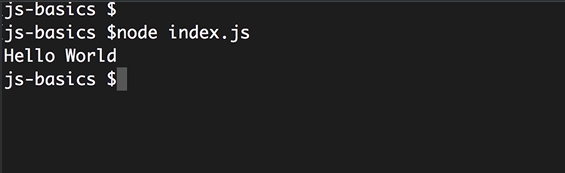
-
We get the same message on the console.
-
We can see that node is a program that includes google's v8 JavaScript engine.
-
We can give it a piece of JavaScript code, and it will execute that code for us just like how we can execute some JavaScript code in a browser.
Node is a run time environment for executing JavaScript code.
-
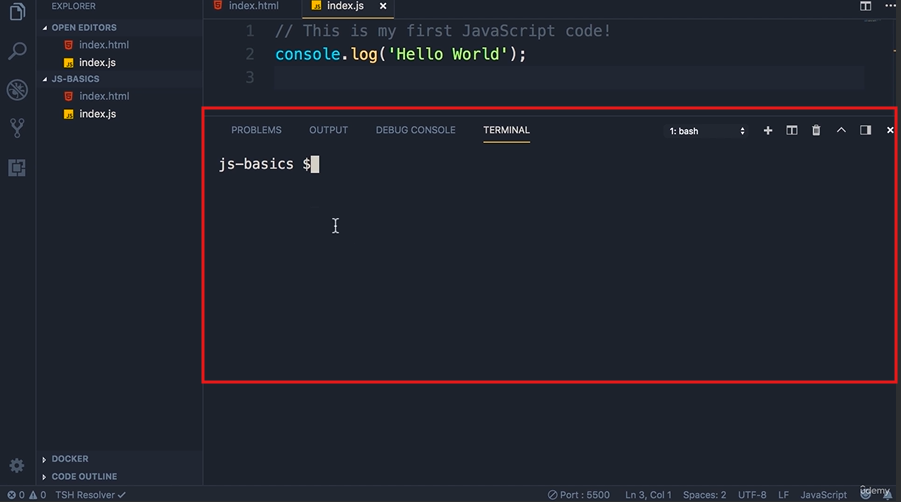
Now let me show you a tip. Here in vs code we have an integrated terminal, so you don't have to explicitly open up a separate terminal window.
-
So go to VS code, and open up the integrated terminal by pressing the shorcut keyboard key :
Cltrl+back quote(which is for Windows)
-
So we don't have to explicitly navigate to this folder. And here we can run Node
index.js as well.
Variables
- Let's start this section by a discussion of variables, which are one of the most fundamental concepts in JavaScript and any other programming languages.
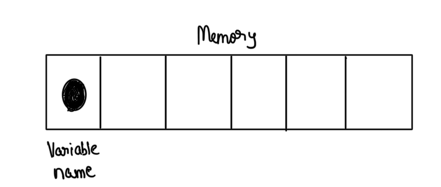
In programming, we use a variable to store data temporarily in the computers memory.
-
So we store our data somewhere, and give that memory location a name.
-
And with this name, we can read the data at the given location in the future
-
Here's a metaphor for better example:
-
Think of the boxes you use to organize your stuff.
-
You put your stuff in various boxes, and put a label on each box.
-
With this, you can easily find your stuff. A variable is like a box.

-
-
What we put inside the box, is the value that we assign to a variable, that's the data, and the label that we put on the box is the name of our variable.
Now let's see this in code:
-
So here in
index.js, I'm going to declare a variable. -
Previously in the old days, before ES6, we used the
varkeyword to declare a variable. But there are issues withvaras you will find out later in the course. (Note that name is the variable name, we will be studying in the next lecture about the naming conventions for variable name)
var name;
- So, going forward from ES6, the best practice is to use the
letkeyword to declare a variable.
let
-
Now, we need to give this variable a name, or an identifier, and this is like the label we put on a box.
-
So I'm going to call this variable a
name, and finally we need to terminate this declaration with a semi colon.
let name;
- Now let's log this on the console and see what we get.
let name;
console.log(name);
- Save the changes, and here in the console we see undefined.
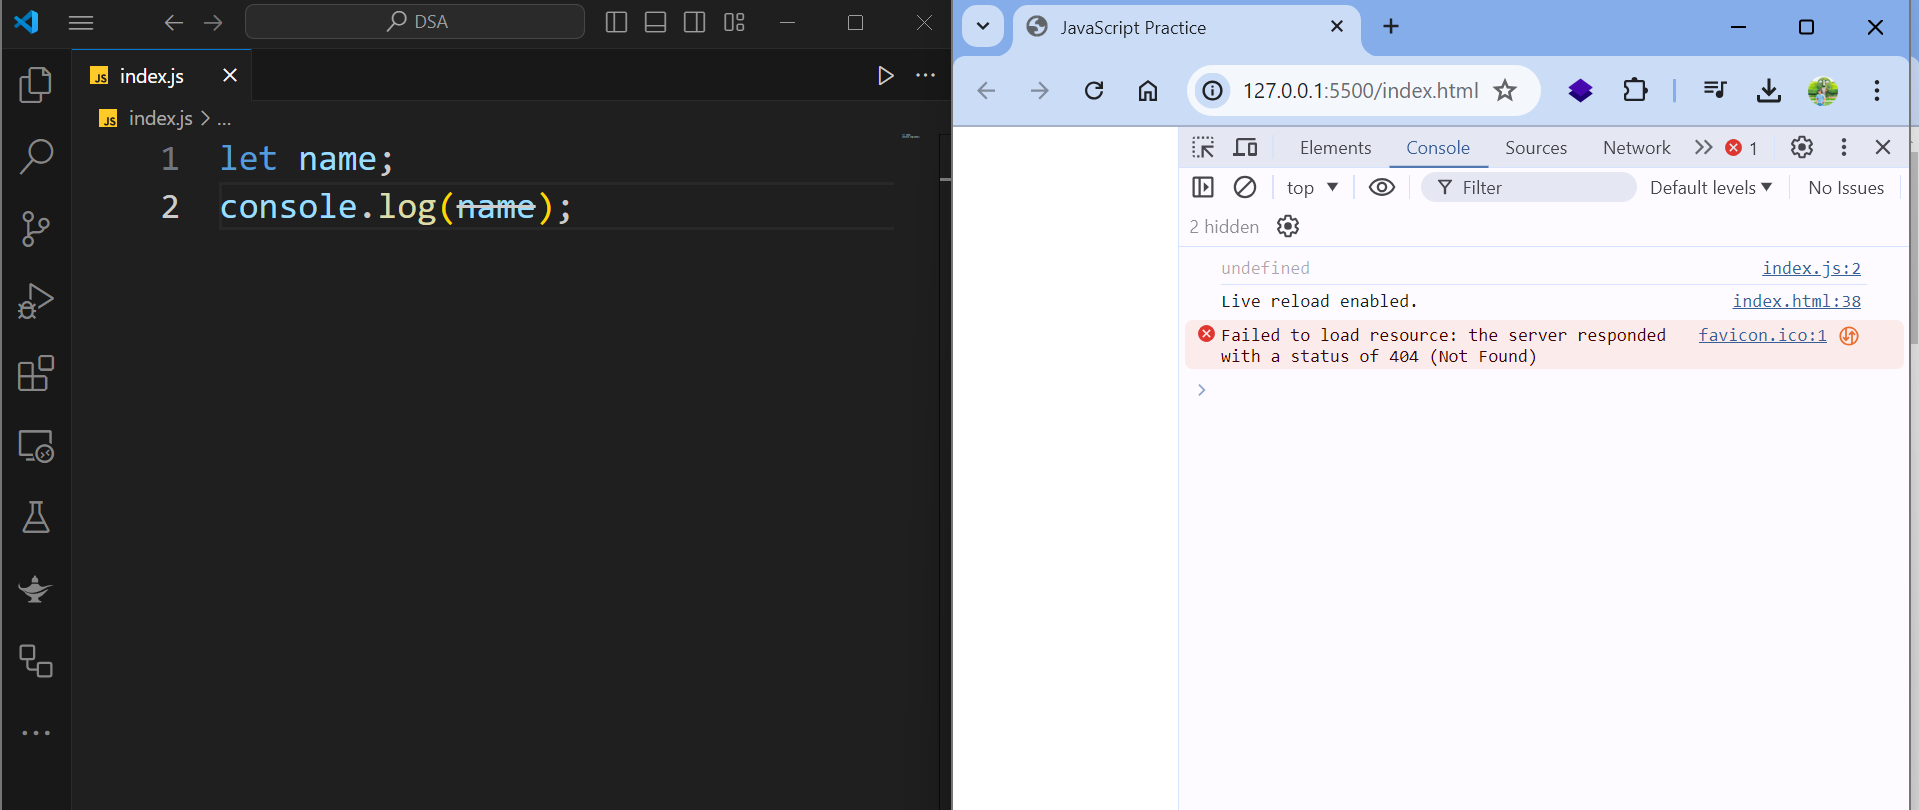
-
So by default, variables that we defined in JavaScript, their value is undefined.
-
Now we can optionally initialize this variable. So I'm going to set this to be a string, like
Pratham
String is a sequence of characters.
let name = 'Pratham';
console.log(name);
-
Note that I'm using single quotes, we can also use double quotes, different developers have different purposes, but it's more common to use single quotes for declaring strings, in JavaScript.
-
When you save the changes, you will see that instead of undefined, we see
Prathamon the console.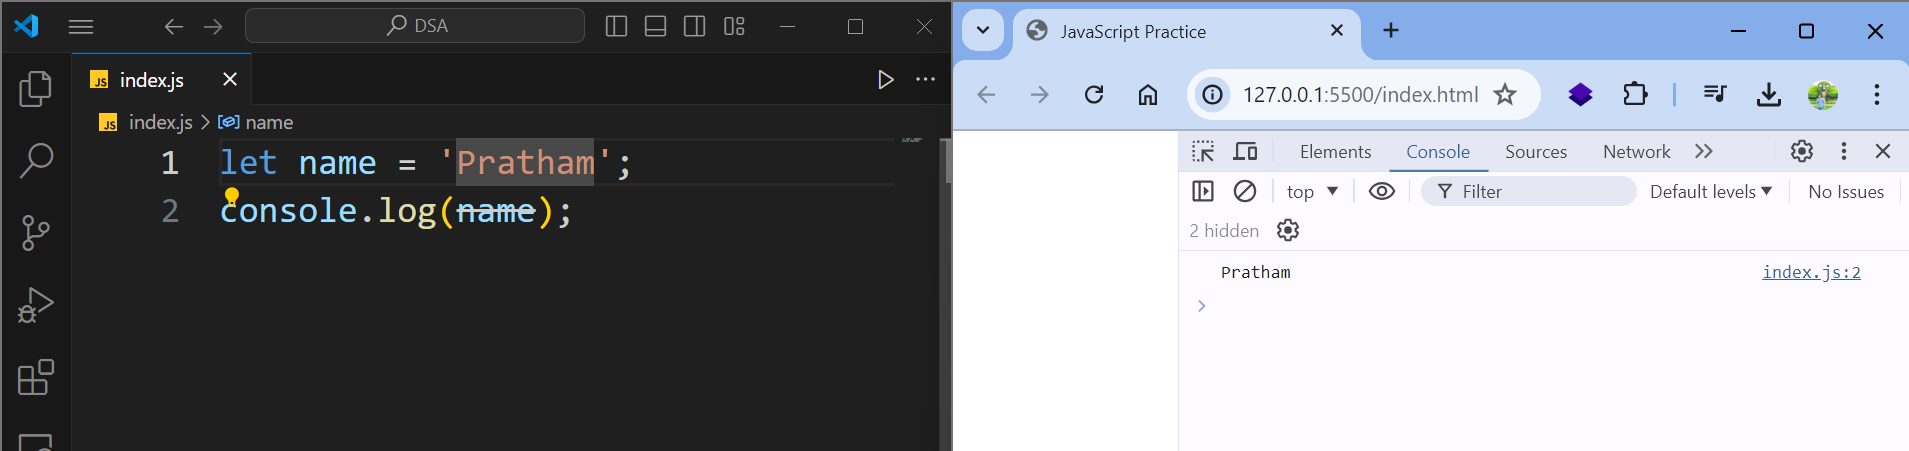
Rules for naming the variable in JS:
-
Now, we have a few rules for naming these variables. here are the rules:
-
first is that they cannot be a reserved keyword, so in Javascript, we have reserved keywords like:
-
let
-
if
-
var, and so on the list continues
-
-
now you don't have to memorize this list, if you try to use one of these above names, you're going to get an error. For example:

-
if I change
nametoifreserved keyword, I will get an error indicating that this is not a valid identifier -
The second rule is that variable names should be meaningful.
-
like meaningful labels. I've seen developers using names like
aorbora1orx. -
These variable names don't give us any clue what is the purpose of these variables and what kind of data are we storing in that memory location
-
So always use meaningful and descriptive names.
-
-
The third rule is that they cannot start on a number.
- So we cannot have a variable like
1name, it will print an error. Also these names are meaningless. Always use meaningful names.
- So we cannot have a variable like
-
The fourth rule is that they cannot contain a space or hyphen
-
So if you have multiple words we need to put them together
-
Here is an example, let's imagine we want to declare a variable called first name.
let firstName; // Camel Case Notation-
Note that here I'm using camel notation, so the first letter of the first word should be lowercase, and the first letter of every word after should be upper case. This is known as CAMEL NOTATION.
-
This is the convention used in JavaScript to name our variables.
-
-
Another thing you need to know about these variable names, is that they are case-sensitive.
- so if I declare another variable, call it first name, but make the f upper case this time.
let firstName; // Camel Notation let FirstName;- Note that these two variables are different, and they are not same. They are case-sensitive.
-
Multiple Declaration and Initialization of variables:
-
Finally the last thing you need to know about these variables, is that if you want to declare multiple variables, there are two ways to do this.
-
You can declare them on one line and separate them using a comma:
let firstName, lastName;
-
For example, as you can see above, the first name and then the last name separated with the comma. Now in this case, I have not initialized either of these
variables, they're both undefined, I can optionally initialize 1 or both of them.
-
So
firstNamewould bePrathamandlastNamewould beMehta. I can also leave lastName undefined, but the modern best practice is to declare each variableon a single line (method 2).
let firstName = 'Pratham', lastName = 'Mehta';
console.log(firstName + ' ' + lastName);
- Later on we will discuss about String contatenation in JavaScript and how can we format the string literals.
- Another way for intialization and declaration is like this:
let firstName = 'Pratham';
let lastName = 'Mehta';
console.log(firstName + ' ' + lastName);
Summary of the code for this lecture:
let name = 'Pratham';
console.log(name);

// Rule 1 : Variable names cannot be a reserved keyword

/*
let if = 'Pratham';
console.log(if); // Syntax Error
 */

// Rule 2 : Variable names should be meaningful

// Rule 3 : Variable names cannot start with a number (1name)

// Rule 4 : Variable names cannot contain a space or hyphen (-)

// Rule 5 : Variable names are case-sensitive

let firstName = 'Pratham'; // Camel Case notation
let FirstName; // Pascal Case notation

//Multiple declaration and Intialization
// Method 1
let firstName = 'Pratham', lastName = 'Mehta';
console.log(firstName + ' ' + lastName);

//Method 2
let firstName = 'Pratham';
let lastName = 'Mehta';
console.log(firstName + ' ' + lastName);
Next we're going to look at constants.
Constants
- Alright now let's declare a variable called interest rate
let interestRate = 0.3;
- Now this is the initial value, we can always change that later, so, we can set interest rate to let's say 1
let interestRate = 0.3;
interestRate = 1;
- Now if you log this on the console, of course we're going to see the new value, right? So save the changes, and here's one on the console.

-
However, on a real world application, there are situations that we don't want the value of a variable to change.
-
Because otherwise it's going to create all kinds of bugs in our application.
-
In those situations, instead of a variable, we use a constant.
Remember that the value of a variable as the name implies, can change, but the value of a constant cannot change.
Syntax:
- So here, if we change
lettoconst. NowinterestRatewill be constant.
const interestRate = 0.3;
interestRate = 1;
- So, when I save the changes, we're going to see an error, in the console on line 2, where we reassign
interestRate.

-
So we cannot reassign a constant or change the value of the constant variable.
-
The best practice is that if you are not going to reassign the value to variable then you should you constant variable (
constkeyword) and that should be the default choice. Otherwise, use variable (letkeyword).
Primitive Types
So you have learned how to declare and initialize a variable. Now you might be wondering what are the kind of values that we can assign to a variable? Well you have seen strings, but we have more types:
-
Basically, in JavaScript we have two categories of types:
-
Primitives / Value Types
-
Reference Types
-
In this lecture, we're going to focus on primitives, and you're going to learn about reference types later in the course.
-
Now in the category of primitives, we have:
-
Strings
-
Numbers
-
Booleans
-
Undefined
-
Null
-
Let's look at each of these in action
let name = 'Pratham'; // String Literal
-
So here we have a variable called name which is set to a string. What we have here is called a string literal.
-
Now let's declare a variable and set it to a number.
let name = 'Pratham';  // String Literal
let age = 25; // Number Literal
-
So this is what we call a number literal.
-
Now let's declare a boolean. A boolean can either have values
trueorfalse.
let name = 'Pratham';  // String Literal
let age = 25; // Number Literal
let isApproved = true; // Boolean Literal
-
This is what we call a boolean literal. We use this in situations where we want to have some logic.
-
For example, if the order is approved, then, it needs to be shipped. So the value of a boolean variable can be true or false.
-
By the way note that both true and false are reserved keywords, so they cannot be variable names.
-
Now you have seen
undefinedbefore, so I can declare another variable, firstName, if we don't initialize it, by default, it's value isundefined, but we can also explicitly set this toundefinedas shown in the code below. (this is not very common)
let name = 'Pratham';  // String Literal
let age = 25; // Number Literal
let isApproved = true; // Boolean Literal
let firstName = undefined;
- In contrast, we have another keyword that is null. So let me declare another variable
let name = 'Pratham';  // String Literal
let age = 25; // Number Literal
let isApproved = true; // Boolean Literal
let firstName = undefined;
let lastName = null;
-
We use
nullin situations where we want to explicitly clear the value of a variable. -
For example, we may want to present the user with a list of colors. If the user has no selection, you want to set the
selectedColorvariable tonull. -
In the future, if user selects a color, then we are going to reassign this variable to a color like
red. And then if they click red again, perhaps we want to remove the selection, so we set this back tonull. -
we use
nullin situations where we want to clear the value of a variable.
Think of it like this:
undefined= "I forgot to put something here"
- JavaScript automatically gives this to variables you don't set
- It's like an empty box that you never filled
null= "I intentionally put nothing here"
- You, the programmer, deliberately set this
- It's like an empty box that you purposely made empty
Simple Examples:
// undefined - you forgot to give it a value
let firstName;
console.log(firstName); // undefined (JavaScript says "you didn't give me anything")

// null - you intentionally clear it
let selectedColor = null;
console.log(selectedColor); // null (you said "I want this to be empty for now")
Real-world analogy:
- undefined: Like a form where you forgot to fill in your middle name - it's blank because you didn't do anything
- null: Like a form where you wrote "N/A" for middle name - you intentionally said "nothing goes here"
The key difference is who decided it should be empty:
undefined= JavaScript decided (because you didn't set it)null= You decided (you explicitly set it to nothing)
These are the examples of primitives and value types. We have strings, numbers, booleans, undefined and null. Now in ES6 we have another primitive that is symbol, and you're going to learn that later in the course.
Dynamic Typing
- One thing that separates JavaScript from a lot of programming languages, is that JavaScript is a dynamic language.
What do I mean by dynamic?
-
Well, we have two types of programming languages:
-
Static languages or
-
Dynamic languages
-
-
In static languages, when we declare a variable, the type of the variable is set and it cannot be changed in the future.
string name = "John";
- In a dynamic language like JavaScript, the type of a variable can change at run time.
let name = 'John';
Let's see this in code:
let name = 'Pratham';
let age = 25;
let isApproved = true;
let firstName = undefined;
let selectedColor = null;
-
So back in the example from the last lecture we have declared this name variable, and we have set that to a string, so the type of name is currently a string, but it can change in the future.
-
Let us take a look in console, we can execute some JavaScript code here, we have:
typeof
- we have this type of operator, and with that we can check the type of a variable.
typeof operator is used to check the data-type of the variable in JavaScript

-
So after that we add the name of the variable after the
typeofoperator. In this case thenamevariable is string. -
If you reassign name to a different value, like a number, and check it's type:
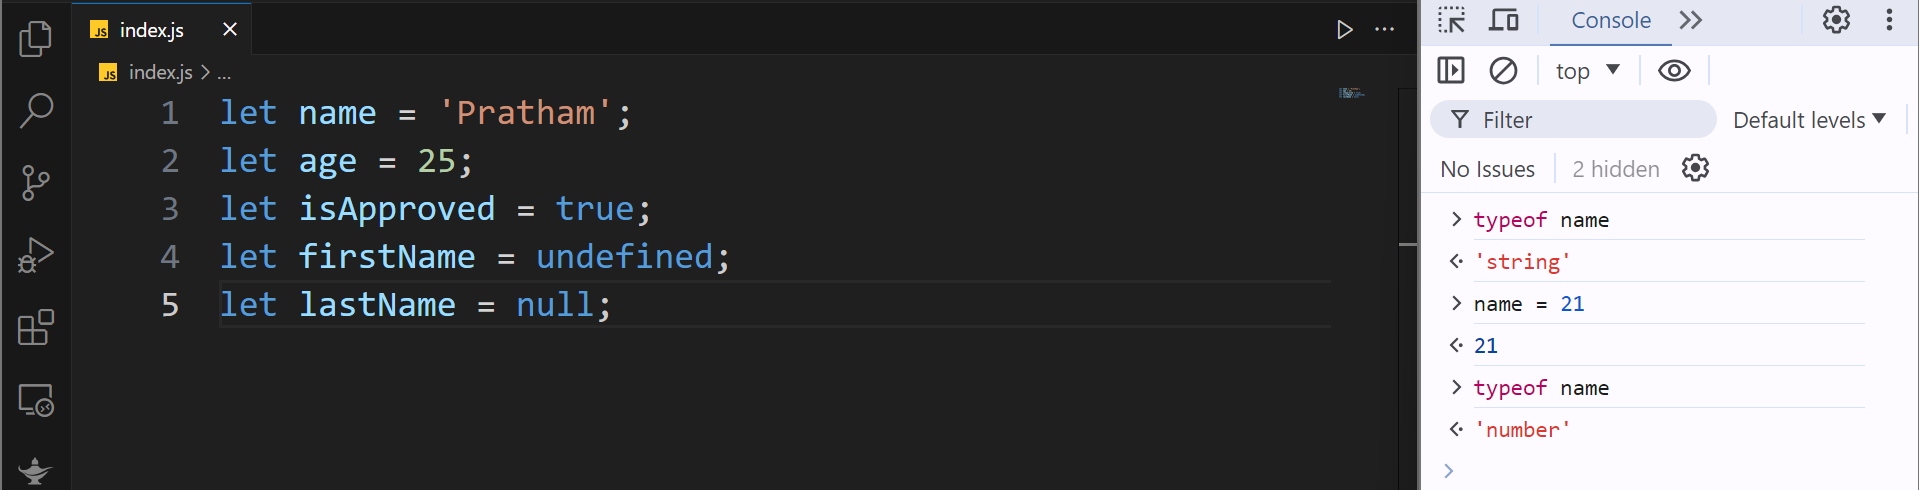
-
Observe that the type is now changed to a number, this is what we call a dynamic language (unlike static languages the type of these variables will be determined at runtime based on the values that we assigned to them).
-
Now, let's take a look at a few more examples of the
typeofoperator.
to clear the console, type command :
ctrl+L
- So now let's take a look at the type of age,
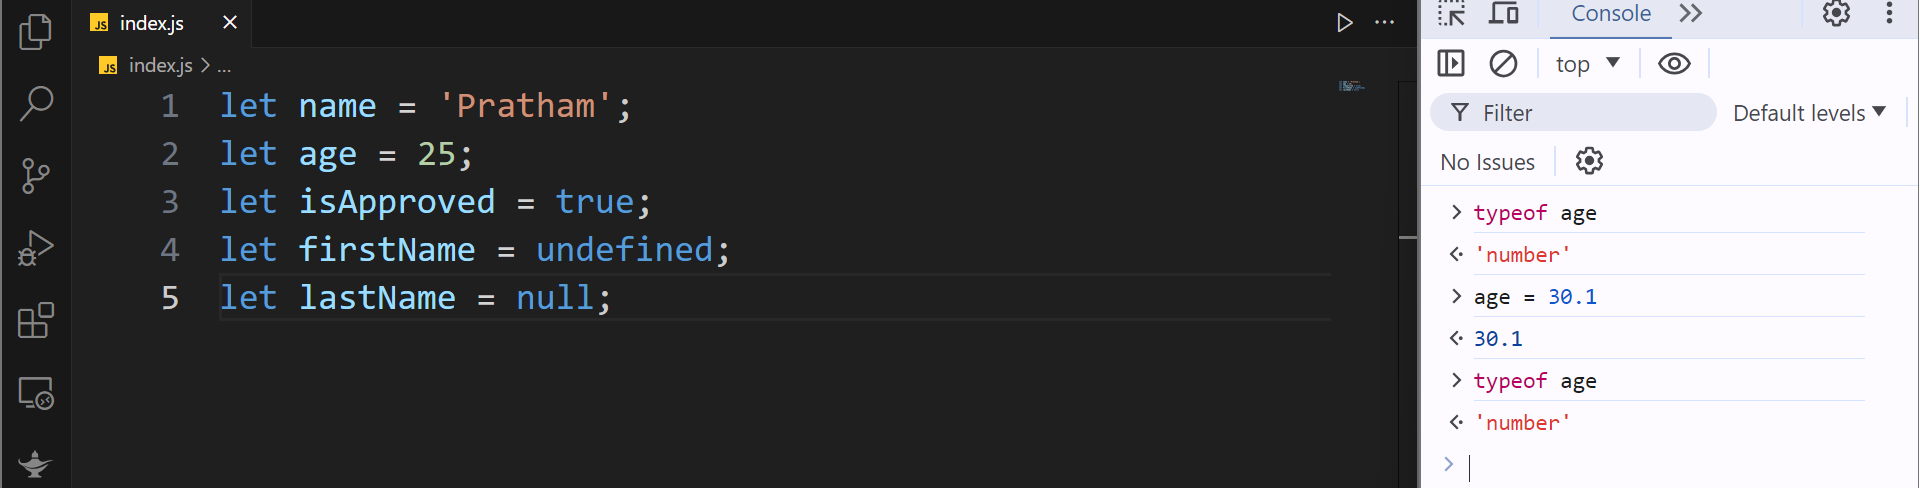
- Now if we change age to a floating point number, and I know it doesn't make sense, but let's just stick to this for example, 30.1, and then look at type of age, it's still a number.
In JavaScript, unlike other programming languages we don't have two kinds of numbers, like integer or floating point number. All numbers are of type number.
- Now, let's look at the type of is approved, it's a boolean as I told you before.

- what about the first name, let's have a look:

It's undefined, and that's funny, because the value of this variable is undefined, but it's type is undefined as well. What does this mean??
-
Well, earlier I told you that we had two categories of types, we have:
-
primitives or value types, and
-
Reference types
-
-
In the primitive types category, we have strings, numbers, booleans, undefined and null. So undefined is actually a type, but it's also a value.
-
In this example, because we have set first name, to undefined as a value it's type is also undefined, But what about selected color??
-
Let's have a look:

- The type of this variable is an object.
What is an object? That's a topic for the next lecture.
Type Conversion in JavaScript
Type conversion is the process of changing the data type of a value to another data type. For example, we can convert:
- Strings to numbers
- Numbers to booleans
- Booleans to strings
- Numbers to strings
- Booleans to numbers
Why Type Conversion Matters
When we accept user input, the data type of that input is a string. If we need to use it for any sort of math, we need to convert it to a number.
Exercise 1: User Age Input Problem
Exercise Description: Create a variable that accepts user age input and adds 1 to it.
Initial Code (With Problem)
let age = window.prompt("How old are you?");
age += 1;
console.log(age);
User Input: 25
Output: 251
What's happening here? When we accept user input, it's a string data type - a series of characters. By adding 1, we appended 1 to the end of our string. We're not increasing our age by one, we're doing string concatenation.
The Solution: Using the Number Function
Now that we understand the problem, let's see how to fix it. After accepting our user input and before making any changes to it, we're going to convert our user input into a number.
Step-by-Step Fix
- Accept the user input with
window.prompt() - Before making any changes, reassign age using the
Number()function - The
Number()function will convert another data type (such as a string or boolean) into a number - Place your age variable within that function
let age = window.prompt("How old are you?");
age = Number(age);
age += 1;
console.log(age);
User Input: 25
Output: 26
Key Learning: This is the reason you may want to type convert - because different data types behave differently.
Checking Data Types
Let's display the type of our age variable to see what's happening:
let age = window.prompt("How old are you?");
age = Number(age);
age += 1;
console.log(age);
console.log(typeof age);
User Input: 25
Output:
26
number
Without Type Conversion
If we remove the type conversion:
let age = window.prompt("How old are you?");
age += 1;
console.log(age);
console.log(typeof age);
User Input: 25
Output:
251
string
This is not exactly what we would like. That's a reason why type conversion is important.
Exercise 2: Converting Different Values to Different Data Types
Exercise Description: Let's see what happens when we convert different values into different data types.
Setup
let x;
let y;
let z;
We'll assign the same value to all three variables and convert them to different data types.
Test Case 1: Converting "Pizza"
x = "Pizza";
y = "Pizza";
z = "Pizza";

x = Number(x);    // Convert to number
y = String(y);    // Convert to string
z = Boolean(z);   // Convert to boolean

console.log(x, typeof x);
console.log(y, typeof y);
console.log(z, typeof z);
Output:
NaN number
Pizza string
true boolean
What's happening:
- If you attempt to convert alphabetical characters into a number, that variable will be
NaNwhich means not a number. The data type is stillnumberthough, as you can see.- The word "Pizza" is already a string, so converting it into a string really doesn't do anything. That's why the value is still "Pizza" and the data type is still a string.
- If you convert a string into a boolean (booleans again are either true or false), converting the word "Pizza" into a boolean returns
trueand the data type is boolean.
Key Takeaway: Basically, as long as there's some value here and you convert it into a boolean, it will always be
true.
Test Case 2: Converting Zero
x = 0;
y = 0;
z = 0;

x = Number(x);
y = String(y);
z = Boolean(z);

console.log(x, typeof x);
console.log(y, typeof y);
console.log(z, typeof z);
Output:
0 number
0 string
false boolean
What's happening:
- We can convert 0 into a number - it doesn't contain any alphabetical characters
- X contains zero, it's a number
- Y is zero but it's treated as a string
- Z contains
falseand it's a boolean
Test Case 3: Converting Empty Strings
x = "";
y = "";
z = "";

x = Number(x);
y = String(y);
z = Boolean(z);

console.log(x, typeof x);
console.log(y, typeof y);
console.log(z, typeof z);
Output:
0 number
 string
false boolean
What's happening:
- Typecasting an empty string as a number is still zero
- We have an empty string for y
- With our boolean it's
false
Practical Use Case for String to Boolean
Why might you want to type cast a string as a boolean? That's one way in which you can check to see if user input is empty - like did somebody type something in? If a user skipped user input, it's most likely going to be an empty string. Then you can check to see if this is
false, then the user didn't type in anything and you can let them know.
Test Case 4: Converting Undefined Variables
let x;
let y;
let z;

x = Number(x);
y = String(y);
z = Boolean(z);

console.log(x, typeof x);
console.log(y, typeof y);
console.log(z, typeof z);
Output:
NaN number
undefined string
false boolean
What's happening:
- Converting an undefined variable to a number results in not a number (
NaN)- Our string is "undefined"
- Our boolean variable returns
false
Summary
So that's the basics of type conversion. It's the process of changing the data type of a value to another.
It's pretty important when you accept user input because:
- When you accept user input, it's a string data type
- At times you may want to convert it to a number if you need to include that number with any sort of arithmetic expressions
- Or convert it to a boolean if you're checking to see if that user input was completed
We'll have more practice with this in the future. And well, that is type conversion in JavaScript.
Quick Reference
Type Conversion Functions
Number(value)- Converts to numberString(value)- Converts to stringBoolean(value)- Converts to boolean
Checking Data Types
typeof variable- Returns the data type as a string
Boolean Conversion Rules
- Any non-empty string →
true - Empty string
""→false - Any number except 0 →
true 0→falseundefined→false
Objects
Overview
In JavaScript, there are two main types of data: primitive types and reference types. This lecture focuses on reference types, which include :
-
objects,
-
arrays, and
-
functions.
Objects in JavaScript
- Definition: An object in JavaScript is a collection of related data and functions. Objects can be compared to real-life objects with properties. For example, a person can have properties like name, age, and address.
- Purpose: Objects help organize multiple related variables into a single entity, making the code cleaner and more manageable.
When you are dealing with multiple related variables, we can put these variables inside of an object.
Declaring an Object
-
Syntax: To declare an object, we use the following syntax:
let person = { name: 'Pratham', age: 25 }; -
Components: The object literal syntax involves curly braces
{}containing key-value pairs. Each key (property) is followed by a colon:and its value, separated by commas.-
Example:
let person = {
  name: 'Pratham',
  age: 25
};
-
Now what if I want to change the name of this person (object), see the upcoming section where we try to access the properties of the object and try to read or modify it.
Accessing Object Properties
-
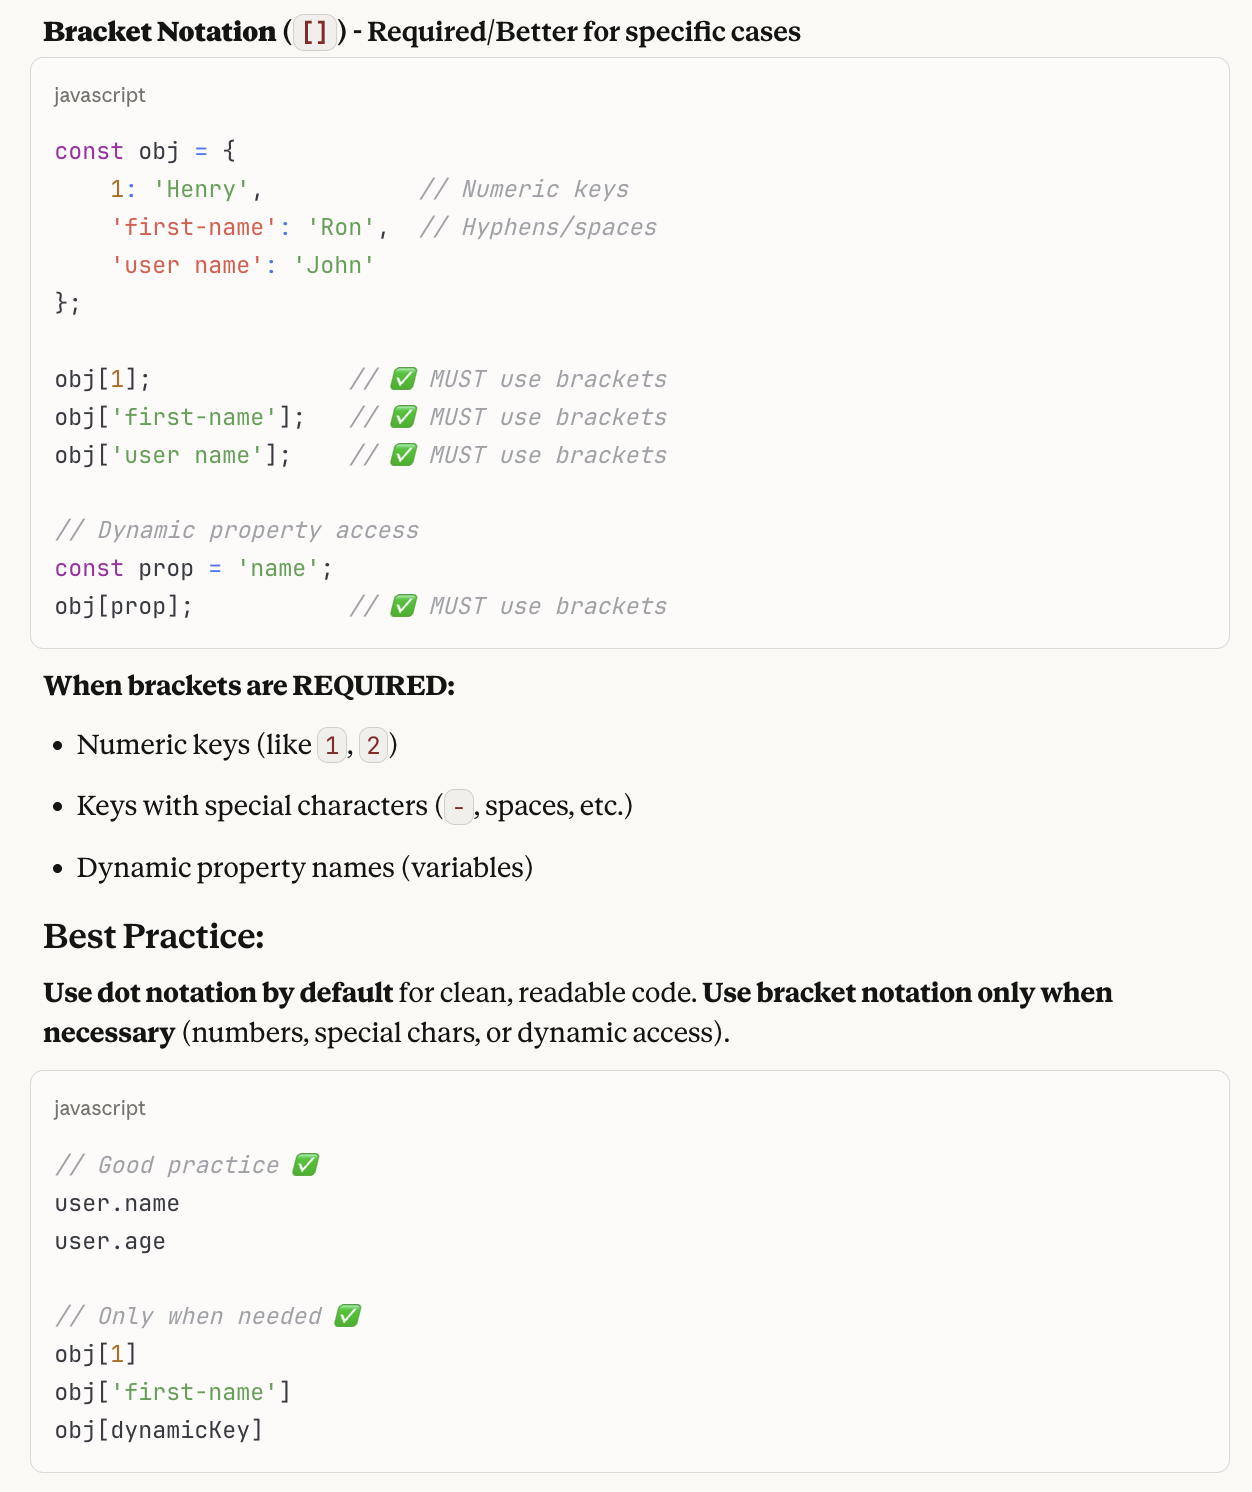
Dot Notation: The dot notation is concise and is the default choice for accessing and modifying object properties.
let person = { name: 'Pratham', age: 25 }; // Dot Notation person.name = 'John'; // Modifies the name property console.log(person.name); // Logs 'John' to the console -
Bracket Notation: The bracket notation is used when the property name is not known until runtime. It allows dynamic access to properties using a string variable.
let person = {
  name: 'Pratham',
  age: 25
};

// Bracket Notation
person['name'] = 'Mary'; // Modifies the name property
console.log(person['name']); // Logs 'Mary' to the console
Choosing Between Dot and Bracket Notation
-
Dot Notation: Preferred for its conciseness and simplicity. (easier for programmers)
-
Example:
person.name = 'John';
-
-
Bracket Notation: Useful when the property name is determined dynamically at runtime. Meaning that in scenarios like we don't know the target property until the runtime, for example in our user interface, the user might be selecting the name of the target property. In that case, in the time of writing code, we don't know what property we are going to access (that is going to be selected at the runtime by the user, the properties). So we might have another variable somewhere else which determines the name of target property that the user is selecting and that can change at runtime. That is where bracket notation would be preferred.
-
Example:
let selection = 'name';
person[selection] = 'Mary';
console.log(person[selection]); // Logs 'Mary'
-
Summary
- Object Declaration: Use object literals with key-value pairs inside curly braces.
- Accessing Properties: Prefer dot notation for simplicity; use bracket notation for dynamic property access.
In the next lecture, we will explore arrays and functions, which are also part of the reference types in JavaScript.
IMPORTANT TO NOTE:
Only read this section below if you are coding in Python as well and have time for pleasure read to understand the difference
Python Dictionaries vs JavaScript Objects
Think of both JavaScript objects and Python dictionaries like boxes where you store things with labels. They're pretty similar, but each language has its own style.
JavaScript Objects - The Flexible Friend
In JavaScript, you create them like this:
let person = {
  name: "Sarah",
  age: 25,
  city: "New York"
}
The cool thing about JavaScript objects is you can grab values in two ways:
person.name(the dot way - simple and clean)person["name"](the bracket way - useful for tricky names)Python Dictionaries - The Consistent Companion
Python does it like this:
person = {
  "name": "Sarah",
  "age": 25,
  "city": "New York"
}
With Python, you only have one way to get values:
person["name"](always brackets, no exceptions)The Big Differences
Keys (the labels on your boxes):
- JavaScript is picky - only text labels allowed
- Python is generous - you can use text, numbers, even more complex things as labels (you will understand the difference down below with an example illustrated)
Getting your stuff out:
- JavaScript: Two ways (dot or brackets)
- Python: One way (just brackets)
Over here you will understand the difference for the keys (labels) JavaScript - The Picky One
In JavaScript, even if you try to use numbers as keys, they secretly get turned into text:
let jsObject = {
  1: "first",
  2: "second",
  "hello": "world"
}

console.log(typeof Object.keys(jsObject)[0])  // "string" - not a number!
// JavaScript converted that 1 into "1" behind the scenes
Python - The Generous One
Python lets you use all sorts of things as keys:
# Numbers as keys? Sure!
my_dict = {
    1: "first",
    2: "second",
    3.14: "pi"
}

# Mix of different types? No problem!
mixed_dict = {
    "name": "Alice",           # string key
    42: "answer",              # number key
    (1, 2): "coordinates",     # tuple key
    True: "boolean key"        # boolean key
}

# You can even use tuples for complex keys
student_grades = {
    ("John", "Math"): 95,
    ("John", "Science"): 87,
    ("Mary", "Math"): 92
}
The Real Difference in Action
Let's say you want to track scores by player number:
// JavaScript - numbers become strings automatically
let scores = {
  1: 100,
  2: 85
}
console.log(scores[1])    // Works: 100
console.log(scores["1"])  // Also works: 100 (same thing!)
# Python - numbers stay as numbers scores = { 1: 100, # integer key "1": 85 # string key - totally different! } print(scores[1]) # 100 print(scores["1"]) # 85 - these are completely different keys!See the difference? JavaScript treats
1and"1"as the same key, but Python sees them as completely different keys. That's what I meant by Python being more generous - it gives you more control over exactly what type of key you want to use!
Arrays
Introduction to Arrays
In JavaScript applications, you might need to manage a list of objects, such as:
- Products in a shopping cart.
- Colors selected by a user.
In such cases, an array is an ideal data structure to store these lists.
Declaring and Initializing Arrays
To declare an array, use a meaningful name and initialize it to an empty array using square brackets:
let selectedColors = [];
These square brackets are called array literals, indicating an empty array. You can initialize this array with values:
let selectedColors = ['red', 'blue'];
console.log(selectedColors); // Output: ['red', 'blue']
Understanding Array Indexes
Arrays maintain the order of elements, where each element has an index:
- The index of the first element is 0.
- The index of the second element is 1.
To access an element, use its index:
console.log(selectedColors[0]); // Output: 'red'
Dynamic Nature of JavaScript Arrays
JavaScript is a dynamic language, allowing arrays to change at runtime:
- Dynamic Length: Arrays can grow in size dynamically. You can add elements to an array:
let selectedColors = ['red', 'blue'];
selectedColors[2] = 'green';
console.log(selectedColors); // Output: ['red', 'blue', 'green']
- Dynamic Types: Arrays can store elements of different types. For example, adding a number to an array of strings:
let selectedColors = ['red', 'blue'];
selectedColors[2] = 1;
console.log(selectedColors); // Output: ['red', 'blue', 1]
Arrays are Objects
Technically, arrays are a special type of object in JavaScript:
- Check the type of an array using
typeof:
console.log(typeof selectedColors); // Output: 'object'
- Arrays inherit properties and methods from the
Arrayprototype, such as thelengthproperty which returns the number of elements:
let selectedColors = ['red', 'blue'];
selectedColors[2] = 1;
console.log(selectedColors); // Output: ['red', 'blue', 1]
console.log(selectedColors.length); // Output: 3
Exploring Array Properties
Arrays come with built-in properties and methods that you can access using dot notation. For instance, the length property:
console.log(selectedColors.length); // Output: 3
These properties are automatically inherited from the array prototype.
Summary
Arrays are a powerful and flexible data structure in JavaScript, characterized by:
- Dynamic Length: Arrays can grow or shrink in size.
- Dynamic Types: Arrays can hold elements of different types.
- Inheritance from Object: Arrays are objects and inherit properties and methods from the
Arrayprototype.
In future sections, you will explore various operations and methods associated with arrays. For now, understand that arrays are used to represent lists of items in a dynamic and flexible way.
Functions
Introduction to Functions in JavaScript
In our study of reference types, we have explored objects and arrays. Today, we'll delve into another fundamental building block of JavaScript: functions. Functions are essential constructs in JavaScript, designed to perform tasks or calculate values. Let's begin by defining a function.
Creating a Function
To declare a function, we use the function keyword followed by a name, parentheses, and curly braces:
function greet() {
}
Function Body
Inside the curly braces lies the body of the function. This is where we define the function's logic. For instance, if we want our function to display a message on the console, we can add a console.log statement:
function greet() {
  console.log('Hello World');
}
Note the use of a semicolon to terminate the statement. However, when declaring the function, a semicolon is not required since we are not declaring it like a variable.
Calling a Function
To execute our function, we simply call it by its name followed by parentheses:
greet(); // Outputs: Hello World
Enhancing Functionality with Parameters
The previous example is quite basic. Let's enhance our function by allowing it to accept inputs, which can alter its behavior. Suppose we want to greet a specific person instead of just saying "Hello World":
function greet(name) {
  console.log('Hello ' + name);
}

greet('John'); // Outputs: Hello John
Here, name acts as a parameter—a variable only accessible within the function. When we call greet, we pass 'John' as an argument, which is the actual value supplied to the parameter.
Function with Multiple Parameters
Our functions can be designed to accept multiple parameters, separated by commas. Let's add a last name to our greeting:
function greet(name, lastName) {
  console.log('Hello ' + name + ' ' + lastName);
}

greet('John'); // Outputs: Hello John undefined
Notice that if a value for lastName is not provided, JavaScript defaults it to undefined. To fix this, we should pass values for both parameters:
greet('John', 'Smith'); // Outputs: Hello John Smith
Conclusion
This session illustrates how functions can be versatile tools in JavaScript. They can be simple or complex, depending on the inputs they are designed to handle. Remember, parameters are specified at the time of function declaration, whereas arguments are the actual values provided during function calls.
The complete code for reference is given below:
function greet(name, lastName) {
  console.log('Hello ' + name + ' ' + lastName);
}

greet('John', 'Smith'); // Outputs: Hello John Smith
Refining Our Code with Template Literals
Currently, the concatenation in our function looks a bit clunky:
// Performing a task
function greet(name, lastName) {
  console.log('Hello ' + name + ' ' + lastName);
}
greet('John', 'Smith');
Though effective, this method can lead to somewhat untidy code. Later in this course, we will explore template literals, which will help streamline our syntax. For now, let's focus on understanding the functionality of functions.
Introduction to Functions that Calculate Values
While some functions perform tasks, like displaying messages, others are designed to calculate values. Consider a function that calculates the square of a number:
// Calculating a value
function square(number) {
  return number * number;
}
To use this function, you might initialize a variable with the returned value:
// Calculating a value
function square(number) {
  return number * number;
}

let number = square(2);
console.log(number); // Outputs: 4
However, if our goal is merely to display the result, we can simplify this by passing the function call directly to console.log:
console.log(square(2)); // Outputs: 4
This approach eliminates the need for a separate variable, streamlining the code.
Understanding Function Calls
Now, consider how many function calls are in the following code snippet:
// Performing a task
function greet(name, lastName) {
  console.log('Hello ' + name + ' ' + lastName);
}

// Calculating a value
function square(number) {
  return number * number;
}

console.log(square(2));
In this example, we actually have two function calls:
square(2)— This is a call to oursquarefunction.console.log(...)— This is a call to thelogfunction of the console object.
Each set of parentheses represents a call to a function. The log function can accept various types of arguments, whether a simple string or an expression involving another function call, like square(2).
Conclusion on Functions
To encapsulate what we've learned so far: a function in JavaScript is a set of statements designed to perform a specific task or calculate and return a value. In real-world applications, these functions are the building blocks, working together to create the functionality of the entire application. Later in the course, we will delve deeper into the comprehensive world of functions.
1. JavaScript Operators
Now that you have learned how to declare variables and constants, let's delve into operators.
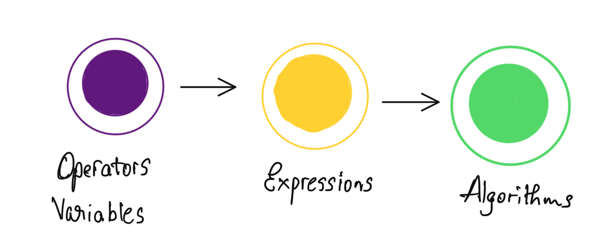
In JavaScript, we have various types of operators. These are used alongside our variables and constants to create expressions. Through these expressions, we can implement logic and algorithms.
Here's an overview of the different kinds of operators in JavaScript:
- Arithmetic Operators
- Assignment Operators
- Comparison Operators
- Logical Operators
- Bitwise Operators
Over the next few lectures, we will explore each of these operators in detail.
Arithmetic Operators
Arithmetic operators in JavaScript are used for performing basic mathematical calculations. Here's a breakdown of each operator with examples.
1. Addition (+)
The addition operator adds two values.
let x = 10;
let y = 3;
console.log(x + y); // Output: 13
2. Subtraction (-)
The subtraction operator subtracts the second value from the first.
console.log(x - y); // Output: 7
3. Multiplication (*)
The multiplication operator multiplies two values.
console.log(x * y); // Output: 30
4. Division (/)
The division operator divides the first value by the second.
console.log(x / y); // Output: 3.3333333333333335
5. Remainder (%)
The remainder operator returns the remainder after dividing the first value by the second.
console.log(x % y); // Output: 1
6. Exponentiation (**)
The exponentiation operator raises the first value to the power of the second value.
console.log(x ** y); // Output: 1000
Increment and Decrement Operators
7. Increment (++)
The increment operator increases the value of a variable by 1. It can be used in two ways: before the variable (prefix) and after the variable (postfix).
-
Prefix Increment (
++x): The value ofxis incremented by 1 first, and then the new value is returned.console.log(++x); // Output: 11 (x is now 11) -
Postfix Increment (
x++): The current value ofxis returned first, and thenxis incremented by 1.console.log(x++); // Output: 11 (x is now 12 after this statement) console.log(x); // Output: 12
8. Decrement (--)
The decrement operator decreases the value of a variable by 1. It can also be used in two ways: before the variable (prefix) and after the variable (postfix).
-
Prefix Decrement (
--x): The value ofxis decremented by 1 first, and then the new value is returned.console.log(--x); // Output: 11 (x is now 11) -
Postfix Decrement (
x--): The current value ofxis returned first, and thenxis decremented by 1.console.log(x--); // Output: 11 (x is now 10 after this statement) console.log(x); // Output: 10
Summary
To summarize, JavaScript provides the following arithmetic operators:
- Addition (
+): Adds two values. - Subtraction (
-): Subtracts the second value from the first. - Multiplication (
*): Multiplies two values. - Division (
/): Divides the first value by the second. - Remainder (
%): Returns the remainder of dividing the first value by the second. - Exponentiation (
**): Raises the first value to the power of the second value. - Increment (
++): Increases the value of a variable by 1. - Decrement (
--): Decreases the value of a variable by 1.
Understanding these operators will help you perform various calculations and manipulations with numbers in JavaScript, just like in mathematics.
Assignment Operators
Certainly! Here is the updated explanation with the additional note about the increment and decrement operators:
Assignment Operators in JavaScript
Assignment operators are used to assign values to variables. The most basic assignment operator is the simple assignment operator (=), but there are several other assignment operators that combine arithmetic operations with assignment.
1. Simple Assignment (=)
The simple assignment operator assigns a value to a variable.
let x = 10; // x is now 10
Note on Increment and Decrement Operators
The increment (++) and decrement (--) operators are useful when you need to add or subtract 1 from a variable. These operators provide a concise way to perform these operations:
-
Increment Operator (
++): Adds 1 to a variable.let x = 10; x++; // x is now 11 (shorthand for x = x + 1) x = x + 1; // this is equivalent to x++ -
Decrement Operator (
--): Subtracts 1 from a variable.let x = 10; x--; // x is now 9 (shorthand for x = x - 1) x = x - 1; // this is equivalent to x--
When you need to add or subtract values other than 1, you can use the following assignment operators:
2. Addition Assignment (+=)
The addition assignment operator adds a value to a variable and assigns the result back to that variable.
let x = 10;

x = x + 5; // x is now 15
x += 5;    // x is now 20 (shorthand for x = x + 5)
3. Subtraction Assignment (-=)
The subtraction assignment operator subtracts a value from a variable and assigns the result back to that variable.
let x = 20;

x = x - 5; // x is now 15
x -= 5;    // x is now 10 (shorthand for x = x - 5)
4. Multiplication Assignment (*=)
The multiplication assignment operator multiplies a variable by a value and assigns the result back to that variable.
let x = 10;

x = x * 3; // x is now 30
x *= 3;    // x is now 90 (shorthand for x = x * 3)
5. Division Assignment (/=)
The division assignment operator divides a variable by a value and assigns the result back to that variable.
let x = 90;

x = x / 3; // x is now 30
x /= 3;    // x is now 10 (shorthand for x = x / 3)
6. Remainder Assignment (%=)
The remainder assignment operator divides a variable by a value and assigns the remainder back to that variable.
let x = 10;

x = x % 3; // x is now 1
x %= 3;    // x is now 1 (shorthand for x = x % 3)
7. Exponentiation Assignment (**=)
The exponentiation assignment operator raises a variable to the power of a value and assigns the result back to that variable.
let x = 2;

x = x ** 3; // x is now 8
x **= 3;    // x is now 512 (shorthand for x = x ** 3)
Examples and Explanation
Combining Assignment and Arithmetic
Assignment operators can be combined with arithmetic operations for convenience and shorter code.
For example, to add 5 to x:
let x = 10;

x = x + 5; // x is now 15
x += 5;    // this is shorthand and does the same thing, x is now 20
Similarly, for multiplication:
let x = 10;

x = x * 3; // x is now 30
x *= 3;    // this is shorthand and does the same thing, x is now 90
Summary
To recap, assignment operators in JavaScript include:
- Simple Assignment (
=): Assigns a value to a variable. - Addition Assignment (
+=): Adds a value to a variable. - Subtraction Assignment (
-=): Subtracts a value from a variable. - Multiplication Assignment (
*=): Multiplies a variable by a value. - Division Assignment (
/=): Divides a variable by a value. - Remainder Assignment (
%=): Assigns the remainder of dividing a variable by a value. - Exponentiation Assignment (
**=): Raises a variable to the power of a value. - Increment (
++): Adds 1 to a variable. - Decrement (
--): Subtracts 1 from a variable.
Understanding these operators allows you to write more concise and readable code, making your JavaScript programs more efficient and easier to maintain.
Comparison Operators in JavaScript
Comparison operators are used to compare the value of a variable with another value. The result of such comparisons is a boolean value: either true or false.
1. Relational Operators
Relational operators compare two values and determine the relational aspect between them.
Greater Than (>)
Checks if the value on the left is greater than the value on the right.
let x = 1;
console.log(x > 0); // Output: true
Greater Than or Equal To (>=)
Checks if the value on the left is greater than or equal to the value on the right.
console.log(x >= 1); // Output: true
Less Than (<)
Checks if the value on the left is less than the value on the right.
console.log(x < 1); // Output: false
Less Than or Equal To (<=)
Checks if the value on the left is less than or equal to the value on the right.
console.log(x <= 1); // Output: true
Example Code for Relational Operators
let x = 1;

// Relational Operators
console.log(x > 0);  // true
console.log(x >= 1); // true
console.log(x < 1);  // false
console.log(x <= 1); // true
2. Equality Operators
Equality operators check if values are equal or not equal.
Strict Equality (===)
Checks if the value on the left is strictly equal to the value on the right. This means both the value and the type must be the same.
console.log(x === 1); // Output: true
Strict Inequality (!==)
Checks if the value on the left is not equal to the value on the right.
console.log(x !== 1); // Output: false
Example Code for Equality Operators
let x = 1;

// Equality Operators
console.log(x === 1); // true
console.log(x !== 1); // false
Summary
In JavaScript, comparison operators include:
- Greater Than (
>): Checks if the value on the left is greater than the value on the right. - Greater Than or Equal To (
>=): Checks if the value on the left is greater than or equal to the value on the right. - Less Than (
<): Checks if the value on the left is less than the value on the right. - Less Than or Equal To (
<=): Checks if the value on the left is less than or equal to the value on the right. - Strict Equality (
===): Checks if the value on the left is strictly equal to the value on the right. - Strict Inequality (
!==): Checks if the value on the left is not equal to the value on the right.
Understanding these operators allows you to make comparisons in your code, which is essential for decision-making and control flow in programming.
Equality Operators in JavaScript
Equality operators are used to compare two values. JavaScript provides two types of equality operators: strict equality (===) and loose equality (==). Understanding the differences between these operators is crucial for accurate and precise comparisons in your code.
1. Strict Equality (===)
The strict equality operator checks if both the value and the type of the two operands are the same.
Example 1: Comparing two numbers
console.log(1 === 1); // Output: true
In this example, both operands are numbers and their values are equal, so the result is true.
Example 2: Comparing a number and a string
console.log('1' === 1); // Output: false
Here, the left operand is a string and the right operand is a number. Since their types do not match, the result is false.
2. Loose Equality (==)
The loose equality operator checks if the values of the two operands are equal after converting the type of one of the operands to match the other.
Example 1: Comparing two numbers
console.log(1 == 1); // Output: true
In this case, both operands are numbers and their values are equal, so the result is true.
Example 2: Comparing a number and a string
console.log('1' == 1); // Output: true
Here, the left operand is a string and the right operand is a number. The loose equality operator converts the string '1' to the number 1 before making the comparison. Since their values are now equal, the result is true.
Example 3: Comparing a boolean and a number
console.log(true == 1); // Output: true
In this example, the left operand is a boolean and the right operand is a number. The loose equality operator converts the number 1 to the boolean true before making the comparison. Since their values are now equal, the result is true.
Examples and Explanation
Strict Equality (===)
The strict equality operator ensures that both operands have the same type and the same value.
// Strict Equality
console.log(1 === 1);   // true
console.log('1' === 1); // false
Loose Equality (==)
The loose equality operator converts the type of one of the operands to match the type of the other before making the comparison.
// Loose Equality
console.log(1 == 1);    // true
console.log('1' == 1);  // true
console.log(true == 1); // true
Summary
To recap, JavaScript provides two types of equality operators:
-
Strict Equality (
===): Checks if both the type and the value of two operands are the same.- Use this operator for precise and accurate comparisons.
- Example:
console.log(1 === 1);// true - Example:
console.log('1' === 1);// false
-
Loose Equality (
==): Converts the type of one operand to match the type of the other before comparing their values.- This operator is less strict and can lead to unexpected results.
- Example:
console.log(1 == 1);// true - Example:
console.log('1' == 1);// true - Example:
console.log(true == 1);// true
Key Takeaways
- The strict equality operator (
===) ensures that both values have the same type and value. - The loose equality operator (
==) converts the type of the right-hand operand to match the type of the left-hand operand before comparing their values. - Most of the time, you should use the strict equality operator because it is more precise and less prone to unexpected results.
Understanding these operators will help you make accurate comparisons in your JavaScript programs, leading to more reliable and maintainable code.
Ternary Operator in JavaScript
The ternary operator, also known as the conditional operator, is a concise way to perform conditional assignments. It is often used to replace simple if-else statements.
Syntax
The syntax for the ternary operator is:
condition ? expressionIfTrue : expressionIfFalse
Example Scenario
Let's implement a rule where if a customer has more than 100 points, they are considered a 'gold' customer; otherwise, they are a 'silver' customer.
Step-by-Step Explanation
-
Declare a Variable to Track Points
let points = 110; -
Declare a Variable to Represent Customer Type
let type; -
Use the Ternary Operator
-
Condition:
points > 100 -
If True: Assign
'gold'totype -
If False: Assign
'silver'totypelet type = points > 100 ? 'gold' : 'silver';
-
-
Log the Result
console.log(type); // Output: 'gold'
Example Code
Here's the complete code the instructor used to explain:
// If a customer has more than 100 points
// they are a 'gold' customer, otherwise,
// they are a 'silver' customer.

let points = 90;
let type = points > 100 ? 'gold' : 'silver';

console.log(type); // Output: 'silver'
Explanation
-
Condition:
points > 100- This checks if the
pointsvariable is greater than 100. - This expression evaluates to a boolean (
trueorfalse).
- This checks if the
-
Question Mark (
?)- If the condition is
true, the value after the?is assigned to the variabletype. - In this case, if
pointsis greater than 100,typeis assigned the value'gold'.
- If the condition is
-
Colon (
:)- If the condition is
false, the value after the:is assigned to the variabletype. - In this case, if
pointsis not greater than 100,typeis assigned the value'silver'.
- If the condition is
Testing Different Values
-
For
points = 110let points = 110; let type = points > 100 ? 'gold' : 'silver'; console.log(type); // Output: 'gold' -
For
points = 90let points = 90; let type = points > 100 ? 'gold' : 'silver'; console.log(type); // Output: 'silver'
Summary
The ternary operator is a shorthand way to perform conditional assignments. It starts with a condition and evaluates to one of two values based on whether the condition is true or false. It's a powerful tool for making your code more concise and readable.
-
Syntax:
condition ? expressionIfTrue : expressionIfFalse -
Example:
let points = 90;
let type = points > 100 ? 'gold' : 'silver';

console.log(type); // Output: 'silver'
Understanding and using the ternary operator can help simplify your code and make conditional assignments more straightforward.
Logical Operators with in JavaScript
Logical operators are used to make decisions based on multiple conditions. In JavaScript, there are three types of logical operators:
- Logical AND (
&&) - Logical OR (
||) - Logical NOT (
!)
Let's explore each of these operators with examples.
1. Logical AND (&&)
The logical AND operator returns true if both operands are true. Otherwise, it returns false.
Syntax:
operand1 && operand2
Example 1: Basic Usage
// Logical AND (&&)
// Returns TRUE if both operands are TRUE
console.log(true && true);  // Output: true
console.log(false && true); // Output: false
If either operand is false, the result is false.
Example 2: Real-world Use Case
Let's imagine we want to build an application for approving loans. The applicant must have a high income and a good credit score to be eligible for a loan.
let highIncome = true;
let goodCreditScore = true;
let eligibleForLoan = highIncome && goodCreditScore;

console.log(eligibleForLoan); // Output: true
If either highIncome or goodCreditScore is false, eligibleForLoan will be false.
2. Logical OR (||)
The logical OR operator returns true if at least one of the operands is true. If both operands are false, it returns false.
Syntax:
operand1 || operand2
Example 1: Basic Usage
// Logical OR (||)
// Returns TRUE if one of the operands is TRUE
console.log(true || false);  // Output: true
console.log(false || false); // Output: false
As long as one operand is true, the result is true.
Example 2: Real-world Use Case
Continuing with our loan application example, let's say an applicant can be eligible for a loan if they have either a high income or a good credit score.
let highIncome = false;
let goodCreditScore = true;
let eligibleForLoan = highIncome || goodCreditScore;

console.log(eligibleForLoan); // Output: true
If both highIncome and goodCreditScore are false, eligibleForLoan will be false.
3. Logical NOT (!)
The logical NOT operator inverts the value of its operand. If the operand is true, it returns false, and if the operand is false, it returns true.
Syntax:
!operand
Example: Real-world Use Case
Let's consider a scenario where we want to mark an application as refused if the applicant is not eligible for a loan.
let highIncome = false;
let goodCreditScore = false;
let eligibleForLoan = highIncome || goodCreditScore;
console.log('Eligible:', eligibleForLoan); // Output: false

// Logical NOT (!)
let applicationRefused = !eligibleForLoan;
console.log('Application Refused:', applicationRefused); // Output: true
Examples and Explanation
Logical AND (&&)
The logical AND operator returns true if both conditions are true.
let highIncome = true;
let goodCreditScore = true;
let eligibleForLoan = highIncome && goodCreditScore;
console.log(eligibleForLoan); // true

highIncome = false;
console.log(highIncome && goodCreditScore); // false
Logical OR (||)
The logical OR operator returns true if at least one condition is true.
let highIncome = false;
let goodCreditScore = true;
let eligibleForLoan = highIncome || goodCreditScore;
console.log(eligibleForLoan); // true

highIncome = false;
goodCreditScore = false;
console.log(highIncome || goodCreditScore); // false
Logical NOT (!)
The logical NOT operator inverts the boolean value.
let highIncome = false;
let goodCreditScore = false;
let eligibleForLoan = highIncome || goodCreditScore;
console.log('Eligible:', eligibleForLoan); // false

let applicationRefused = !eligibleForLoan;
console.log('Application Refused:', applicationRefused); // true
Summary
Logical operators in JavaScript are essential for making decisions based on multiple conditions:
-
Logical AND (
&&): Returnstrueif both operands aretrue.- Syntax:
operand1 && operand2 - Example:
console.log(true && true);// true
- Syntax:
-
Logical OR (
||): Returnstrueif at least one operand istrue.- Syntax:
operand1 || operand2 - Example:
console.log(true || false);// true
- Syntax:
-
Logical NOT (
!): Inverts the boolean value of its operand.- Syntax:
!operand - Example:
console.log(!true);// false
- Syntax:
Understanding these operators will help you make complex logical decisions in your code, making your programs more flexible and robust.
Logical Operators with Non Booleans
In JavaScript, logical operators can be used with non-boolean values, which makes them extremely powerful. These operators include logical AND (&&), logical OR (||), and logical NOT (!).
Logical OR (||)
• Returns the first truthy value it encounters.
• If all values are falsy, it returns the last value.
Syntax:
operand1 || operand2
Examples:
console.log(false || 'Pratham'); // Output: 'Pratham'
console.log(null || 0 || undefined || 'Hello' || 42); // Output: 'Hello'
console.log(false || 0 || ''); // Output: ''
In the above examples, the logical OR operator stops at the first truthy value and returns it. If no truthy value is found, it returns the last falsy value.
Truthy and Falsy Values
In JavaScript, values can be categorized as either “truthy” or “falsy”.
Falsy Values:
-
undefined
-
null
-
0
-
false
-
' ' (empty string)
-
NaN
Anything that is not falsy is considered truthy.
Logical AND (&&)
• Returns the first falsy value it encounters.
• If all values are truthy, it returns the last value.
Syntax:
operand1 && operand2
Examples:
console.log(true && 'Pratham'); // Output: 'Pratham'
console.log(42 && null && 'Hello'); // Output: null
console.log('Hello' && 42 && true); // Output: true
In the above examples, the logical AND operator stops at the first falsy value and returns it. If all values are truthy, it returns the last truthy value.
Logical NOT (!)
• Returns the opposite boolean value of its operand.
• Converts the operand to a boolean value if it is not already.
Syntax:
!operand
Examples:
console.log(!true); // Output: false
console.log(!0); // Output: true
console.log(!'Hello'); // Output: false
The logical NOT operator converts its operand to a boolean value and then returns the opposite.
Summary
• Logical OR (||): Returns the first truthy value or the last value if all are falsy.
• Syntax: operand1 || operand2
• Example: console.log(false || 'text'); // ‘text’
• Logical AND (&&): Returns the first falsy value or the last value if all are truthy.
• Syntax: operand1 && operand2
• Example: console.log('Hello' && 42); // 42
• Logical NOT (!): Converts the operand to a boolean value and returns the opposite.
• Syntax: !operand
• Example: console.log(!0); // true
Understanding these behaviors helps in writing concise and effective conditional expressions in JavaScript.
Bitwise Operators in JavaScript
Bitwise operators treat their operands as a set of 32 bits (binary digits), rather than as decimal, hexadecimal, or octal numbers. They operate on the binary representations of the numbers.
Here are the basic bitwise operators:
1. Bitwise AND (&)
- Compares each bit of the first operand to the corresponding bit of the second operand.
- If both bits are 1, the corresponding result bit is set to 1. Otherwise, the corresponding result bit is set to 0.
Example:
5 & 1
Binary representation:
5 = 0101
1 = 0001
---------
Result: 0001 (which is 1 in decimal)
Explanation: Only the last bit is 1 in both numbers, so the result is 1.
2. Bitwise OR (|)
- Compares each bit of the first operand to the corresponding bit of the second operand.
- If at least one of the bits is 1, the corresponding result bit is set to 1. Otherwise, it is set to 0.
Example:
5 | 1
Binary representation:
5 = 0101
1 = 0001
---------
Result: 0101 (which is 5 in decimal)
Explanation: At least one bit is 1 in the first, second, and fourth positions, so the result is 5.
3. Bitwise XOR (^)
- Compares each bit of the first operand to the corresponding bit of the second operand.
- If the bits are different, the corresponding result bit is set to 1. If they are the same, the result bit is set to 0.
Example:
5 ^ 1
Binary representation:
5 = 0101
1 = 0001
---------
Result: 0100 (which is 4 in decimal)
Explanation: Only the second bit is different, so the result is 4.
4. Bitwise NOT (~)
- Inverts all the bits of the operand.
- Changes 0s to 1s and 1s to 0s.
Example:
~5
Binary representation:
5 = 0000 0101
~5 = 1111 1010 (which is -6 in decimal, using two's complement representation)
Explanation: All bits are inverted.
5. Bitwise Left Shift (<<)
- Shifts the bits of the first operand to the left by the number of positions specified by the second operand.
- New bits are filled with 0s.
Example:
5 << 1
Binary representation:
5 = 0101
5 << 1 = 1010 (which is 10 in decimal)
Explanation: All bits are shifted one position to the left, and a 0 is added at the end.
6. Bitwise Right Shift (>>)
- Shifts the bits of the first operand to the right by the number of positions specified by the second operand.
- For non-negative numbers, new bits are filled with 0s.
Example:
5 >> 1
Binary representation:
5 = 0101
5 >> 1 = 0010 (which is 2 in decimal)
Explanation: All bits are shifted one position to the right, and a 0 is added at the beginning.
7. Bitwise Zero Fill Right Shift (>>>)
- Shifts the bits of the first operand to the right by the number of positions specified by the second operand.
- New bits are filled with 0s.
Example:
5 >>> 1
Binary representation:
5 = 0101
5 >>> 1 = 0010 (which is 2 in decimal)
Explanation: All bits are shifted one position to the right, and a 0 is added at the beginning.
Summary
Bitwise operators perform operations on the binary representations of numbers:
- AND (
&): Returns 1 if both bits are 1. - OR (
|): Returns 1 if at least one bit is 1. - XOR (
^): Returns 1 if bits are different. - NOT (
~): Inverts the bits. - Left Shift (
<<): Shifts bits to the left, filling with 0s. - Right Shift (
>>): Shifts bits to the right, filling with 0s for non-negative numbers. - Zero Fill Right Shift (
>>>): Shifts bits to the right, filling with 0s.
These operators are useful for low-level programming tasks, such as manipulating individual bits within a byte.
Application of using Bitwise Operators in JS
Access Control System
Bitwise operators are powerful tools for managing binary data. One practical use case is in implementing an access control system. Let's break down how this can be done step-by-step.
Access Control System Using Bitwise Operators
In this example, we will use bitwise operators to manage permissions for read, write, and execute operations.
Step 1: Define Permission Constants
First, define constants for each type of permission using their decimal equivalents:
const readPermission = 4;    // Binary: 100
const writePermission = 2;   // Binary: 010
const executePermission = 1; // Binary: 001
Step 2: Initialize Permissions
Initialize a variable to store the permissions. Initially, it is set to 0, meaning no permissions:
let myPermission = 0;
Step 3: Add Permissions Using Bitwise OR (|)
Use the bitwise OR operator to add permissions. The bitwise OR operator allows us to combine multiple permissions:
myPermission = myPermission | readPermission | writePermission;
console.log(myPermission); // Output: 6
Explanation:
readPermissionis 4 (binary100)writePermissionis 2 (binary010)4 | 2results in 6 (binary110), meaning both read and write permissions are granted.
Step 4: Check Permissions Using Bitwise AND (&)
To check if a specific permission is granted, use the bitwise AND operator:
let message = (myPermission & readPermission) ? 'yes' : 'no';
console.log(message); // Output: yes
Explanation:
myPermission & readPermissionchecks if thereadPermissionbit is set inmyPermission.- If the result is not 0, it means the permission is granted.
Step 5: Remove a Permission and Check Again
To demonstrate how removing a permission affects the check:
myPermission = myPermission & ~readPermission;
message = (myPermission & readPermission) ? 'yes' : 'no';
console.log(message); // Output: no
Explanation:
~readPermissioninverts the bits ofreadPermission, making it011.myPermission & ~readPermissionclears thereadPermissionbit inmyPermission.
Practical Example
Here is the complete code from the lecture, along with the explanations:
const readPermission = 4;    // Binary: 100
const writePermission = 2;   // Binary: 010
const executePermission = 1; // Binary: 001

let myPermission = 0;
myPermission = myPermission | readPermission | writePermission;
console.log(myPermission); // Output: 6 (Binary: 110)

let message = (myPermission & readPermission) ? 'yes' : 'no';
console.log(message); // Output: yes

// Remove readPermission and check again
myPermission = myPermission & ~readPermission;
message = (myPermission & readPermission) ? 'yes' : 'no';
console.log(message); // Output: no
Summary of Bitwise Operators in Access Control
- Bitwise OR (
|): Used to add permissions. - Bitwise AND (
&): Used to check if a specific permission is granted. - Bitwise NOT (
~): Used to invert bits, helpful for clearing specific permissions.
Key Takeaways
- Permissions as Flags: Each bit in a binary number represents a different permission (flag). By combining these flags, you can manage multiple permissions efficiently.
- Bitwise OR: Combines multiple flags.
- Bitwise AND: Checks if a specific flag is set.
- Bitwise NOT: Inverts bits, useful for clearing flags.
Understanding these concepts allows for efficient and powerful manipulation of binary data, which is useful in many real-world applications beyond access control systems.
Operator Precedence in JavaScript
Operator precedence determines the order in which operators are evaluated in expressions. Operators with higher precedence are evaluated before operators with lower precedence.
Simple Example
Consider the following expression:
let result = 3 + 4 * 2;
In this example, the multiplication (*) operator has higher precedence than the addition (+) operator, so the multiplication is performed first:
4 * 2is evaluated first, resulting in8.- Then
3 + 8is evaluated, resulting in11.
Precedence Table
Here’s a simplified table of some common operators, ordered from highest to lowest precedence:
| Precedence | Operator Type | Operators | Associativity |
|---|---|---|---|
| 1 (highest) | Member Access | . | Left-to-right |
| 2 | Function Call | () | Left-to-right |
| 3 | New Object | new | Right-to-left |
| 4 | Increment/Decrement | ++, -- | Right-to-left |
| 5 | Logical NOT, Bitwise NOT | !, ~ | Right-to-left |
| 6 | Multiplication/Division | *, /, % | Left-to-right |
| 7 | Addition/Subtraction | +, - | Left-to-right |
| 8 | Bitwise Shift | <<, >>, >>> | Left-to-right |
| 9 | Relational | <, <=, >, >= | Left-to-right |
| 10 | Equality | ==, !=, ===, !== | Left-to-right |
| 11 | Bitwise AND | & | Left-to-right |
| 12 | Bitwise XOR | ^ | Left-to-right |
| 13 | Bitwise OR | ||
| 14 | Logical AND | && | Left-to-right |
| 15 | Logical OR | | | |
| 16 | Conditional (Ternary) | ? : | Right-to-left |
| 17 (lowest) | Assignment | =, +=, -=, *=, %=, etc. | Right-to-left |
Associativity
In addition to precedence, operators also have associativity, which can be either left-to-right or right-to-left. Associativity determines the order in which operators of the same precedence level are evaluated.
- Left-to-Right Associativity: Operators are evaluated from left to right.
- Example:
3 - 4 + 5is evaluated as(3 - 4) + 5.
- Example:
- Right-to-Left Associativity: Operators are evaluated from right to left.
- Example:
a = b = cis evaluated asa = (b = c).
- Example:
Practical Examples
Example 1: Mixing Addition and Multiplication
let result = 5 + 3 * 2;
- Multiplication has higher precedence than addition.
3 * 2is evaluated first, resulting in6.- Then
5 + 6is evaluated, resulting in11.
Example 2: Using Parentheses to Change Precedence
let result = (5 + 3) * 2;
- Parentheses have the highest precedence.
5 + 3is evaluated first, resulting in8.- Then
8 * 2is evaluated, resulting in16.
Example 3: Logical Operators
let a = true;
let b = false;
let result = a && !b;
- The logical NOT (
!) operator has higher precedence than the logical AND (&&) operator. !bis evaluated first, resulting intrue.- Then
a && trueis evaluated, resulting intrue.
Example 4: Ternary Operator
let result = true ? false ? 1 : 2 : 3;
console.log(result); // 2
- false ? 1 : 2 is evaluated first, resulting in 2.
- Then true ? 2 : 3 is evaluated, resulting in 2.
Summary
- Operator Precedence: Determines the order in which operators are evaluated.
- Higher precedence operators are evaluated before lower precedence operators.
- Associativity: Determines the order in which operators of the same precedence level are evaluated.
- Left-to-right or right-to-left.
- Use Parentheses: Parentheses can be used to explicitly define the order of evaluation in complex expressions.
Understanding operator precedence and associativity helps in writing clear and accurate expressions in JavaScript, avoiding unexpected results and making the code more readable.
Quiz on JS Operators
Question 1
What is the value of y?
let x = 10;
let y = (x > 5) && (x < 15);
a - 10
b - 5
c - 15
d - true
Ans
d - trueQuestion 2
What is the value of x?
let x = 5;
x += 3;
a- 3
b- 8
c- 15
d- 5
Ans
b - 8Question 3
What is the value of y?
let x = 10;
let y = x++;
a- 10
b- 11
c- 12
d- 13
Ans
a - 10Question 4
What is the value of y?
let x = 1;
let y = x !== 2;
a- 1
b- 2
c- false
d- true
Ans
d - trueProgramming Execise 1 - Swapping Variables
- Write a program to swap the values of the variables, like from red to blue, the sample code is given below:
let a = red;
let b = blue;
console.log(a);
console.log(b);
- Write some code here to swap the value of these two variables. So when we log these on the console, instead of getting red and blue, we're going to get blue and red.
Solution:
let a = red;
let b = blue;
let temp;
// before swapping
console.log(a);
console.log(b);
temp = a;
a = b;
b = temp;
// after swapping
console.log(a);
console.log(b);
so the logic behind here is about to create a temporary container, and storing the variable value which helps in swapping. So value of a is stored first for temporarily in temp variable and after assigning the value of b to a, the value of temp variable is assigned to b.
Control Flow in JavaScript
If...else statement
Overview
-
In the last section you learned about expressions and operators. In this section we're going to use these expressions and operators along with conditional statements to implement interactivity in our applications.
-
In JavaScript we have two types of conditional statements, we have:
-
if and else
-
switch and case
-
-
You're going to learn about if and else in this lecture, and we'll look at switch and case in the next lecture.
-
Problem Description:
Imagine in our application we're going to get the current hour and depending on it's value, we're going to greet the user with a different message. So if the hour is between let's say 6am and 12pm, you will display something like good morning. Similarly, if it is between 12pm and 6pm we're going to display good afternoon. Otherwise we're going to display good evening.
// get hour from the user
// if it is between 12 pm and 6 pm : Good morning!
// if it is between 12 pm and 6 pm : Good afternoon !
// Otherwise : Good evening !
Solution:
- To have some logic like this in our application, we use if and else.
if Statement
- Syntax
// for multiple statements (put curly braces)
if (condition){
    //statements
}

// for single statement
if (condition)
    //statements
-
We start with the
if, then we add parenthesis. And in between these parenthesis, we add a condition. If this condition evaluates to true, the statement we put after will be executed. -
Now if you have multiple statements, we need to put them in between these curly
braces. We refer to these as a block of code.
else if Statement
- Syntax
else if (anotherCondition){
    // statements
}
else if (yetanotherCondition){
    // statements
}
-
It is used for additional conditions (if it is required)
-
if the primary condition turns out to be false, it jumps to
else ifcondition, and if the additional condition is true, then the statement is executed. -
we could have multiple
else ifconditions as we want, there is no limitation based on the problem statement. If optionally none of the conditions are set to be true, we could useelse.
Now what if everything turns out to be false, you might either want to execute some set of instructions, when everything turns out to be false, for that we use else logic
else statement
- Syntax
else {
    // statements
}
- It is used when none of the previous conditions are true.
The whole if...else structure looks like this:
if (condition){
    //statements
}

else if (anotherCondition){
    // statements
}
else if (yetanotherCondition){
    // statements
}
else {
    // statements
}
- Now we want to get this logic and map it into this structure. So let's start with conditions given based on problem statement
// get hour from the user
// if it is between 6 am and 12 pm : Good morning!
// if it is between 12 pm and 6 pm : Good afternoon !
// Otherwise : Good evening !

let hour = 10;
if (hour>=6 && hour<12){
    console.log("Good Morning !");
}
else if (hour>=12 && hour<18){
    console.log("Good Afternoon");
}
else{
    console.log("Good Evening");
}
Explanation:
• Condition 1: if (hour >= 6 && hour < 12)
• Checks if the hour is between 6 AM and 12 PM.
• If true, it logs “Good morning.”
• Condition 2: else if (hour >= 12 && hour < 18)
• Checks if the hour is between 12 PM and 6 PM.
• If true, it logs “Good afternoon.”
• Default Case: else
• If none of the above conditions are true, it logs “Good evening.”
Switch and Case Statements
Switch and case statements provide an alternative way to implement conditional logic in JavaScript, especially when you need to compare a variable against multiple values.
Basic Switch Statement Structure
Let's start by declaring a variable called role that represents the role of the current user:
let role; // This will be undefined initially
Now we want to check if the user is a guest, moderator, or admin. While we could use if-else statements, let's explore the switch and case approach.
Step-by-Step Implementation
- Start with the switch statement: We begin with the
switchkeyword, add parentheses, and instead of adding a condition, we add the variable we want to evaluate:
switch (role) {
    // Case statements go here
}
- Add case statements: Each case statement compares the value of the variable with something specific:
switch (role) {
    case 'guest':
        console.log('Guest user');
        break;

    case 'moderator':
        console.log('Moderator user');
        break;

    default:
        console.log('Unknown role');
}
Important: The Break Statement
Critical Note:
Consider the code below:
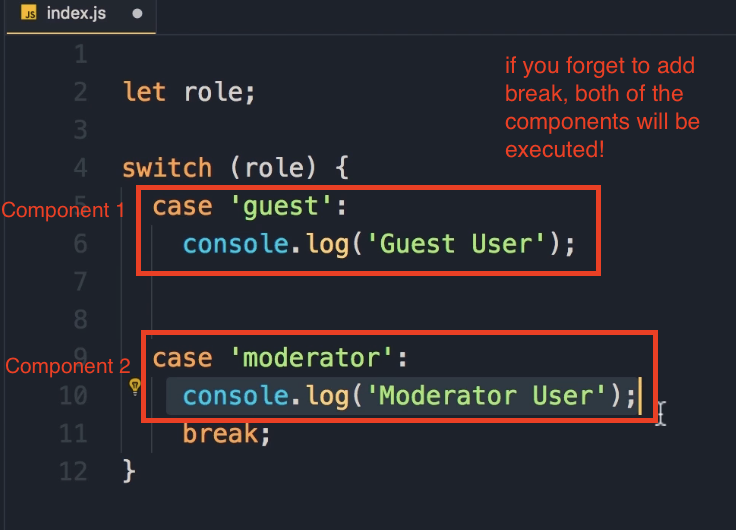
You must add a break statement after each case. Without it, the execution will "fall through" to the next case statements, causing multiple console.log statements to execute even when only one should match.
For example, if you forget the break after the 'guest' case and the role equals 'guest', both the guest and moderator console.log statements would execute.
Default Statement
The default statement is optional and executes when none of the cases match. You don't need a break statement for default because the control will automatically exit the switch block at that point.
Testing the Switch Statement
Let's see how this works in practice:
See the code below:
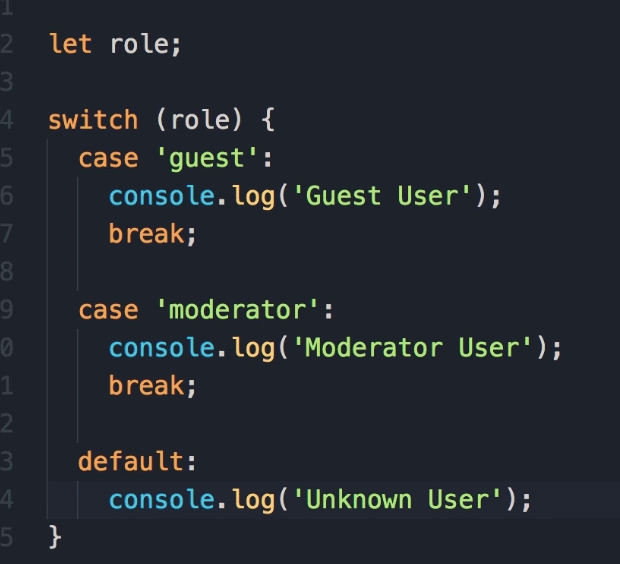
Initial Test (role is undefined):
let role; // undefined
// Output: Unknown role
Testing with 'guest':
let role = 'guest';
// Output: Guest user
Testing with 'moderator':
let role = 'moderator';
// Output: Moderator user
Alternative Implementation with If-Else
Here's how you could implement the exact same logic using if-else statements:
if (role === 'guest') console.log('Guest user');
else if (role === 'moderator') console.log('Moderator user');
else console.log('Unknown user');
Note: We're using strict equality (===) here, which checks both the type and value of the variable against what we have on the right side. (right side, means the output or the console of the browser)
Key Takeaway: Switch vs If-Else Comparison
When comparing these two implementations, the if-else approach is cleaner and shorter. We don't have all the break statements, default keyword, or extra curly braces - these are considered extra noise in the code.
When to Use Switch vs If-Else
- Switch and case: Can compare a variable against multiple values (strings, numbers, or even booleans, though booleans are less common)
- If statements: More appropriate for boolean comparisons (true/false)
- Personal preference: The instructor tends to use if-else more often, as switch statements are somewhat outdated and can look less clean
Important Note: There's nothing terribly wrong with switch statements - they can sometimes be more explicit. The choice often comes down to personal preference and coding style.
Data Types in Switch Statements
Switch statements work with:
- Strings (most common, as shown in examples)
- Numbers
- Booleans (less common - if comparing true/false,
ifstatements usually make more sense to be used)
For Loops
Sometimes we want to repeat an action a number of times.
For example, let's imagine we want to display "Hello World" 5 times on the console. The poor way of doing that is like this:
console.log('Hello World');
console.log('Hello World');
console.log('Hello World');
console.log('Hello World');
console.log('Hello World');
This code is ugly. There is a better way to achieve the same result, and that's where we use loops.
Introduction to Loops
In JavaScript, we have various kinds of loops, and all these loops essentially do the same thing: they repeat an action a number of times.
We have:
-
forloops -
whileloops -
do...whileloops -
for...inloops -
for...ofloops
All these loops essentially do the same thing, but there is a subtle difference between how they start and end. Let's start by looking at the for loop.
The for Loop
Syntax and Structure
This is how we write a for loop. We use for, we add parentheses, and here we need 3 statements.
for ( [initialExpression]; [condition]; [incrementExpression] )
-
initialExpression: The first statement is what we callinitialExpression. Here we declare and initialize a variable.-
We use
letto declare a variable likeiand set it to0. -
iis short for "index" and is a common convention to use inforloops. This is what we call the loop variable. -
We terminate this statement with a semi-colon (
;).
-
-
condition: The second part of theforloop is what we call acondition.-
Here we want to add a condition and compare the value of
iwith something else. -
This loop will run as long as this condition evaluates to
true. -
If we want this loop to run 5 times, we compare
iwith 5 (e.g.,i < 5). As long asiis less than 5, this loop will execute. -
Once again, we terminate this statement with a semi-colon (
;).
-
-
incrementExpression: The third part is what we callincrementExpression.-
Quite often, what we have here is something like this:
i++. -
We use the increment operator to increment the value of
iby 1 after each loop iteration.
-
After this for statement, we can add one or more statements. Just like if statements, if you have multiple statements here, you need to put them in a code block ({ ... }).
Example 1: Hello World 5 Times
Instead of repeating the line 5 times, we put it in a for loop.
-
Code:
for (let i = 0; i < 5; i++) { console.log('Hello World'); } -
Running the Code:
Now, save the changes.
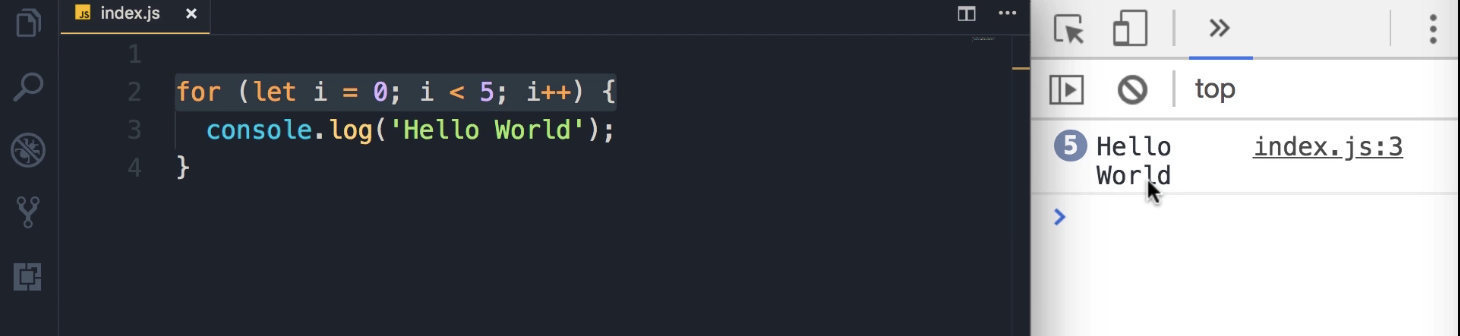
-
Output:
We get 5 "Hello World" messages on the console.
Key Learning: How the for Loop Executes
Alright, now that you have seen a for loop in action, let's see exactly how this loop works.
-
The
initialExpression(let i = 0;) runs one time at the beginning. -
The
condition(i < 5) is evaluated.-
If
true: The statements in the loop body are executed. -
If
false: The loop terminates.
-
-
After the loop body executes, the
incrementExpression(i++) is executed. -
The process repeats from Step 2 (the condition is evaluated again).
for Loop Examples
Example 2: Logging the Loop Variable (i)
To show you this in action, I'm going to output i on the console.
-
Code:
for (let i = 0; i < 5; i++) { console.log('Hello World', i); } -
Output:
This is what we get. Note that in the first iteration i is 0, then it's incremented by 1 until it reaches 4.
Hello World 0 Hello World 1 Hello World 2 Hello World 3 Hello World 4 -
Explanation:
At the end of the 5th iteration,
iwill be 4. When we increment that by 1, it will be 5. So, the condition (i < 5) will evaluate to false (because 5 is not less than 5), and the loop will stop.
Key Takeaway: Two Ways to Loop 5 Times
Essentially, there are two ways to repeat an action 5 times using the for loop.
-
Way 1: Initialize
ito0and check if it's less than 5 (i < 5). -
Way 2: Initialize
ito1and check if it's less than or equal to 5 (i <= 5).
Let's look at the second way:
-
Code:
for (let i = 1; i <= 5; i++) { console.log('Hello World', i); } -
Output:
Now, if you save the changes, you can see i starts from 1 and finishes at 5.
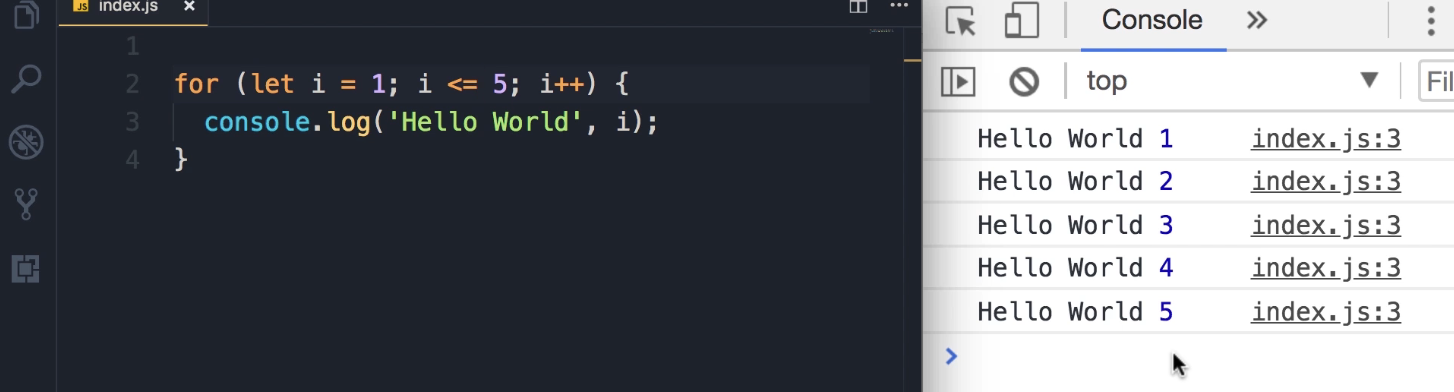
Example 3: Displaying Odd Numbers
Now we can make this programming more interesting. Let's say we want to display the odd numbers between 1 to 5.
-
Logic:
Instead of logging "Hello World," we can have an if statement and check the remainder of the division of i by 2 (i % 2). If the remainder... is not 0 (i % 2 !== 0), that means i is an odd number.
-
Code:
for (let i = 1; i <= 5; i++) { if (i % 2 !== 0) console.log(i); } -
Output:
Save the changes, so here are the odd numbers between one and five.
1
3
5
Example 4: Looping in Reverse Order
There is also another way to write this loop. Instead of starting from 1 and going all the way to 5, we can start from 5 and go back to 1.
-
Logic:
We change the initialExpression (set i to 5), the condition (as long as i is greater than or equal to 1), and the incrementExpression (we want to decrement i).
-
Code:
for (let i = 5; i >= 1; i--) { if (i % 2 !== 0) console.log(i); } -
Output:
Save the changes. Now we get the odd numbers in the reverse order.
5
3
1
It's more common to use the previous form (so we initialize i to 0 or 1 and increment it in every iteration). But in certain problems, you want to use the for loop in reverse order.
JavaScript Loops: Implementing a while Loop
In the last lecture, we wrote a for loop to display all the odd numbers between 0 and 5. In this lecture, I'm going to show you how to implement the same logic by using a while loop.
Key Learning: for Loop vs. while Loop
One key difference between a while loop and a for loop is that in for loops, the loop variable is part of the loop itself. But in while loops, you have to declare this variable externally. Let me show you what I mean.
Translating a for Loop to a while Loop
Here is the for loop from the previous lesson that we want to translate:
// Displays odd numbers between 0 and 5
for (let i = 0; i <= 5; i++) {
  if (i % 2 !== 0) {
    console.log(i);
  }
}
Output:
1
3
5
Here is the step-by-step process to implement that same logic using a while loop.
1. Declare the Loop Variable
We start with declaring a variable like i and set it to 0.
let i = 0;
A Note on Variable Scope
Note that this
iwe have here is different from theiwe have in theforloop, because that variable is only meaningful and accessible inside of thatforloop. This is called scope, and I'm going to talk about it later in the course.All I want you to know is that these two variables are completely different, even though their names are the same.
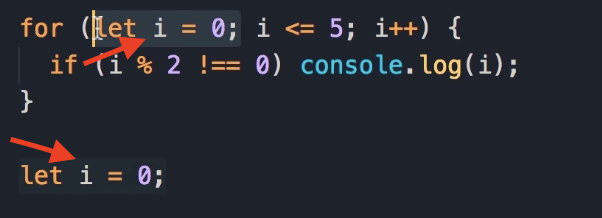
2. Add the while Statement and Condition
Now, we have our loop variable initialized to 0. Next, we add a while statement. In parenthesis, we need to add our condition. What is the condition here? That is i less than or equal to 5.
while (i <= 5) {
  // Statements go here
}
3. Add the Statements to Repeat
Next, we need to add our statements. What is the statement that we want to repeat? We want to display the odd numbers, so we add that here as well.
while (i <= 5) {
  if (i % 2 !== 0) {
    console.log(i);
  }
}
4. Increment the Loop Variable
Finally, at the end of this while block, we need to increment i.
while (i <= 5) {
  if (i % 2 !== 0) {
    console.log(i);
  }
  i++;
}
Final Code and Execution Flow
So, this is a direct translation of the for loop into a while loop.
Completed while Loop:
let i = 0;
while (i <= 5) {
  if (i % 2 !== 0) {
    console.log(i);
  }
  i++;
}
Output:
1
3
5
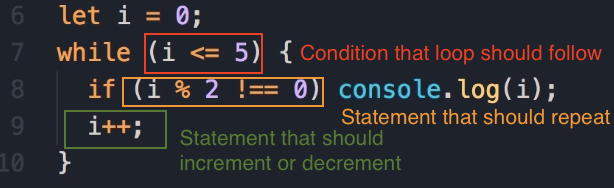
This is what happens when we execute this code:
-
Initially,
iis 0. -
Now in the
whileloop, first this condition (i <= 5) is evaluated. -
If this condition is true, then the body of the
whileloop will be executed. -
Again, in the next iteration, the condition is evaluated again.
-
If it's true, the statements in the
whileblock will be executed. -
Otherwise, the
whileblock will terminate.
In the next lecture, we're going to look at another kind of loop in JavaScript.
The do-while Loop
Alright, now let's take a look at the third kind of loop we have in JavaScript: the do-while loop. do-while loops are very similar to while loops, but they're slightly different.
It's easier to show you in code. I'm going to rewrite this logic (displaying odd numbers) using a do-while loop.
-
Just like
whileloops, we have to declare our loop variable externally.let i = 0; -
Note on Scope: Okay, now if we save the changes, we're going to get an error:
Identifier has already been declared.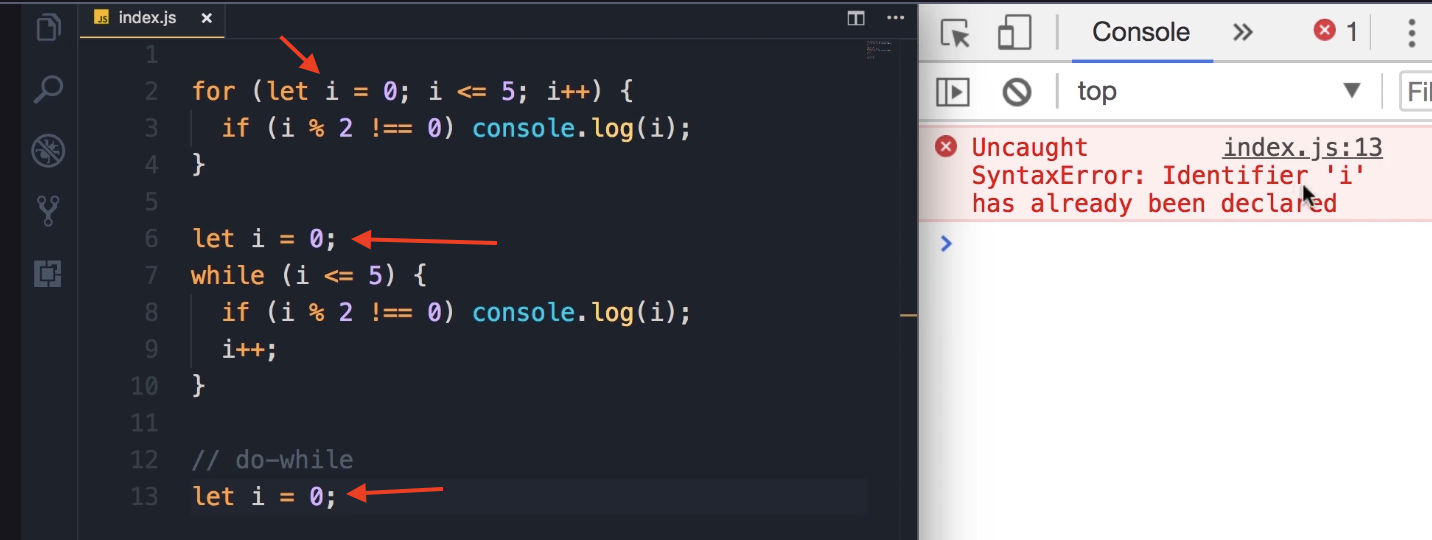
This is because I have declared
ihere (for thedo-whileloop) and also had it declared for thewhileloop. I cannot redeclare it here. This is different than theithat we have in theforloop. Again, this is all about scoping, and I'm going to talk about that later in the course. -
To make this work, I'm going to temporarily comment out these few lines and rewrite this logic using a
do-whileloop.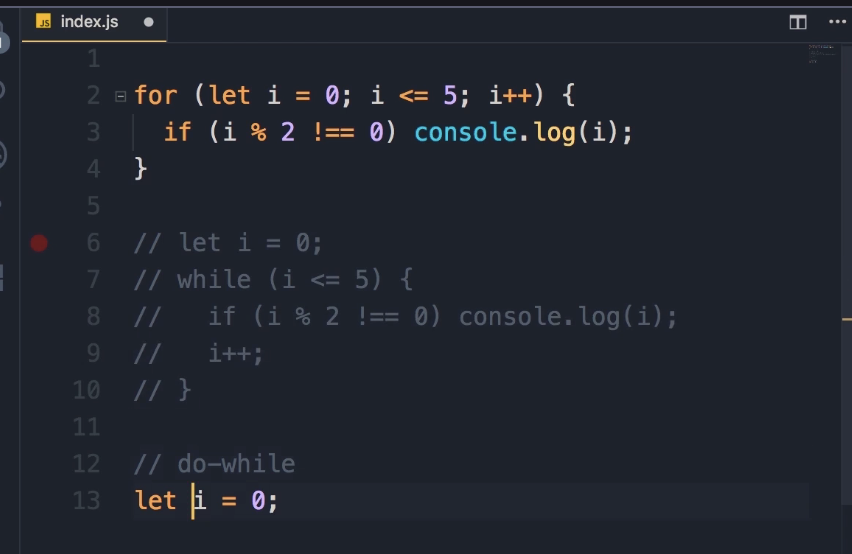
-
We add the
dostatement here, then a code block. In this block, we should have our statements. I'm going to borrow them from ourwhileloop (copy and paste them here). -
Finally, at the end of this block, we add the
whilestatement along with our condition (i <= 5), followed by a semicolon.// Assuming 'i' was declared externally, e.g., let i = 0; // (Previous 'while' and 'for' loops are commented out) do { // Statements borrowed from the while loop if (i % 2 !== 0) { console.log(i); } i++; } while (i <= 5);
Key Difference: while vs. do-while
Now, you might be wondering: what is the difference between a while loop and a do-while loop?
Key Takeaway: Execution Order
do-while loops are always executed at least once, even if this condition evaluates to false.
Let me show you what I mean.
Scenario 1: The while loop
-
I'm going to temporarily comment out these few lines and bring back our
whileloop. (Also, we don't need thisforblock for now, so let's comment it out).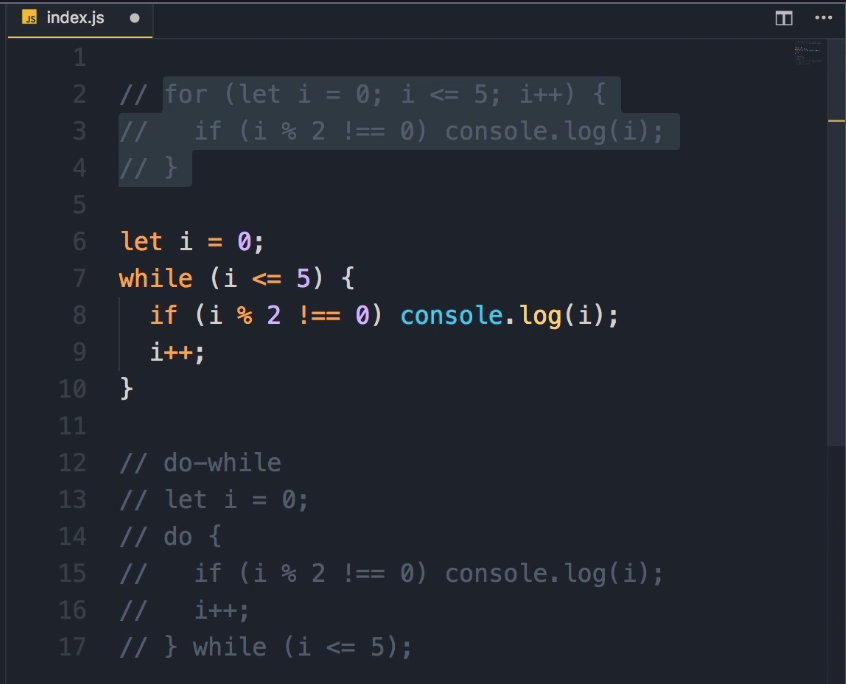
-
If you save the changes (with
let i = 0), we get1, 3, 5on the console. -
However, if I change
ito 9:let i = 9; while (i <= 5) { if (i % 2 !== 0) { console.log(i); } i++; } -
We are not going to see anything. Save the changes, and look, there's nothing in the console.

-
Reason: In
whileloops, this condition is evaluated ahead of time—at the beginning of every iteration. The first time we try to execute thiswhileloop, the condition (9 <= 5) evaluates tofalse, so these statements below while loop, are never executed.
Scenario 2: The do-while loop
-
In contrast, in
do-whileloops, this condition is evaluated at the end. And that means these statements are always executed at least once, even if the condition is false. -
Let's try this. I'm going to comment out this
whileloop and changeito 9, just like before.let i = 9; do { if (i % 2 !== 0) { console.log(i); } i++; } while (i <= 5); -
Save the changes.
-
Expected Output:
9 -
Reason: Why? Because in our
do-whileloop here:-
On line 15 (in the video), we check to see if this is an odd number. It is.
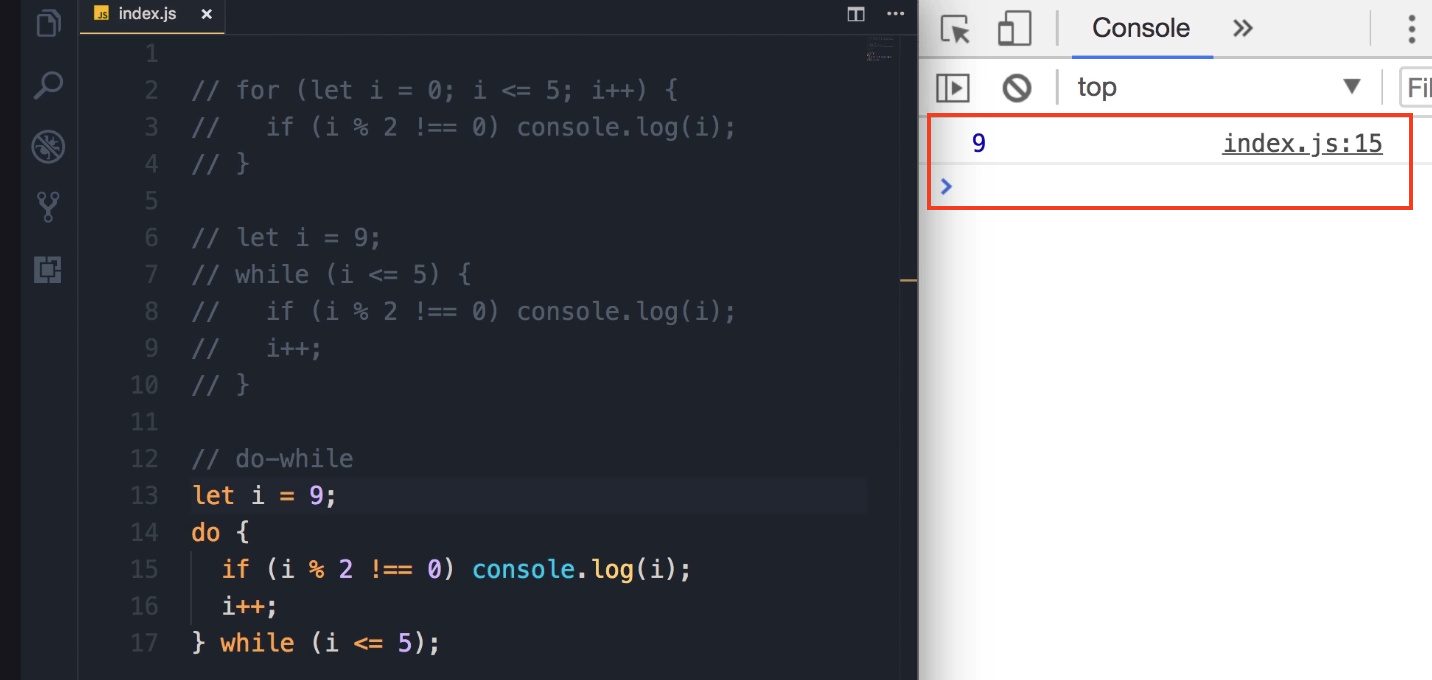
-
We display it on the console.
-
Next, we increment
iby 1, soiis 10. -
Then, the condition is evaluated. Of course, it's
false(10 <= 5). So our loop will terminate.
-
Note: Practical Usage
Now, realistically, we're not going to use this do-while a lot in programming. There are situations you may want to use this, but in practical terms, most of the time you will be using a for or while loop. Just be aware of the difference between a while loop and a do-while loop.
Infinite Loops
When writing loops, something that you need to be aware of is what we call an "infinite loop."
As the name implies, an infinite loop executes infinitely or forever. If you accidentally create one of these loops, you're going to crash your browser or your computer.
Example of an Infinite while Loop
Let me show you an example.
-
Here, I'm going to declare a variable, set it to 0, and put it in a
whileloop. -
The condition will be "as long as
iis less than 5." -
Inside the loop, we're going to do a
console.logofi. -
Now, technically, we should increment
ihere. But if you forget to do so, you end up creating an infinite loop.let i = 0; while (i < 5) { console.log(i); // We forgot to increment i (i++;) } -
Why this is an infinite loop:
-
In the first iteration,
iis 0, and it's less than 5. So, we'll displayion the console. -
Now, in the second iteration,
iis still 0 and less than 5. -
This loop will run forever.
-
Expected Output and Behavior
When I save the changes:
-
On the console: This number you see before the "0" is the number of times you're displaying "0" on the console. You can see this number is increasing rapidly. So far, we have displayed "0" more than 3,500 times.
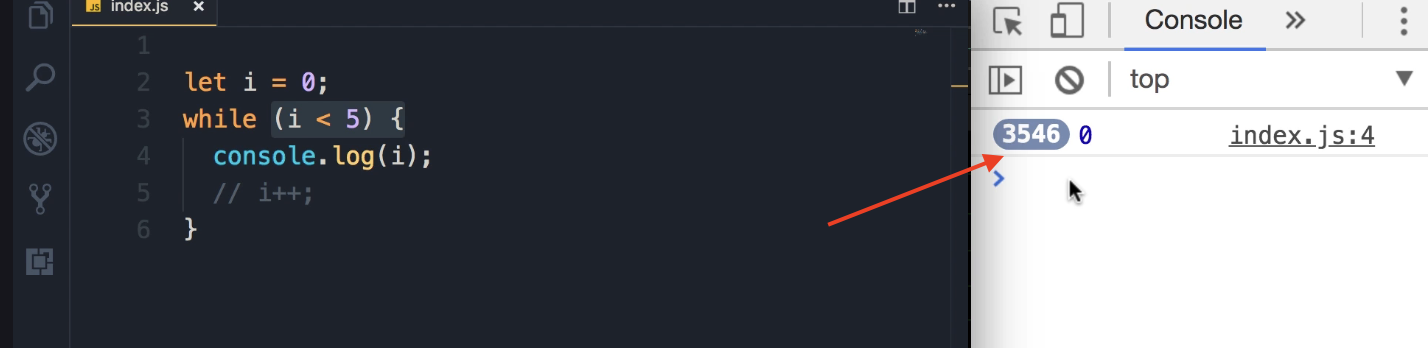
-
In the browser: If you look at the browser, you can see this spinner going forever.

Warning: The only way to get rid of this is to close this window. Or, if this doesn't work, you'll have to force-quit Chrome. This is one example of an infinite loop.

Other Examples of Infinite Loops
Infinite loops are not limited to while loops.
-
while (true):
Here's another example. This loop is going to run forever.
while (true) { // Runs forever } -
do-while loop:
We can create an infinite do-while loop.
do {
  // Runs forever
} while (true);
Or, similar to the first example, maybe we create a loop variable like 0 and then have a condition like
x < 5, but we forget to incrementxhere.let x = 0; do { // ... // We forgot to increment x } while (x < 5); -
for loop:
We can also create an infinite for loop. Maybe we have the right condition, like i < 10, but we forget to add the third part. So, we don't increment i.
for (let i = 0; i < 10; ) {
  // We don't increment i
}
This is exactly like the
whileloop that we had earlier without incrementingi.OR:
for (let i = 0; i > 0; i++){
    console.log('Hello World');
}
Key Takeaway
Be aware of infinite loops. Avoid them, because they can crash your browser or your computer.
For...in Loop
So far you have learned about three kinds of loops in JavaScript:
-
forloops, -
whileloops, and -
do-whileloops.
With all these loops, we can repeat an action a number of times.
But we have two more kinds of loops in JavaScript, and we use them to iterate over the properties of an object or elements in an array.
Let me show you. In this lecture, we're going to look at the for...in loop.
The for...in Loop for Objects
-
Let's say we have an object like
person, with two properties:name('Mosh') andage(30).const person = { name: 'Mosh', age: 30 }; -
Let's say we want to display all the properties of this
personobject. That's when we use thefor...inloop. -
So,
for, and now in parentheses, unlike theforloop that we learned about earlier, we don't have three parts. We don't have that initial expression followed by a semicolon, the condition followed by the increment part. It looks a little bit different, let me show you. -
We have
let key in person. In every iteration, thiskeyvariable will hold one of the properties in thispersonobject. Let me show you.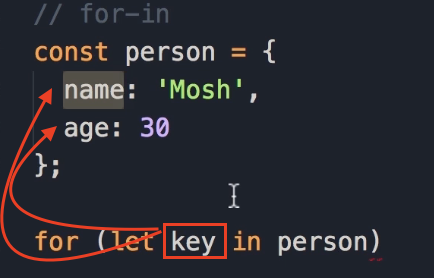
-
Here I'm going to do a simple
console.logofkey.const person = { name: 'Mosh', age: 30 }; for (let key in person) { console.log(key); } -
Save the changes.
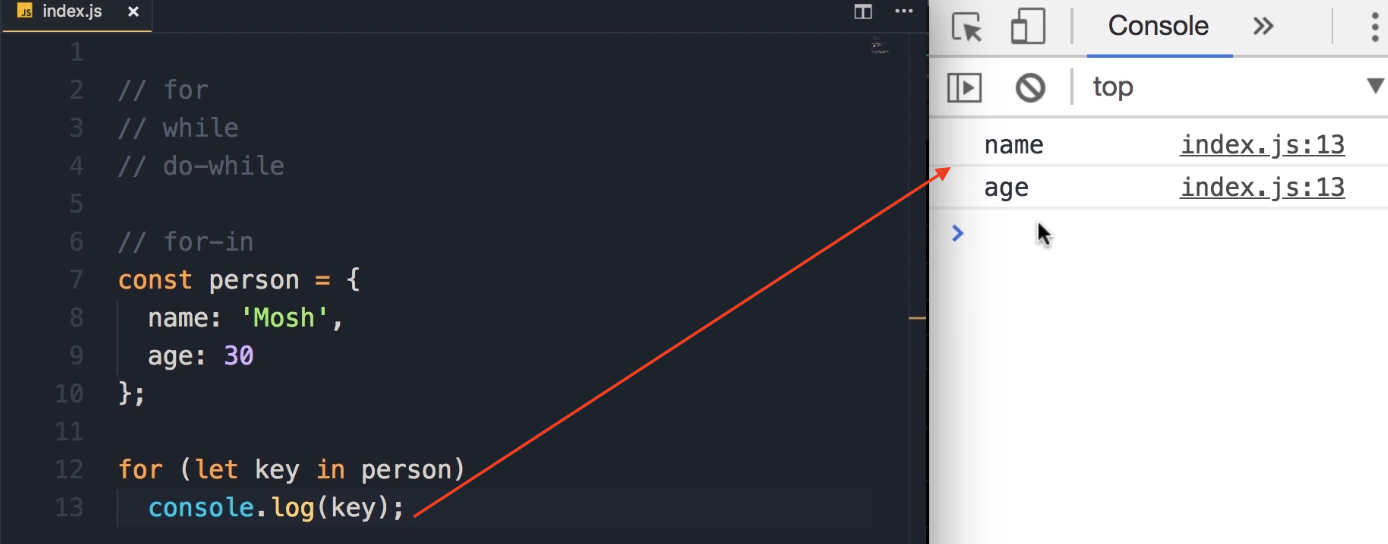
Expected Output:
name ageSo in the first iteration,
keyisname, and in the second iteration, it isage.
Displaying Property Values
-
Now, what if you want to display the value of each property next to it?
-
Well, earlier you learned that there are two ways to access the properties of an object.
-
We can use the dot notation, which looks like this:
person.name. -
Or we can use the bracket notation:
person['name'], passing the name of the target property as a string.
-
-
Earlier I told you that we use the bracket notation when we don't know ahead of time, at the time of writing code, what property we're going to access. Perhaps the name of the target property is calculated at runtime.
-
Here is a real example. When we iterate over the properties of the
personobject, in each iteration, the value ofkeyis going to be different.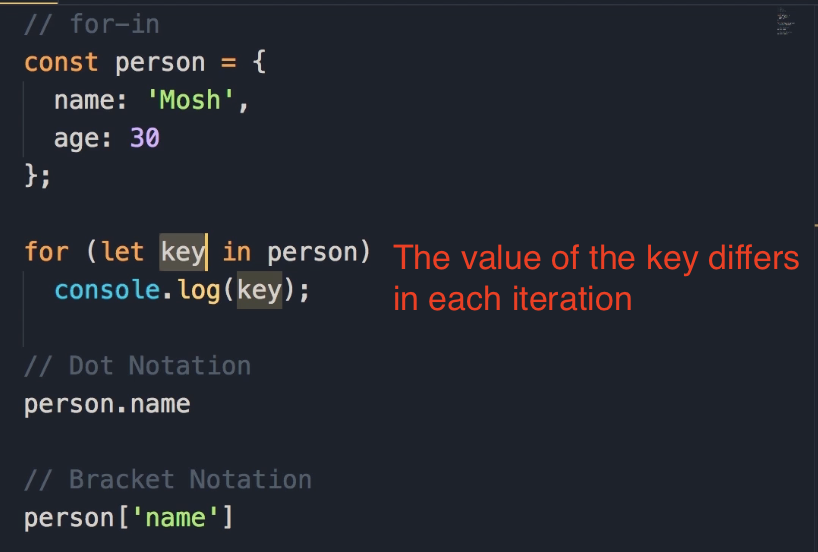
-
So, here we cannot use the dot notation to display the value of this property. In other words, we can't do something like this:
const person = { name: 'Mosh', age: 30 }; // This will not work for (let key in person) console.log(key, person.key);...because we don't have a property called "key" in the
personobject. -
So that's when we use the bracket notation. We add square brackets and pass
keyas the name of the target property. -
Now let me delete this stuff here. Let's log the
keyand the value using bracket notation.const person = { name: 'Mosh', age: 30 }; for (let key in person) { console.log(key, person[key]); } -
Save the changes.
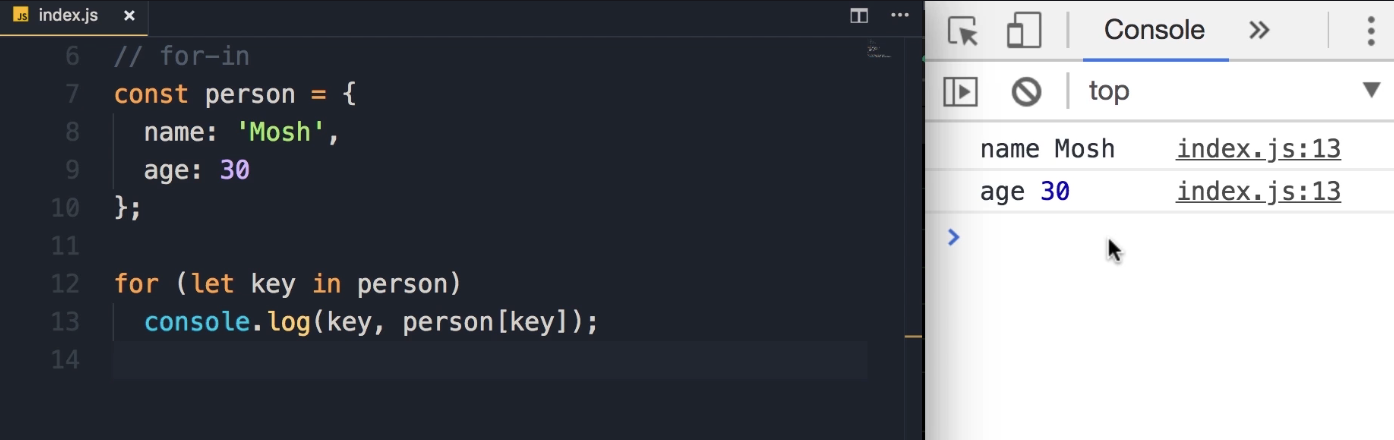
Expected Output:
name Mosh
age 30
So you can see the value of
nameis Mosh and the value ofageis 30.
Key Takeaway:
- This is the
for...inloop, and we use it to iterate over the properties of an object.
Using for...in with Arrays
-
We can also use these to iterate over an array. But it's not an ideal way; in the next lecture, I'm going to show you a better way. But let's see how that works before we finish this lecture.
-
I'm going to define an array called
colorswith three values: 'red', 'green', and 'blue'.const colors = ['red', 'green', 'blue']; -
Now we can use the
for...inloop to iterate over this array.for (let index in colors) { } -
Note that I named this loop variable
index, because in each iteration, thisindexvariable will be set to the index of one of the elements in this array. So it's going to be 0, 1, and 2. -
Let's take a look. So,
console.log(index).const colors = ['red', 'green', 'blue']; for (let index in colors) { console.log(index); } -
Save the changes.

Expected Output:
0
1
2
So, we get 0, 1, and 2.
-
Now, if you want to get the element at a given index, once again we use the square bracket notation. So,
colors[index].const colors = ['red', 'green', 'blue']; for (let index in colors) { console.log(index, colors[index]); } -
Save the changes.
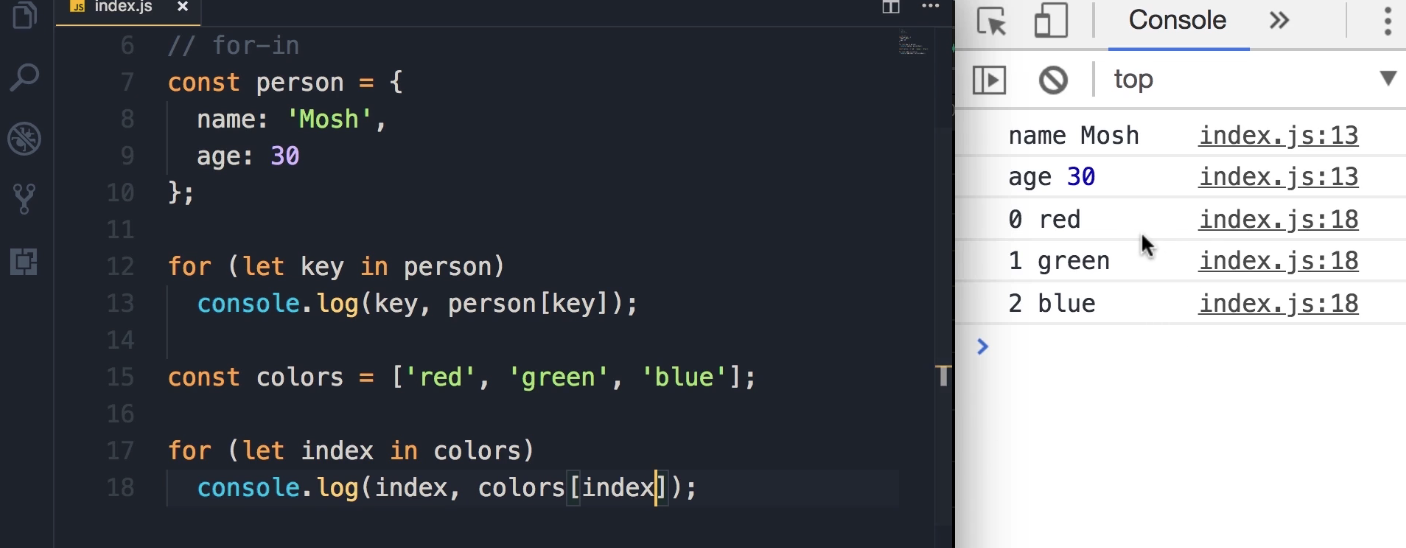
Expected Output:
0 red
1 green
2 blue
And now we can see each element in our
colorsarray.
Preview: The for...of Loop
Now, starting from ECMAScript 6 (or ES6), which is the modern version of JavaScript, we have a new kind of loop that is called the for...of loop, and that is an ideal way to iterate over arrays. That's what you're going to learn in the next lecture.
For...of Loop
Starting from ECMAScript 6 (or ES6), we have a new way to iterate over arrays: the for...of loop. It's very similar to the for...in loop, but instead of the in keyword, we use the of keyword.
Iterating an Array with for...of
-
Given our
colorsarray:const colors = ['red', 'green', 'blue']; -
We can write a
for...ofloop to iterate over it.for (let color of colors) { console.log(color); }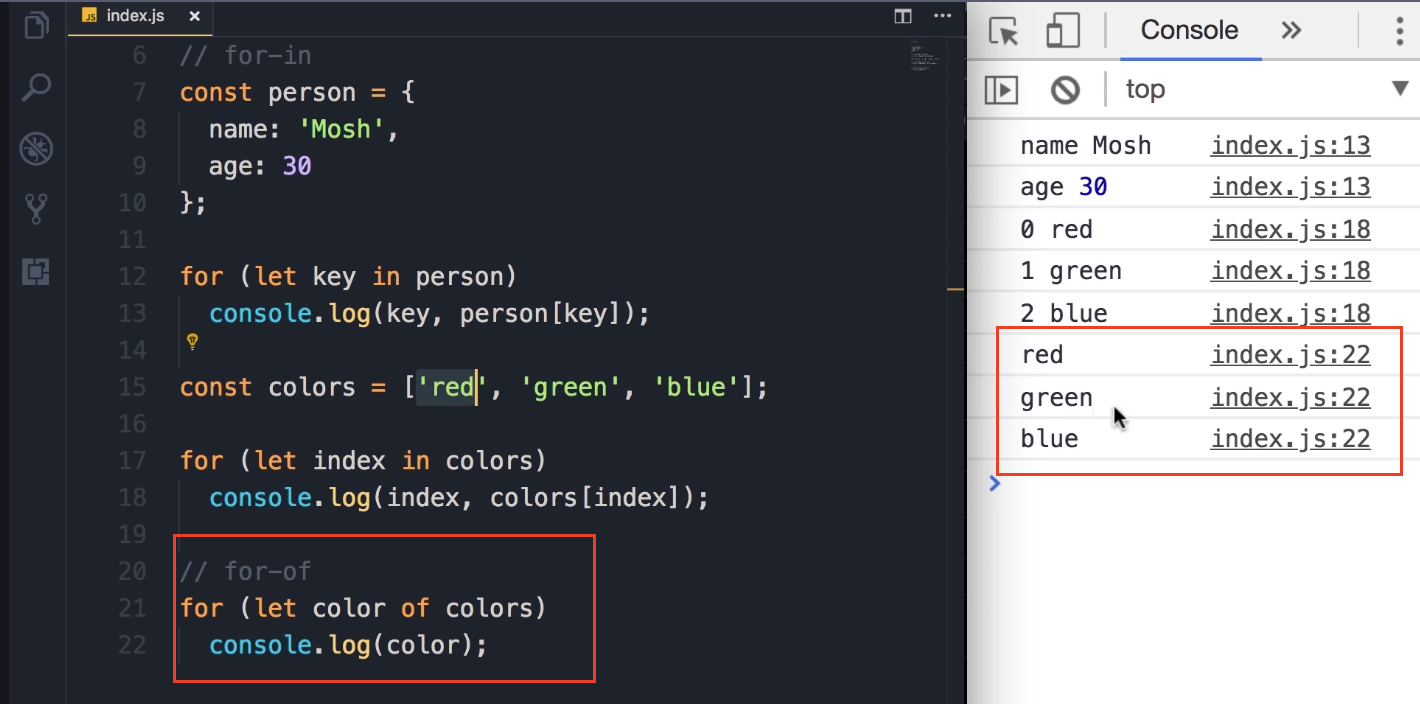
-
Explanation:
-
You can see with this new
for...ofloop, we don't have to deal with the index. We don't have to access the element at a given index (e.g.,colors[index]). -
In each iteration, the
colorvariable (our loop variable) will hold one of the items in the array.
-
-
Expected Output:
When this code is run (or "when I save the changes"), you see the items logged directly to the console:
Output:
red
green
blue
Key Takeaway: for...in vs. for...of
To summarize everything:
-
We use the
for...inloop to iterate over the properties of an object. -
We use the
for...ofloop to iterate over the elements or items in an array.
The break and continue Keywords
With all the loops you have learned about, there are two keywords, break and continue, that can change how the loop behaves.
In this demo, I'm going to use a while loop, but what you're going to learn applies to all loops we have learned in this section.
Basic Loop Setup
-
Let's start by declaring a variable called
iand initializing it to 0. -
Now, we put this in a
whileloop. As long asiis less than or equal to 10, we're going to displayion the console and then increment it.let i = 0; while (i <= 10) { console.log(i); i++; } -
Save the changes. This gives us the numbers 0-10.
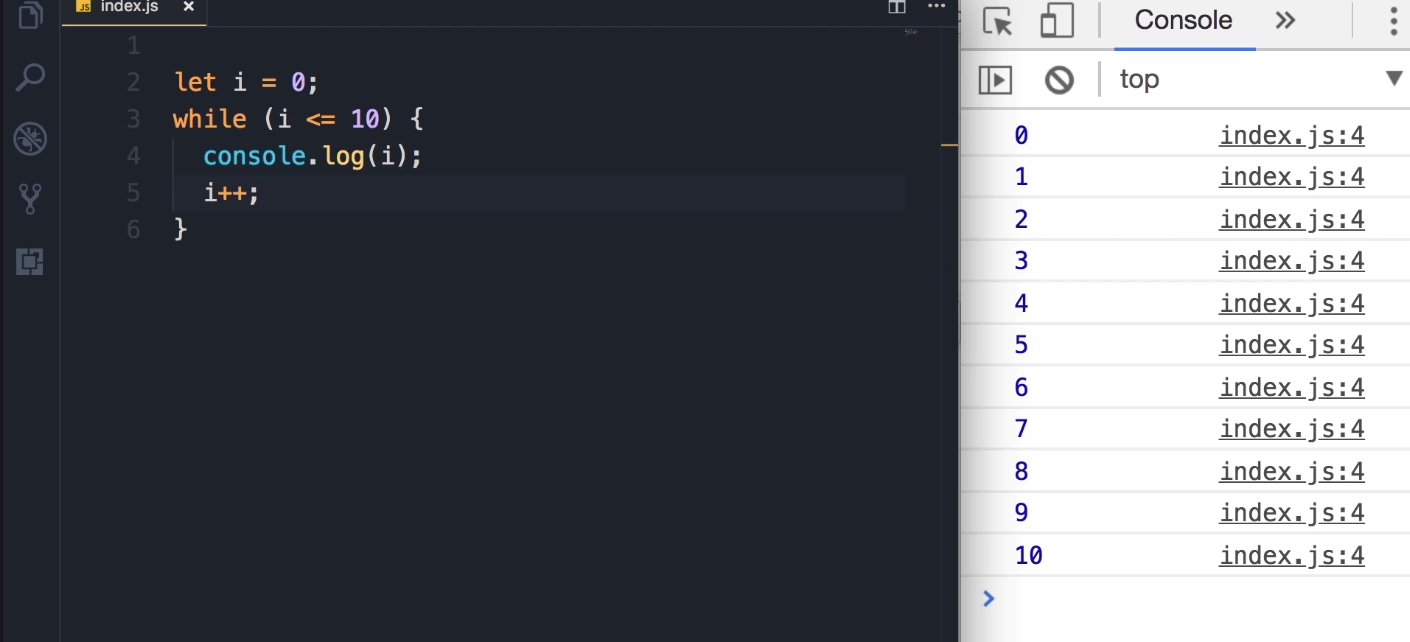
Output:
0
1
2
3
4
5
6
7
8
9
10
Using the break Keyword
Now, sometimes you want to jump out of a loop for some reason that may happen at runtime.
-
For example, here we can have an
ifstatement with a condition. Let's say ifiequals 5, we want to jump out of this loop. That's where we use thebreakkeyword.let i = 0; while (i <= 10) { if (i===5) break; console.log(i); i++; } -
We will modify the loop to add the
ifstatement inside the loop, after the increment, so it stops after printing4. -
Now when we save the changes, see what happens. We get the numbers 0 to 4.
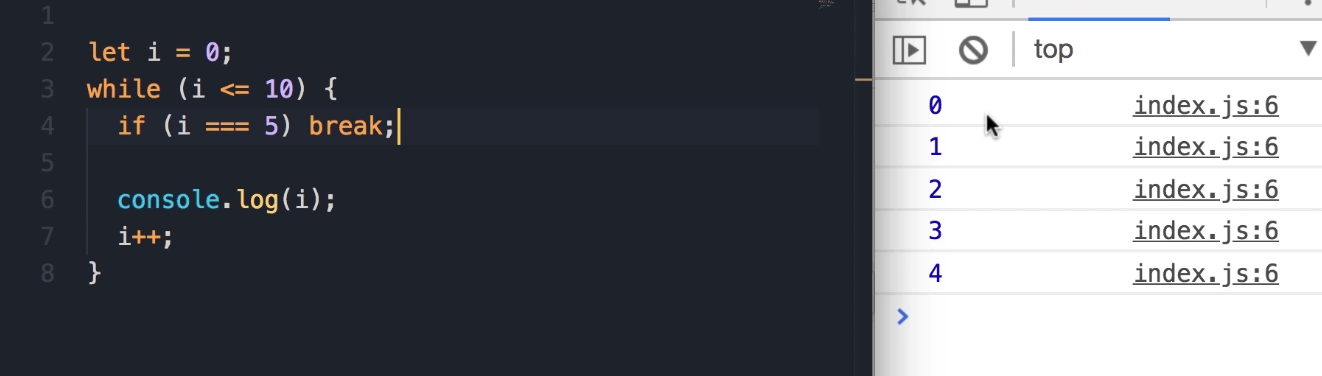
Output:
0
1
2
3
4
Using the continue Keyword
Now, let me comment this out and look at the continue keyword.
let i = 0;
while (i <= 10) {
   // if (i===5) break;
   if (i%2===0){
    i++;
    continue;
   }
   console.log(i);
   i++;
}
-
I'm going to write another
ifstatement. I want to see ifiis an even number or not. So,imodulus 2 equals 0. -
If that's the case (if
iis even), I want to incrementiand thencontinue. Thecontinuekeyword will jump to the beginning of the loop, skipping the code that comes after it. -
To get this to work and only log the odd numbers, the code needs to handle incrementing in two places:
-
once for the even numbers before continuing, and
-
once for the odd numbers after logging.
-
-
Save the changes. We only get the odd numbers.
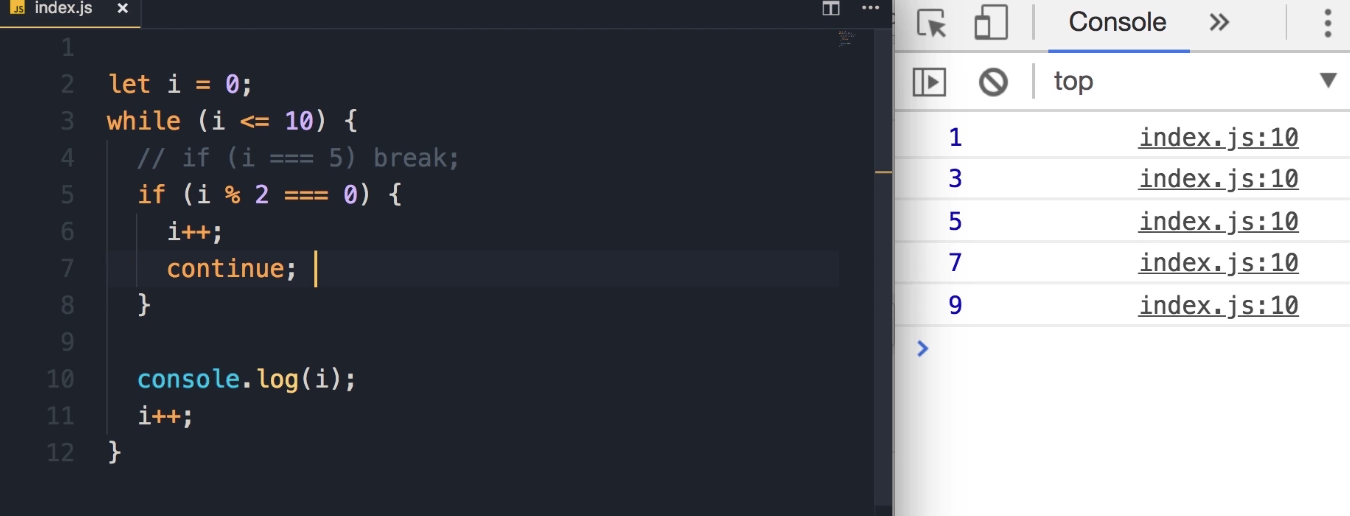
Output:
1 3 5 7 9 -
Why is that? Alright, let's take a look at an example.
-
When
ibecomes 2, it's an even number. -
At this point, we increment
i, soiwill be 3. -
Now when the JavaScript engine sees the
continuekeyword, it will jump to the beginning of the loop and continue its execution in the next iteration. -
At this point
iis 3, so thisifstatement is not executed. That's why we seei(which is 3) on the console.
-
Note on continue :
In my personal experience, continue is not something you will use that often. It's one of those old, legacy things in JavaScript. I'm only explaining it here in case you see it in projects you're working on. It's not something that I recommend you to use; it's an ugly way of writing code.
Key Takeaway Just to recap:
-
With the
breakkeyword, you jump out of a loop. -
With the
continuekeyword, we jump to the next iteration.
JavaScript Exercises
Exercise Description 1 : Max of 2 numbers
Here's an exercise for you:
Write a function that takes two numbers and returns the maximum of the two. Call that function, give it different arguments, and make sure it's working properly.
Solution 1
Step 1: Defining the max Function
I'm going to start by defining a function, call it max. Here we need two parameters. We can call them number1 and number2, or we can use shorter names like a and b.
A Note on Variable Names: Earlier I told you not to use mysterious variable names like
aandb, but in this particular case, it doesn't really matter. Becauseaandbare kind of self-explanatory, we are not dealing with a complex logic; we don't have to guess whataandbare.
In this function, we want to have some logic to compare the value of a with b, so we're going to use an if statement.
function max(a, b) {
  if (a > b)
    return a;
  else
    return b;
}
That's the simplest implementation. It's not the best way; we're going to optimize this step-by-step.
Step 2: Testing the Function
Before going any further, let's make sure that this function actually works. I'm going to declare a variable called number and set it to max of 1 and 2. Now let's display number on the console.
let number = max(1, 2);
console.log(number);
Testing Case 1: Second argument is greater
-
Code:
max(1, 2) -
Expected Output:
2
Testing Case 2: First argument is greater
-
Code:
max(3, 2)(changing 1 to 3) -
Expected Output:
3
Testing Case 3: Both arguments are equal
-
Code:
max(3, 3) -
Expected Output:
3
Key Takeaway: The Importance of Testing
Did you notice how I called this function with different arguments? I called it with different test cases.
-
First, I assumed that the second argument is greater.
-
Then, I assumed if the first argument is greater.
-
And finally, I assumed that both arguments are equal.
Note: When writing code, when writing functions, you should test your functions with different possible values.
Step 3: Code Optimization (Removing else)
Now, let's get back to this max function and clean up this code.
The first thing I want to improve here is to remove this else keyword. Why?
-
Because if
ais greater thanb, we're going toreturn a. -
When we
return a, we'll jump out of this function. -
So none of the code after that line will be executed; in fact, it will never get to this point.
So we don't really need the else keyword. If a is greater than b, we'll return a, otherwise, we'll return b.
function max(a, b) {
  if (a > b)
    return a;

  return b;
}
This is a cleaner implementation.
Step 4: Code Optimization (Using the Conditional Operator)
But hey, we can make this even cleaner. Earlier we learned about the conditional operator. Remember this ?
We add a condition in parenthesis, then a question mark (?). If this condition evaluates to true, we use one value, otherwise (using a colon :) we use the other value.
We can rewrite these two lines using our conditional operator.
-
What is the condition here?
(a > b) -
If this condition is true, we want to return
a. -
Otherwise, we want to return
b.
All we need here is a return statement and to terminate this with a semicolon.
function max(a, b) {
  // This line is exactly equivalent to the previous two lines.
  return (a > b) ? a : b;
}
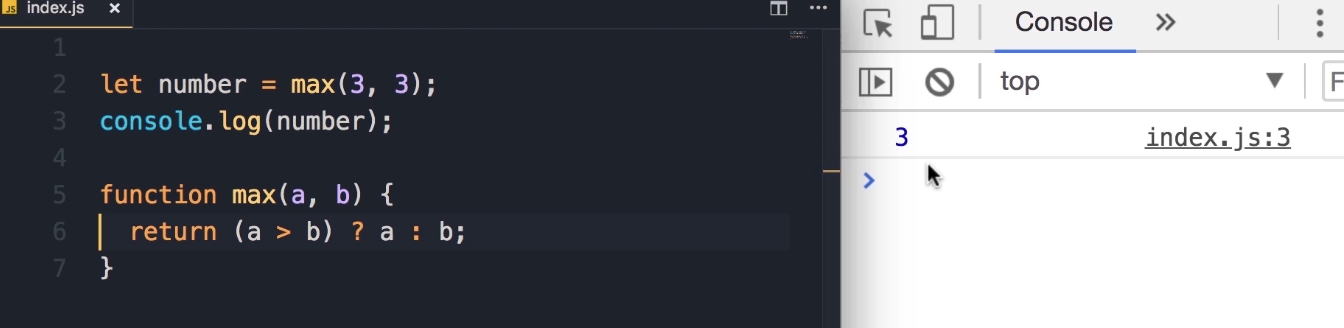
Step 5: Testing the Final Optimized Function
Now, save the changes and let's try another test case.
Test 1: Equal arguments
-
Code:
let number = max(3, 3); -
Output:
3
Test 2: First argument larger
-
Code:
let number = max(5, 3); -
Output:
5
Test 3: Second argument larger
-
Code:
let number = max(5, 10); -
Output:
10
Beautiful. So our function is working.
Exercise 2 : isLandscape Function
Here is another exercise. I want you to:
Implement the function isLandscape. It takes two parameters, width and height of an image, and returns true if the image is landscape (which means width is greater than height), otherwise it returns false.
Note: Now you may think this is similar to the exercise in the last lecture, in fact it is. But I want you to do this exercise because I'm going to give you a simple and effective tip to write better code.
Solution 2
Alright, so similar to the last lecture, we can start with a simple if and else.
-
Initial if/else Implementation
So if width is greater than height, you want to return true, otherwise we want to return false.
function isLandscape(width, height) { if (width > height) return true; else return false; } -
Conditional Operator Implementation
But I told you that in this case we can use the conditional operator. So, we add the condition if width is greater than height, we can return true, otherwise we'll return false. And here's our return statement, right?
(condition)? if true : if falsefunction isLandscape(width, height) { return (width > height) ? true : false; }So here's the implementation of this function.
Key Takeaway: A Tip for Better Code
However, code like this looks very amateurish. You don't want to return true or false explicitly. This is very ugly. Why? Well, let me show you.
We can completely delete this part here (? true : false) and simply return the value of this expression.
Final, Optimized Implementation
function isLandscape(width, height) {
  return (width > height);
}
Explanation:
If width is greater than height, this expression (width > height) will be evaluated to true. So, you will simply return true. Otherwise, if width is less than height, this expression will evaluate to false, so it will return false.
So there is really no need to explicitly return
trueandfalsehere, that's a poor way of writing code.
Testing the Function
So, now we have this function, let's test it.
-
We can do a
console.log, simply call this function hereisLandscape, I'm going to pass these dimensions 800 by 600. So we expecttrueon the console.console.log(isLandscape(800, 600));Save the changes, here's
true- Expected Output:
true
- Expected Output:
-
Now let's change the width to, let's say, 300. Now we have a vertical image.
console.log(isLandscape(300, 600));Save. So we get
false.- Expected Output:
false
- Expected Output:
Exercise 3: The FizzBuzz Algorithm
This next exercise is a very popular interview question called the FizzBuzz algorithm.
We have this function called fizzBuzz that we give an input to, and it returns a string.
Let me show you how that works. Let's declare a constant called output and call fizzBuzz, passing an input like 3. Then, we log the output on the console.
// Initial setup to test the function
const output = fizzBuzz(3);
console.log(output);

function fizzBuzz(input){ ...
}
Let's see what we get.

We get Fizz.
Exercise Description
Here are the requirements for the fizzBuzz function:
-
If the number that we're passing is divisible by 3, we get
Fizz.- Example:
fizzBuzz(3)=>Fizz
- Example:
-
If the number that we pass is divisible by 5, we get
Buzz.- Example:
fizzBuzz(5)=>Buzz
- Example:
-
If the number that we're passing is divisible by both 3 and 5, we get
fizzBuzz.- Example:
fizzBuzz(15)=>FizzBuzz
- Example:
-
If the number is not divisible by either 3 or 5, we're going to get the same number back.
- Example:
fizzBuzz(7)->7
- Example:
-
If we don't pass a number (e.g., we pass a string, a boolean, or anything that is not a number), we should get this message:
Not a number.
Student Pause Point: I want you to pause and spend 10-15 minutes on this exercise, and when you're done, come back and continue reading the solution below.
Solution 3
Alright, let's see how we can implement this fizzBuzz function.
Step 1: Check the Input Type
First, we want to see if the input is a number or not. Because if it's not a number, then we don't care about dividing that number by 3 or 5.
-
For that, we use the
typeofoperator. -
So, if
typeof inputis not'number', we want to return the message:Not a number. -
That's the first
ifstatement in this function.
function fizzBuzz(input) {
  if (typeof input !== 'number') {
    return 'Not a number';
  }
}
Step 2: Add Logic for Divisibility (Initial Attempt)
Now, if we get to this point, that means we have a number. We want to see if this number is divisible by 3, 5, both of them, or none of them.
-
We can write the
ifstatements like this: -
If
input % 3 === 0, that means this number is divisible by 3, so wereturn 'Fizz'. -
Similarly, we have another
ifstatement. Ifinput % 5 === 0, we're going toreturn 'Buzz'. -
Next, we want to see if this number is divisible by both 3 and 5. So, if
input % 3 === 0andinput % 5 === 0.-
Teaching Tip: Here we're dealing with a complex expression. To make this code more readable, I would like to put each expression in parenthesis, like this:
(input % 3 === 0) && (input % 5 === 0). -
IDE Tip: We can select an expression and type the opening parenthesis
(, and this automatically adds the closing parenthesis. That's a quick tip for you.
-
-
If this number is divisible by both 3 and 5, we want to
return 'fizzBuzz'. -
Finally, if we get to this point, that means the number is not divisible by either 3 or 5. So we simply
returnthe sameinput.
Here is the code from our first attempt:
function fizzBuzz(input) {
  if (typeof input !== 'number') {
    return 'Not a number';
  }

  if (input % 3 === 0) {
    return 'Fizz';
  }

  if (input % 5 === 0) {
    return 'Buzz';
  }

  if ((input % 3 === 0) && (input % 5 === 0)) {
    return 'FizzBuzz';
  }

  return input;
}
Step 3: Testing and Debugging
Now let's test this function.
-
Test Case:
false-
Initially, let's pass
false. We should getNot a numberon the console. -
const output = fizzBuzz(false);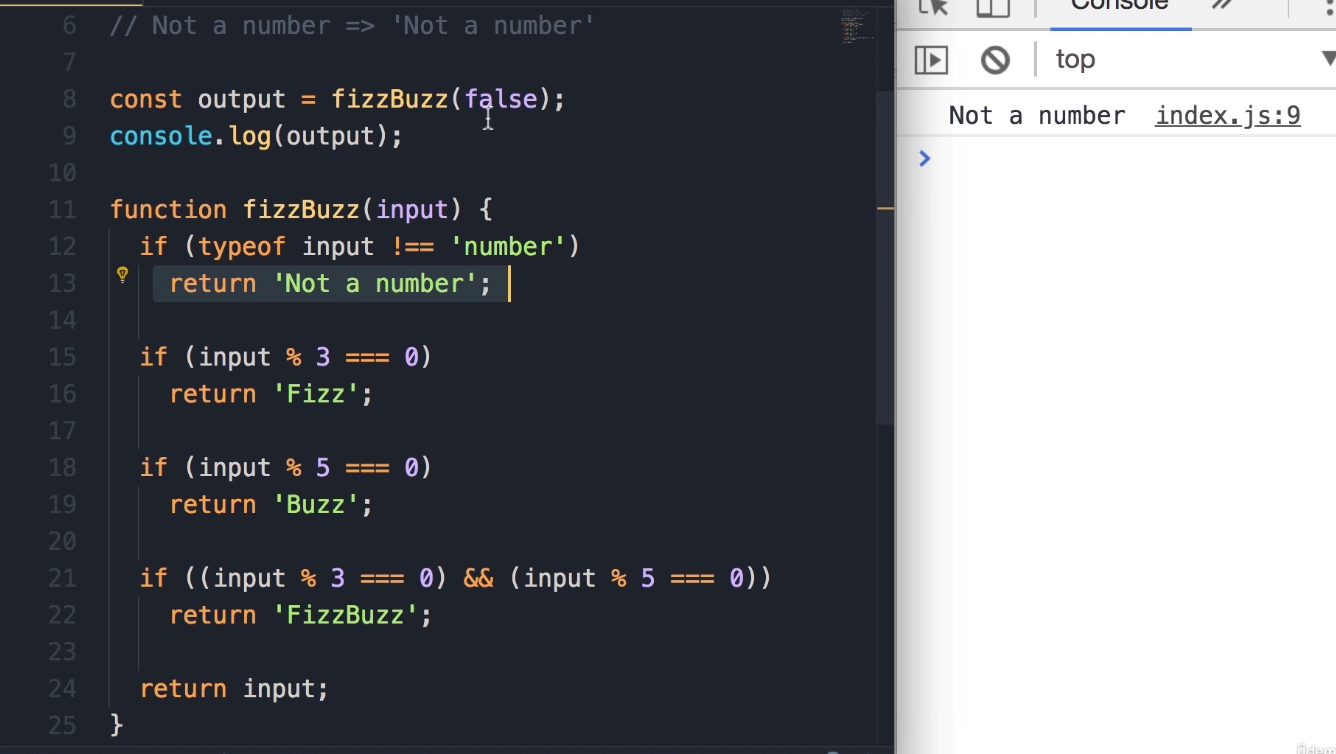
-
Result:
Not a number.
-
-
Test Case:
3and5-
const output = fizzBuzz(3); -
Result:
Fizz. -
fizzBuzz(3)->Fizz. -
fizzBuzz(5)->Buzz.
-
-
Test Case:
15🚨(The Bug) 🚨-
What if we pass
15?15is divisible by both 3 and 5, so we should getfizzBuzz. -
const output = fizzBuzz(15);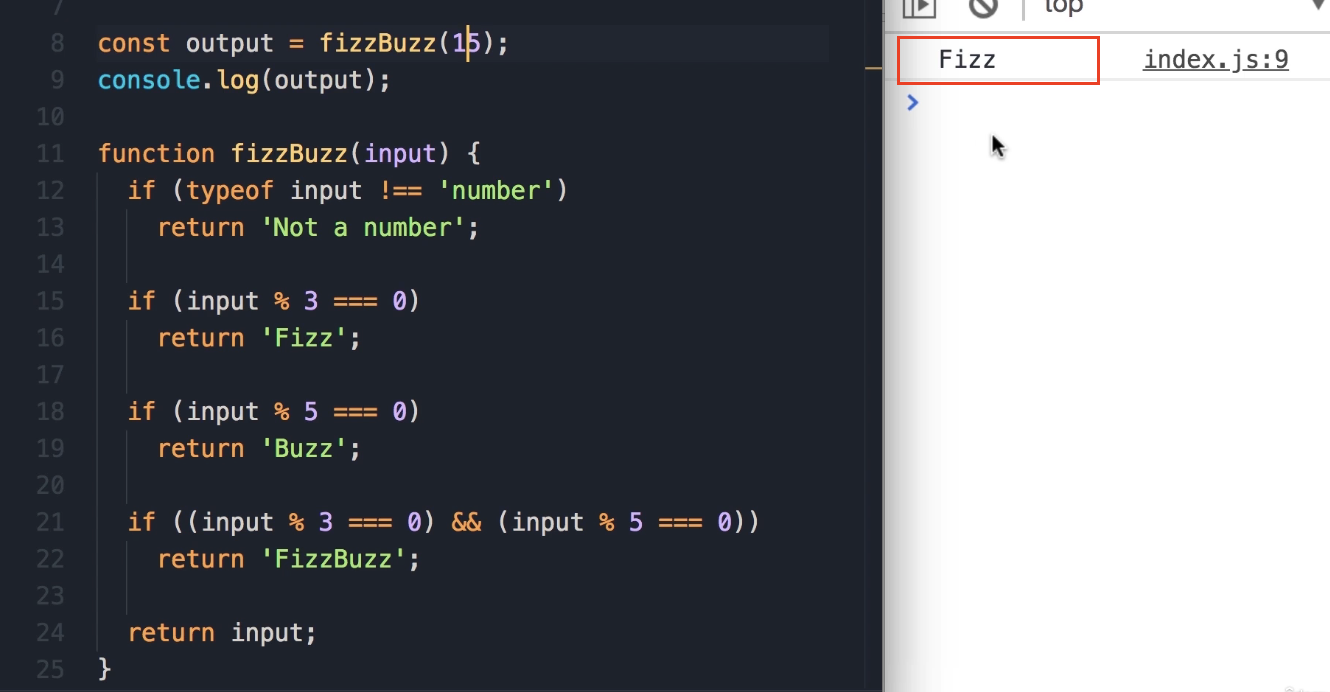
-
Result:
Fizz. -
Wait a sec, what happened here? We got
Fizzwhen we expectedfizzBuzz. -
Debugging the Logic: The reason for that is because of how we have ordered our
ifstatements. In this case,15is divisible by 3, so this firstifstatement (if (input % 3 === 0)) is executed, and here we immediatelyreturn 'fizz'. The function execution stops, and the otherifstatements are never checked. (see the image or code above)
-
Step 4: Fixing the Bug (Code Optimization)
To solve this problem, we need to move the most specific if statement to the top. The check for divisibility by both 3 and 5 is the most specific one.
-
Select the two lines for the
fizzBuzzcheck.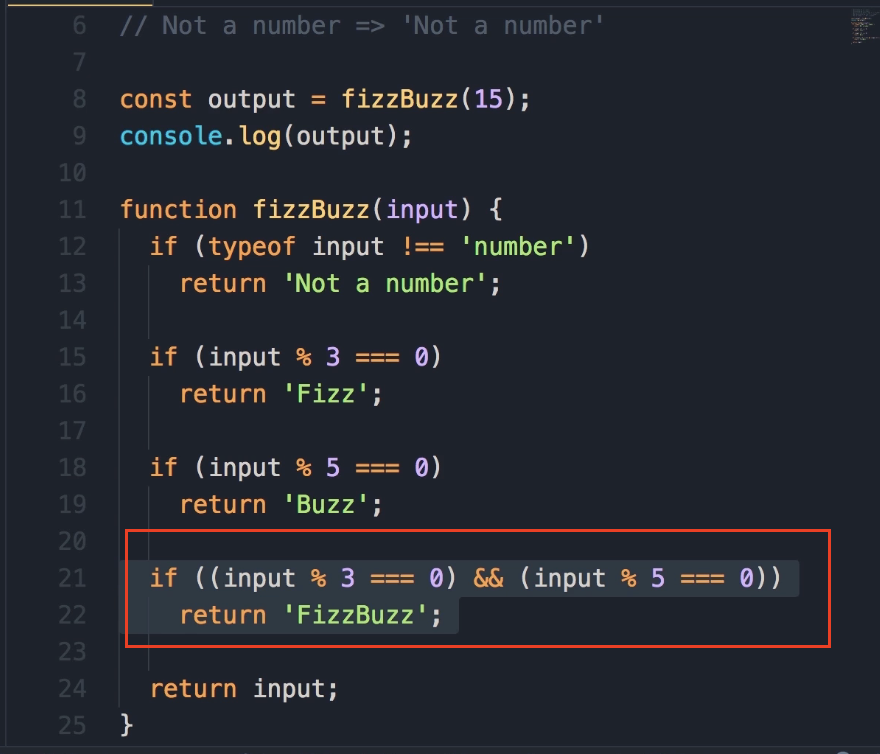
-
To move this code up, we can simply press the alt key and the up arrow. Simple as that.
-
We will move this block to be the first check after the
typeofvalidation.
Here is the corrected code:
function fizzBuzz(input) {
  if (typeof input !== 'number') {
    return 'Not a number';
  }

  // Moved this block to the top
  if ((input % 3 === 0) && (input % 5 === 0)) {
    return 'fizzBuzz';
  }

  if (input % 3 === 0) {
    return 'fizz';
  }

  if (input % 5 === 0) {
    return 'buzz';
  }

  return input;
}
Step 5: Retesting the Function
-
Test Case:
15(Fixed)-
Now, let's save the changes.
-
const output = fizzBuzz(15); -
Result:
FizzBuzz. Okay, the problem is solved.
-
-
Test Case:
7-
What if we pass a number that is not divisible by 3 or 5? Let's say
7. -
const output = fizzBuzz(7); -
Result:
7. We get the same input.
-
So this is the FizzBuzz algorithm that you see in a lot of programming interviews.
Key Learning: The NaN Value
Now I want to show you something. In JavaScript, we have this special value called NaN, which stands for "Not a Number".
-
Here, I'm going to replace the string
"Not a number"withNaN.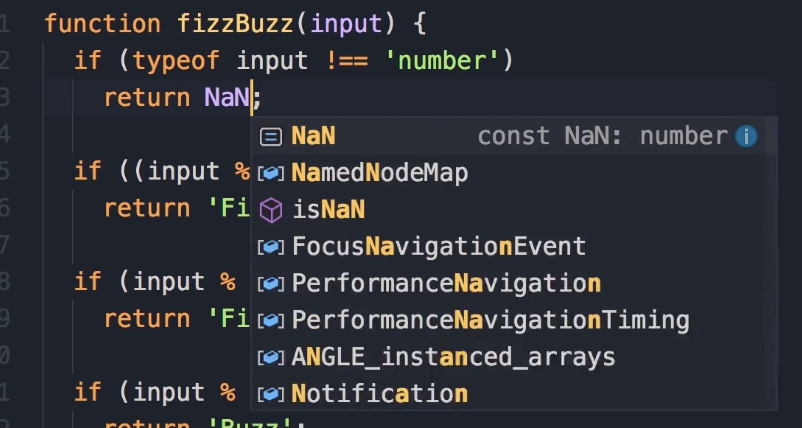
-
Whenever you're dealing with some mathematical calculation, if the result is not a number, this value is returned. So we can use this same value instead of returning a string.
-
This was not part of the exercise, it's something that I'm teaching you now.
Here is the final version of the code:
function fizzBuzz(input) {
  if (typeof input !== 'number') {
    return NaN; // Return the special NaN value
  }

  if ((input % 3 === 0) && (input % 5 === 0)) {
    return 'fizzBuzz';
  }

  if (input % 3 === 0) {
    return 'fizz';
  }

  if (input % 5 === 0) {
    return 'buzz';
  }

  return input;
}
Let's save the changes. Now, instead of passing a number, let's pass false.
const output = fizzBuzz(false);
console.log(output);
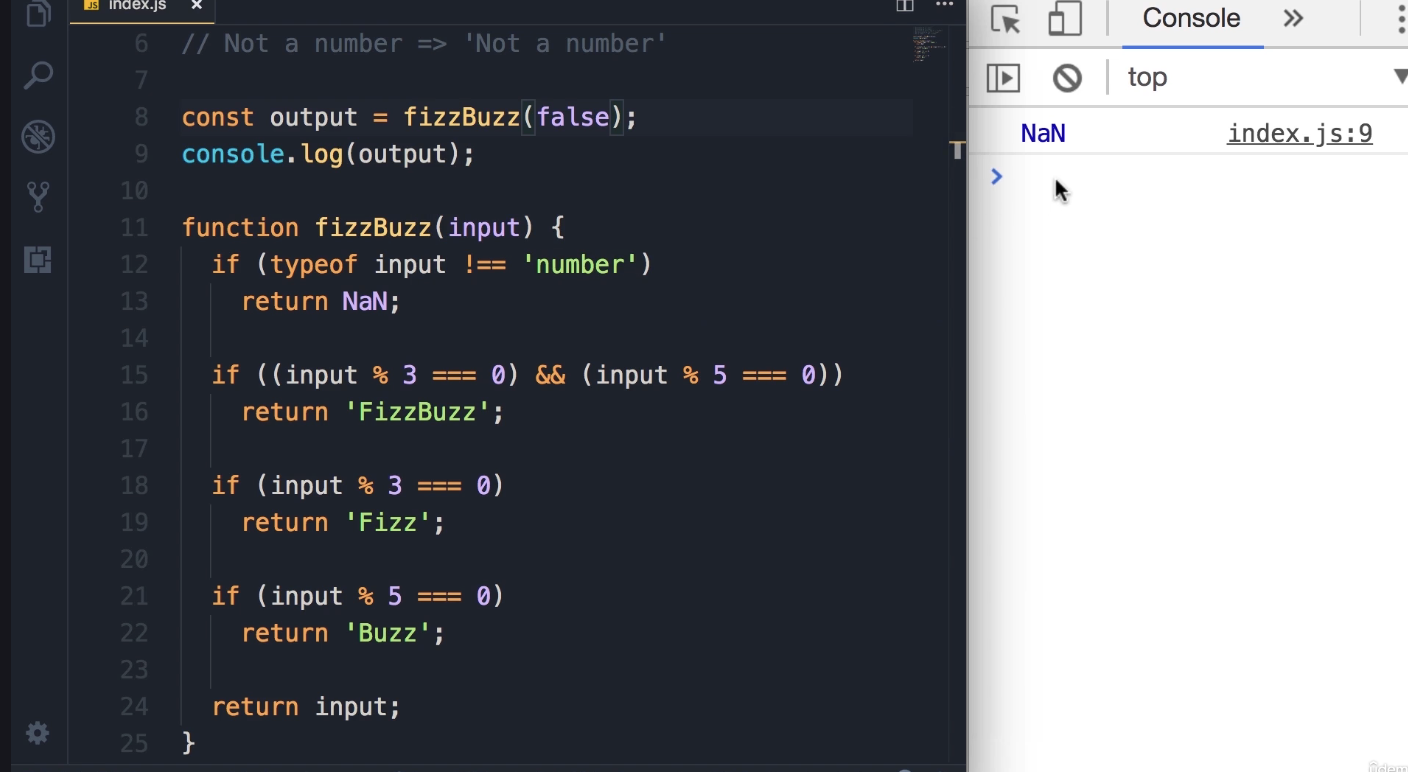
Now we get NaN.
Key Takeaway: Let's take a look at the type of this value.
console.log(typeof NaN);Weirdly enough, the type of this value is... a
'number'. The value is just something specific that is not a valid mathematical number.
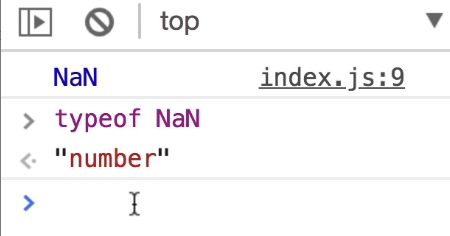
Exercise 4: checkSpeed Function
Alright, here's another exercise, but this exercise is a little more complicated than the earlier exercises.
Exercise Description
-
We need to implement a function called
checkSpeed, which takes one parameter:speed(the speed of a car). -
In this program, we are assuming the speed limit is 70 km/h.
-
If a car is driving under the speed limit, we should get an "Ok" message on the console.
-
Similarly, if we pass 70 (driving exactly at the speed limit), we're still good and should get the "Ok" message.
-
For every 5 kilometers above the speed limit, the driver is going to get 1 point.
-
checkSpeed(75)should result in 1 point.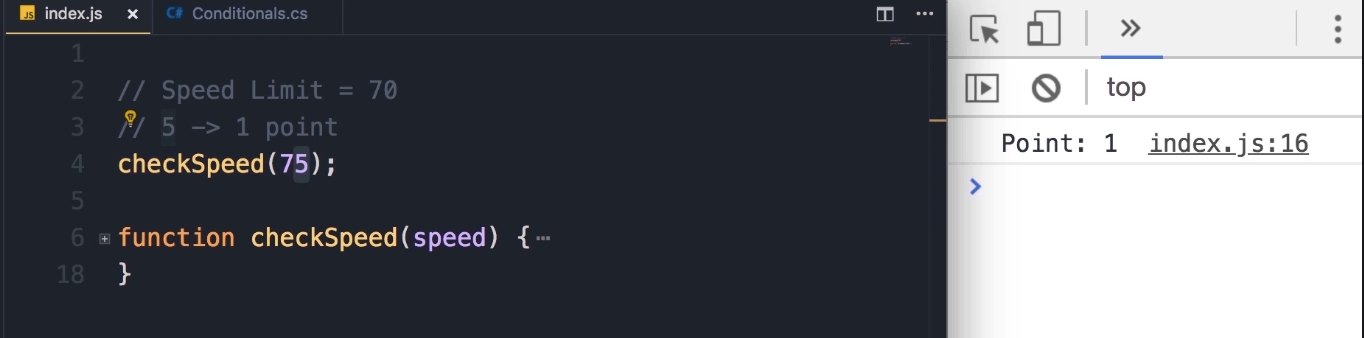
-
checkSpeed(72)is still good (not yet a full 5 km over).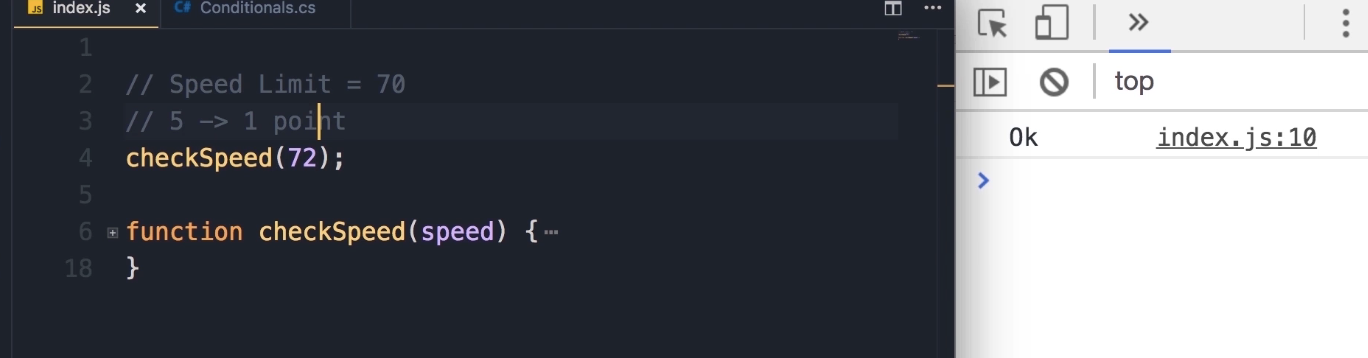
-
-
As part of calculating the point, you will have to use one of the built-in functions in JavaScript:
Math.floor(). We can give this function a floating-point number (like 1.3 points), and this will convert that to the greatest integer.-
Math.floor(1.3) -
Output:
1
-
-
If you pass 80, we should get 2 points.
-
If a driver gets more than 12 points, their license should be suspended.
-
checkSpeed(180)should result in "License Suspended".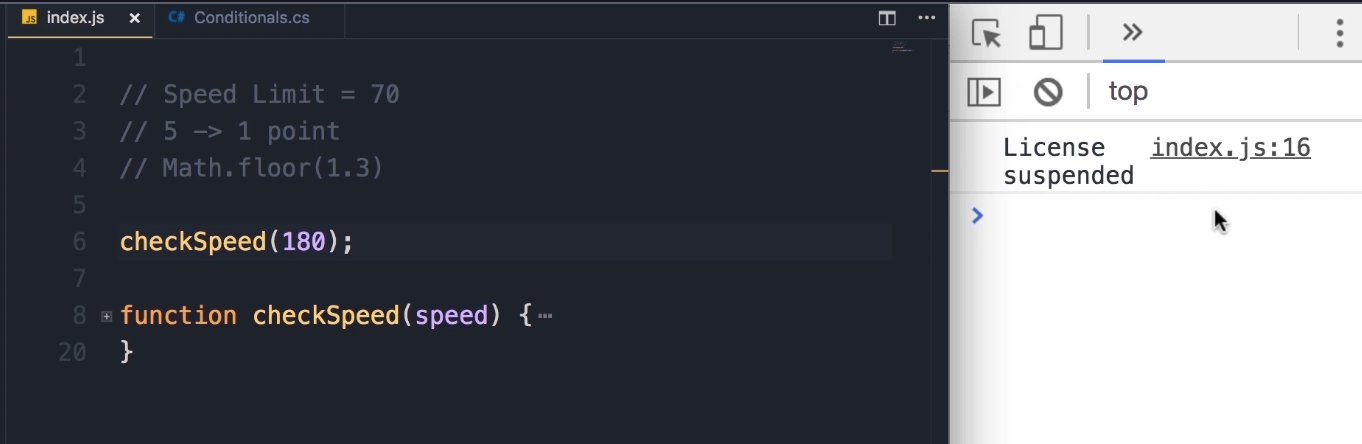
-
Pause and Try: I want you to spend 15-20 minutes to do this exercise. Once you're done, come back and see the solution.
Solution 4
Alright, now let's see how I solved this problem.
-
First, let's define the function:
function checkSpeed(speed) { } -
We want to see if the speed is less than the speed limit.
function checkSpeed(speed) { if (speed < 70) { console.log('Ok'); } } -
Refactoring Magic Numbers (Part 1)
The first thing I want to improve here is to turn this "magic number" (70) into a constant. Someone else looking at this code may not know what 70 represents.
You should avoid using magic numbers in your code; always use constants to describe them.
function checkSpeed(speed) {
   const speedLimit = 70;
   if (speed < speedLimit) {
       console.log('Ok');
   }
}
With this change, our code is more expressive. Also, if we want to use this number somewhere else in this function, we don't have to repeat it. If tomorrow the speed limit changes to 75, there is only a single place that we have to change.
-
Adding the else Block and Calculating Points
Otherwise (if the speed is not less than the speed limit), we should calculate the points.
function checkSpeed(speed) { const speedLimit = 70; if (speed < speedLimit) { console.log('Ok'); } else { // Simple calculation const points = (speed - speedLimit) / 5; } } -
Refactoring Magic Numbers (Part 2)
Once again, we don't want to use this magic number 5 here; it's not descriptive. We want to turn this into a constant.
function checkSpeed(speed) { const speedLimit = 70; const kmPerPoint = 5; // New constant if (speed < speedLimit) { console.log('Ok'); } else { const points = (speed - speedLimit) / kmPerPoint; } } -
Using
Math.floor()The result of this expression can be a floating-point number. We need to use Math.floor() to convert that to the greatest integer.
// ... inside the else block const points = Math.floor((speed - speedLimit) / kmPerPoint); -
Checking Points and Displaying Output
Now we should check to see if the driver gets 12 or more points.
Key Takeaway: const vs. let
Technically, I could use
letfor points, butconstis better practice to make sure I don't accidentally modify points.constshould be your default choice. If you want to reassign a variable, that's when you use the let keyword.// ... inside the else block const points = Math.floor((speed - speedLimit) / kmPerPoint); if (points >= 12) { console.log('License Suspended'); } else { console.log('Points', points); }
Testing Methodology and Debugging
Now let's test this program. It's very important when we write a function to test it with different values.
-
Test Case 1:
checkSpeed(50);-
Output:
Ok -
So far, so good.
-
-
Test Case 2 (Bug 1):
checkSpeed(70);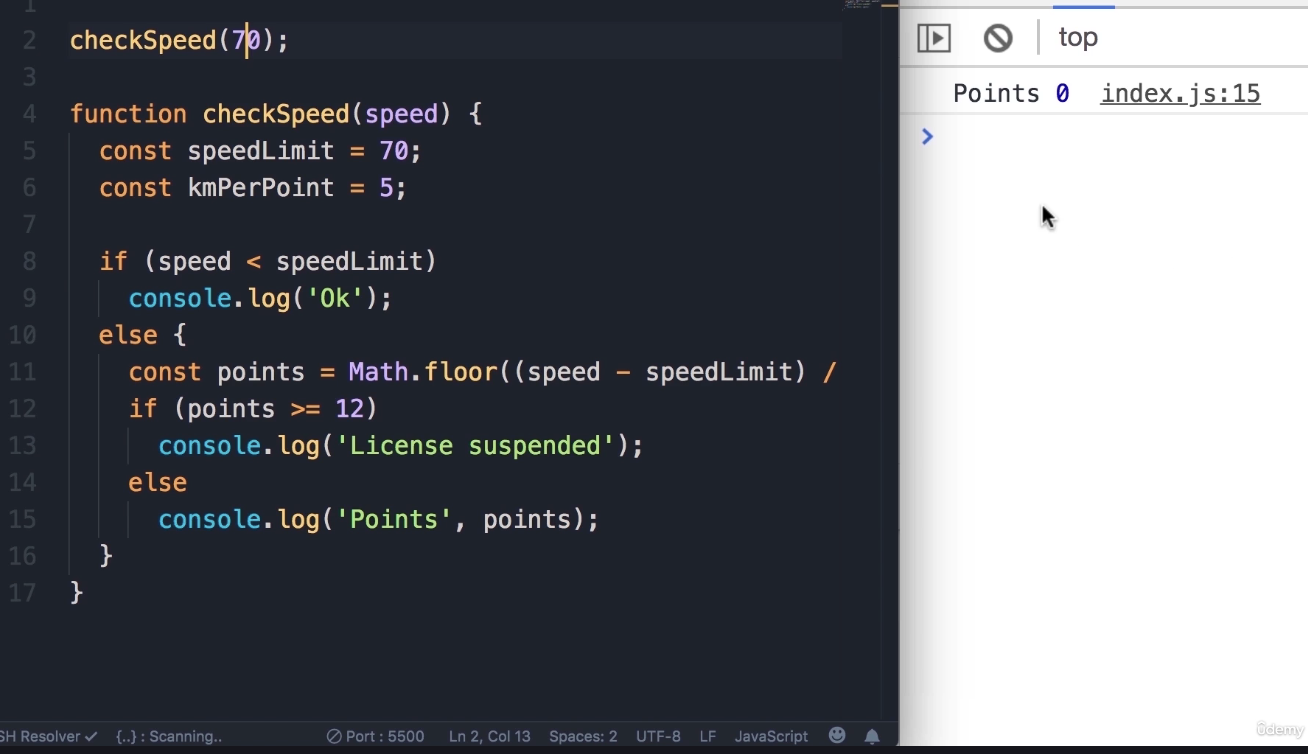
-
Output: (Nothing)
-
Bug: Hmm, that's weird. Instead of getting 0 points, we should get the "Ok" message. There is a bug in our condition.
-
Fix 1: Change
if (speed < speedLimit)toif (speed <= speedLimit).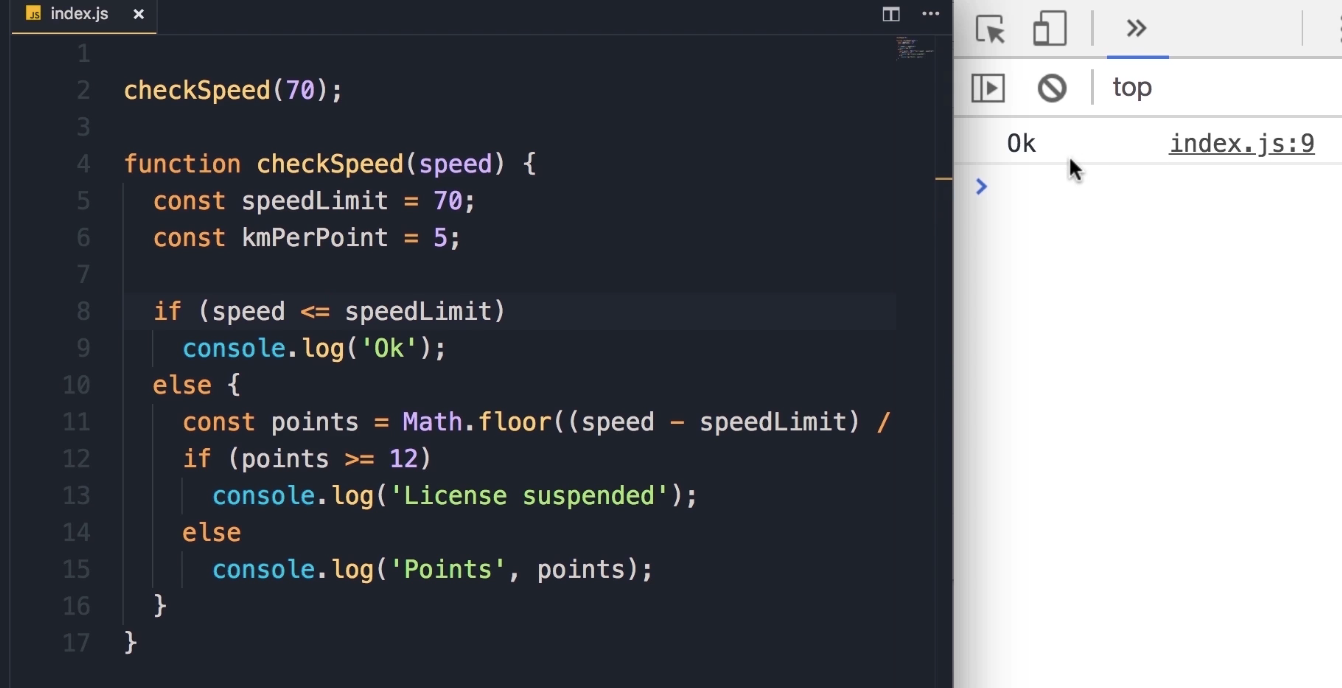
-
Save the changes. Now the bug is solved.
-
-
Test Case 3 (Bug 2):
checkSpeed(71);-
Output:
Points 0 -
Bug: "We got 0 points, so we still have a bug in this function." We should still get the "Ok" message, because starting from 75 we should get the first point.
-
Fix 2 Logic: Well, we should actually change this condition...
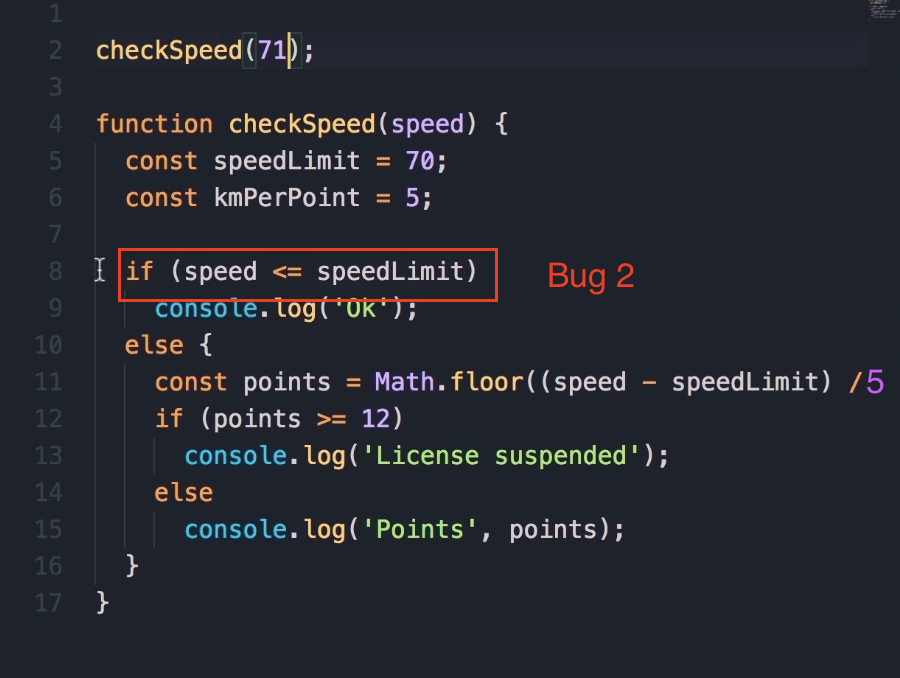
Now understand the code changes very well below:
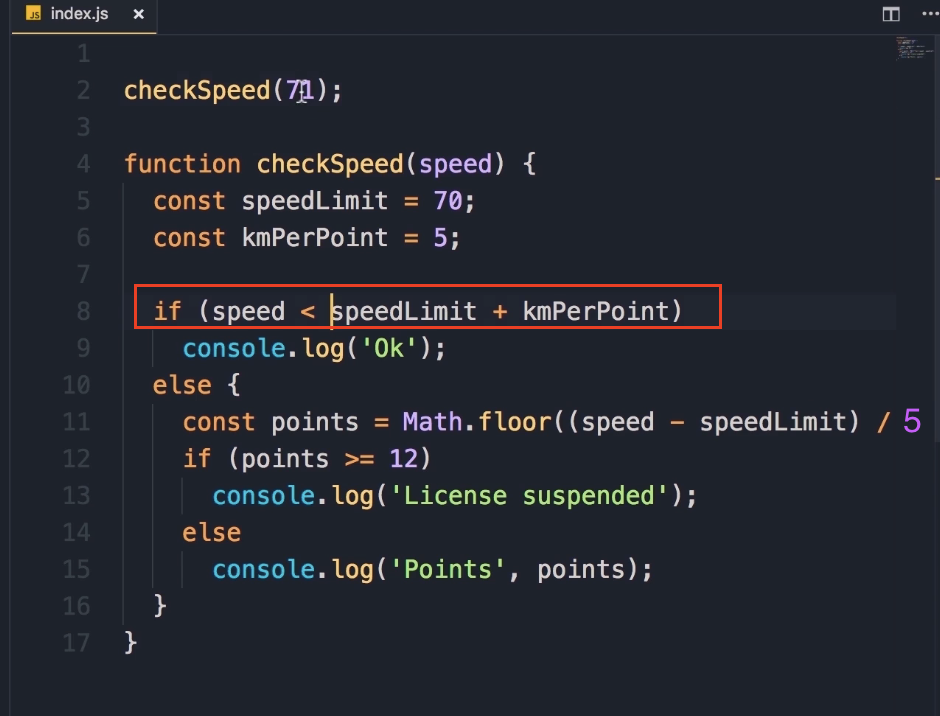
We want to get the
speedLimit(70) and addkmPerPoint(5), so that would give us 75. If we drive less than 75, we are still good. But from 75 km/h or faster, we should get a point.
-
-
Test Case 4:
checkSpeed(71);(After Fix 2)-
Output:
Ok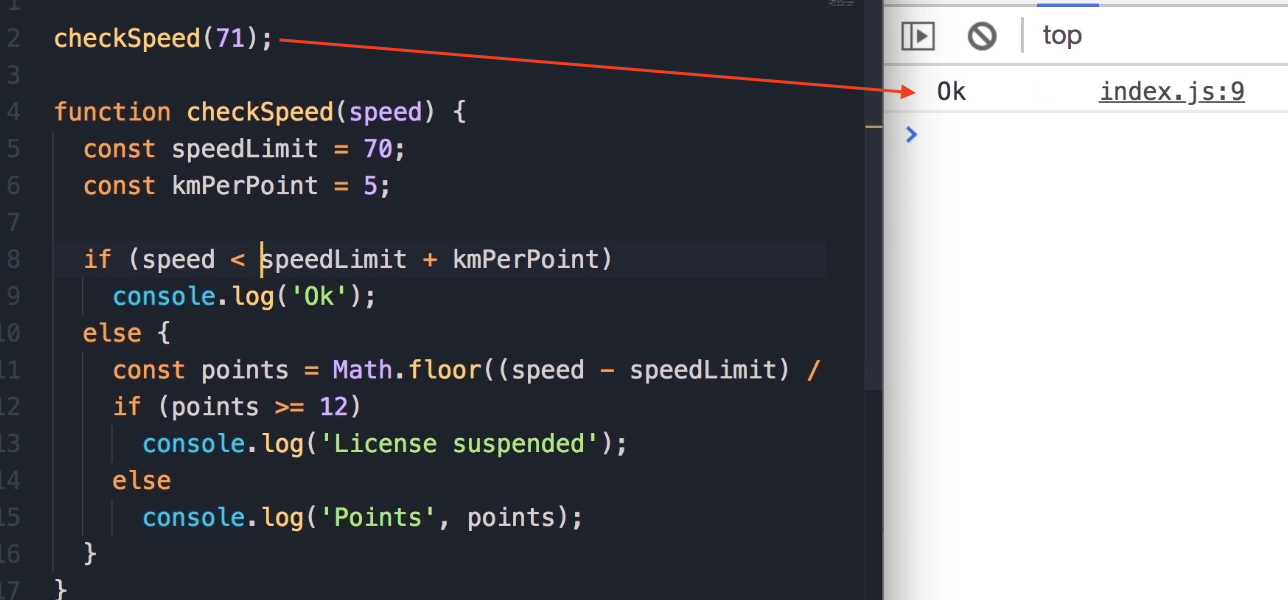
-
"At 71 miles an hour we get the ok message, beautiful."
-
-
Test Case 5:
checkSpeed(75);-
Output:
Points 1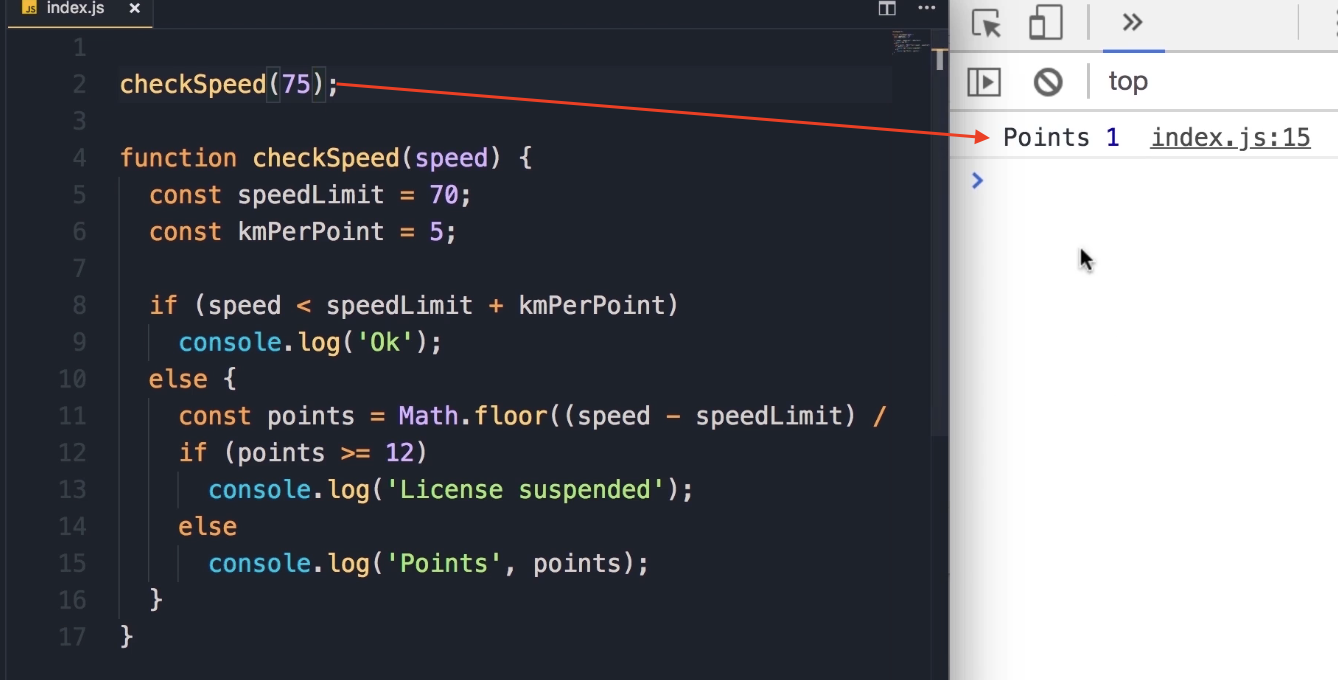
-
"Beautiful."
-
-
Test Case 6:
checkSpeed(77);-
Output:
Points 1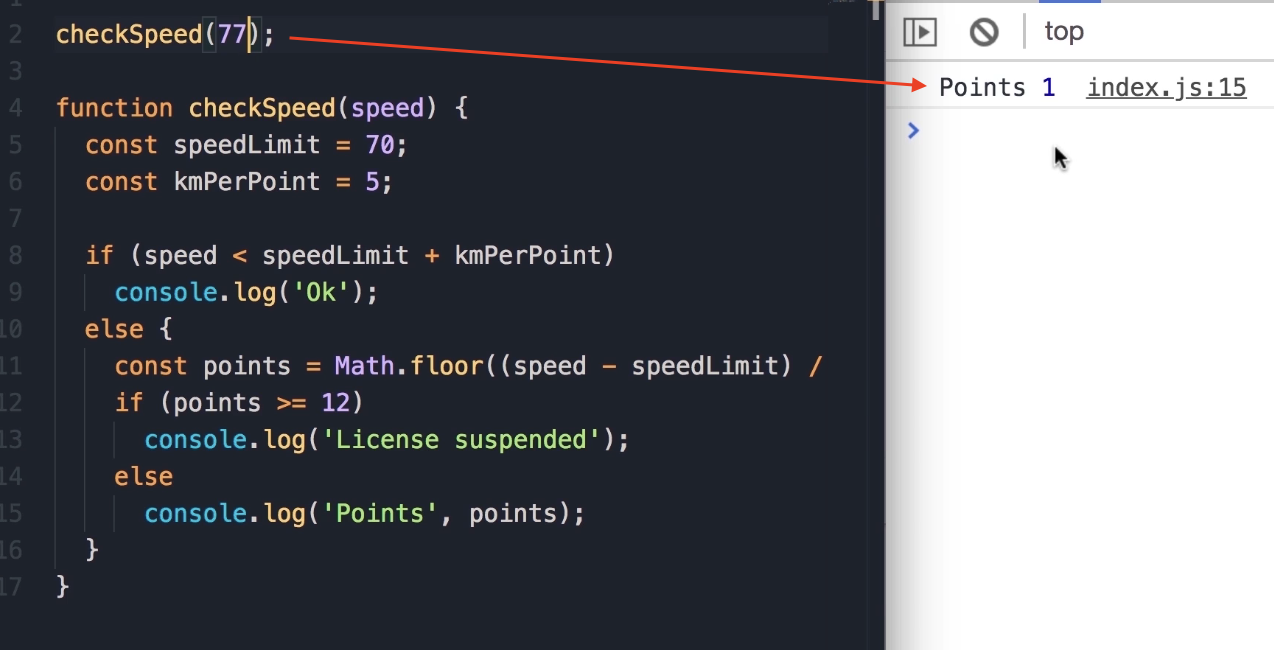
-
"Beautiful."
-
-
Test Case 7:
checkSpeed(80);-
Output:
Points 2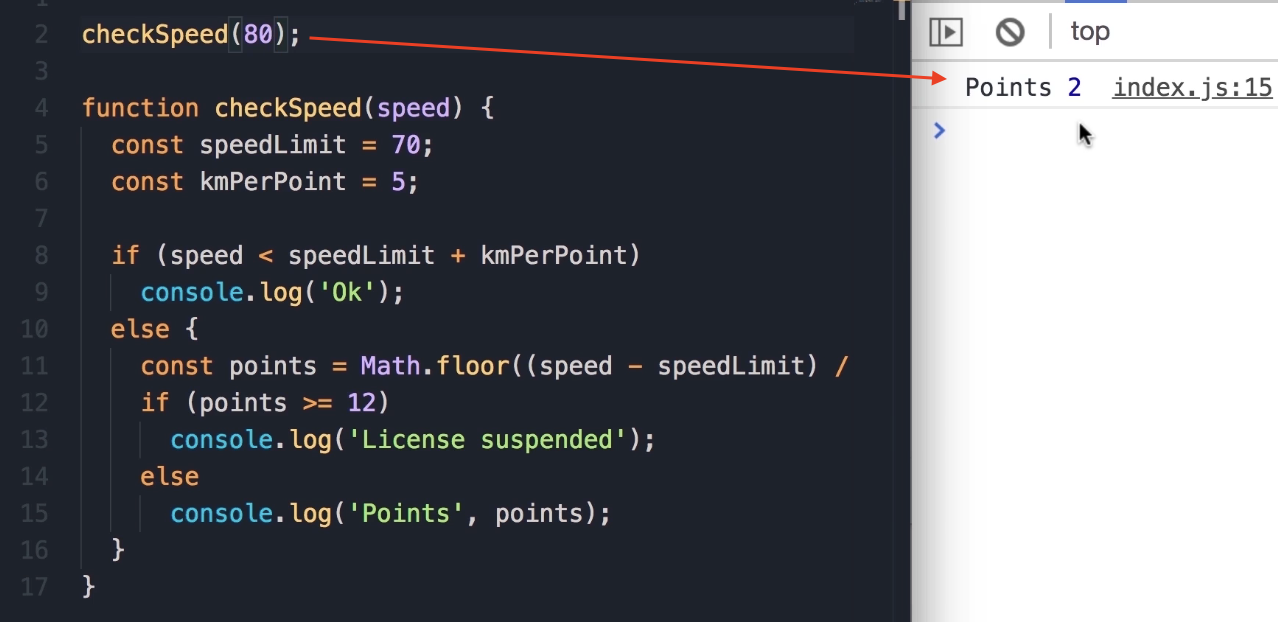
-
"There you go."
-
-
Test Case 8:
checkSpeed(130);-
Logic: To get 12 points, we have to drive 12 * 5 = 60 km above the speed limit (70 + 60 = 130).
-
Output:
License Suspended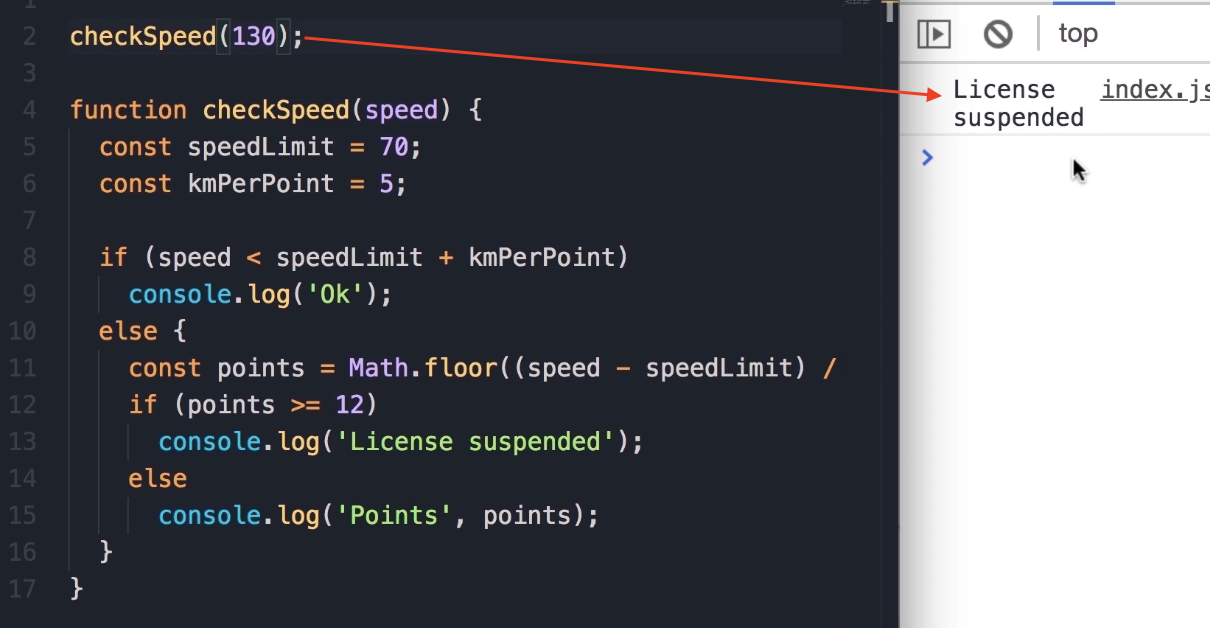
-
"Beautiful. So our function is working."
-
Code Optimization: Removing the else Block
I just want to show you one more tip to make this code cleaner. Here, we have this else block, and this has caused indentation. This is not a terribly bad thing, but it's better to avoid indentation if we can (otherwise we have to scroll left and right).
If the first condition is true, we want to display "Ok" on the console, and then return. With return, we will jump out of this function, and none of the code after it will be executed.
With this, we can delete the else statement as well as the code block, and remove the indentation.
Final Cleaned Code
(This code reflects both bug fixes: it handles speeds up to 74 km/h as "Ok")
checkSpeed(130); // Test call

function checkSpeed(speed) {
    const speedLimit = 70;
    const kmPerPoint = 5;

    // This condition now correctly handles the logic up to 75
    if (speed < speedLimit + kmPerPoint) {
        console.log('Ok');
        return;
    }
    // This code is now un-indented and will only run
    // if the 'if' block above is false (i.e., speed is 75 or more).
    const points = Math.floor((speed - speedLimit) / kmPerPoint);
    if (points >= 12)
        console.log('License Suspended');
    else
        console.log('Points', points);
}
Exercise 5
Write a function called showNumbers that takes a parameter called limit.
When we call this function and pass a number (e.g., 10), it should display all the numbers from 0 up to (and including) the limit. Next to each number, it should specify if the number is "even" or "odd".
Student Pause Point: It's a fairly easy exercise. Pause the video, spend a few minutes, and when you're done, come back and see the solution.
Solution 5.1: Using if/else
-
First, we need a
forloop. We set ourivariable to 0. -
As long as
iis less than or equal to thislimit, we are going to run this loop. -
In every iteration, we'll increment
i. -
Inside the loop, we need to check if
iis an even number or not. -
So, if
imodulous 2 (i % 2) equals 0, we displayconsole.logofi, and as the second argument, we pass "even". -
Otherwise, we do a
console.logofiand "odd".
function showNumbers(limit) {
  for (let i = 0; i <= limit; i++) {
    if (i % 2 === 0) {
      console.log(i, 'even');
    } else {
      console.log(i, 'odd');
    }
  }
}
Solution 5.2: Code Optimization (Using Conditional Operator)
There is another way to write this program. Instead of having two separate console.log statements, we can do something like this:
-
We can declare a constant, call it
message. -
Here, we can use the conditional operator. So, if
iis an even number (i % 2 === 0), we setmessageto "even"; otherwise, we set it to "odd". -
Next, we do a single
console.logofiandmessage.
function showNumbers(limit) {
  for (let i = 0; i <= limit; i++) {
    const message = (i % 2 === 0) ? 'even' : 'odd';
    console.log(i, message);
  }
}
Key Takeaway: I find this second implementation cleaner and less noisy, but if you used the first implementation, that's perfectly fine as well.
Testing and Expected Output
Now, save the changes. If we call the function with 10:
showNumbers(10);
We get all the numbers from 0 to 10.
Expected Output:
0 "even"
1 "odd"
2 "even"
3 "odd"
4 "even"
5 "odd"
6 "even"
7 "odd"
8 "even"
9 "odd"
10 "even"
Exercise 6: Count Truthy Values
Concept: Truthy and Falsy Values
To understand how to solve this exercise, let's quickly refresh your memory on truthy or falsy values.
Sometimes when we have an
ifstatement, we might pass a booleantrueorfalseas the condition.For example: we might have a constant called
isActiveset totrue. When we use this constant as the condition, we get a "Hello" message on the console because this is a booleantrue. (see the code below)const isActive = true; if (isActive) console.log('Hello');
However, sometimes what we have in our
ifstatement is not necessarily a boolean value. It could be a string, a number, or an object.In these cases, the JavaScript engine tries to convert that value to something that is like a boolean but is not strictly a boolean.
Example 1: Truthy
Let's say I have a constant called name and set it to a string,
'Mosh'. Obviously, name is a string; it is not a boolean true or false. However, the JavaScript engine tries to interpret this as truthy or falsy.const name = 'Mosh'; // Truthy Value if (name) console.log('Hello');Output : Hello
IMP to Note that:
When we run this code, you can see we still see the "Hello" message because we are dealing with a string of characters. This is what we call a truthy value. It is not the boolean
true, it is truthy.
Example 2: Falsy:
In contrast, if we had an empty string, the JavaScript engine would save this as falsy. Again, it is not the boolean false, it is falsy.
const name = '';
if (name) console.log('Hello');
Now when we run this code, you no longer see the "Hello" message.
The Complete List of Falsy Values
Here is the quick review of the list of falsy values in JavaScript.
-
undefined -
null -
''(Empty string) -
false(The boolean itself) -
0 -
NaN(Not a Number)
Exercise Description
Your Job: Create a function called countTruthy which takes an array and returns the number of truthy elements in this array.
Testing Methodology
Here is an example of how we will test this. I will declare an array with mixed values and pass it to our function.
Test Case 1: Numbers
If I declare an array and set it to [1, 2, 3], we have 3 truthy values.
const array = [1, 2, 3];
console.log(countTruthy(array));
Expected Output: 3
Test Case 2: Adding Falsy Values
Now, if we add 0 here, because 0 is a falsy value, we should still get 3. If you add null, undefined, and an empty string, we should still get 3.
const array = [0, null, undefined, '', 1, 2, 3];
console.log(countTruthy(array));
Expected Output: 3
Test Case 3: Removing Truthy Values
If I remove one of the numbers, let's say 1, we get 2.
const array = [0, null, undefined, '', 2, 3];
console.log(countTruthy(array));
Student Pause Point: Go ahead, do this exercise. And when you're done, come back and continue watching.
Solution: Counting Truthy Values
Alright, to count the number of truthy values, follow these steps:
- Initialize the Count
First, I am going to declare a variable called count and initialize it to 0.
- Iterate Over the Array
Now we need to use a for...of loop to iterate this array. For each element, we need to check to see if that element is truthy or not.
- The Truthy Check
If the value is truthy, we are going to increment count.
function countTruthy(array) {
    let count = 0;
    for (let value of array) {
        if (value)
            count++;
    }
    return count;
}
Teaching Explanation: How the Check Works
- Simply pass the value into the if condition. That value might be a boolean or a non-boolean. If it is not a boolean, the JavaScript engine tries to interpret it as truthy or falsy. If the result is truthy, then the count will be incremented.
- Return the Result
Finally, we return this count.
Key Learning: Code Optimization
Note right here I am not comparing this value with all those falsy values.
In other words, I didn't write code like this:
// AVOID THIS APPROACH
if (value !== false || value !== undefined || value !== null ...)
This is a very poor way of writing this code. We don't want to have 5 conditions here for every falsy value. Simple as that.
Exercise 7 : Show Properties
Your job is to create a function called showProperties. We pass an object here, and this function should display all the properties of this object that are of type string.

Exercise Description
Let me give you an example. On the top, I'm going to define an object, like movie. Here is the object literal syntax to initialize this.
We are going to add a few properties:
-
title: Set it to a simple string (the value doesn't really matter, 'a' is enough). -
releaseYear: Set it to a number, like 2018. -
rating: Again, a number. -
director: Set it to another string.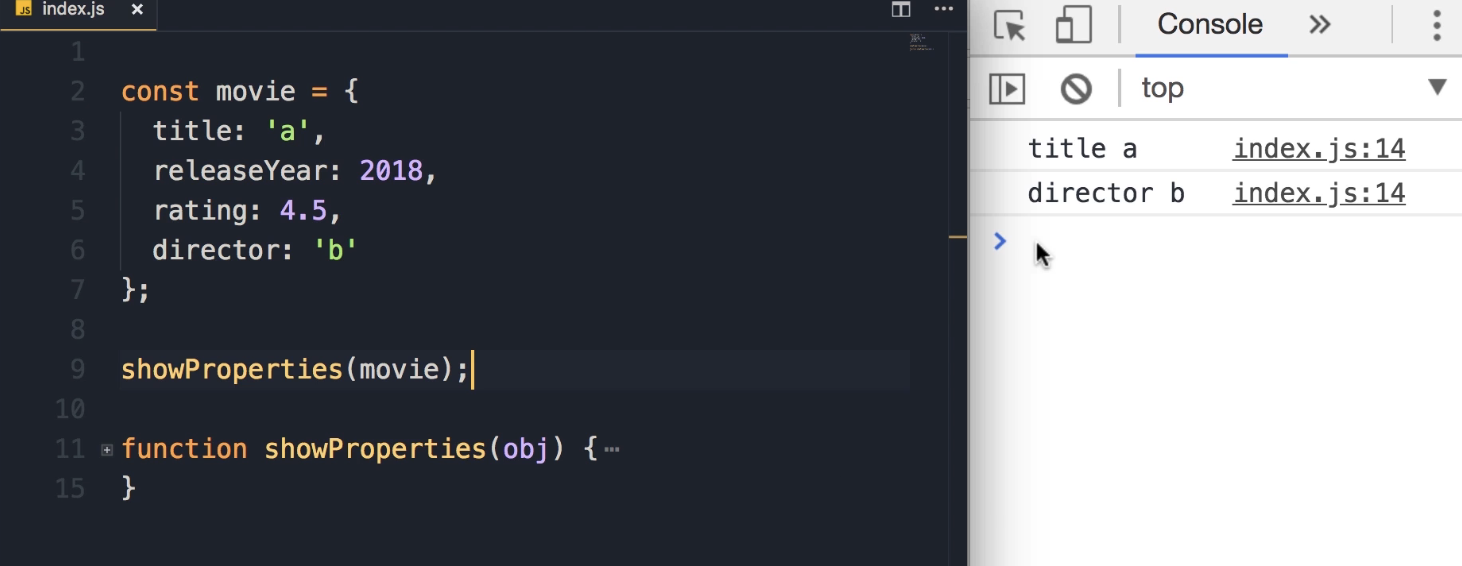
Now, if we call the function showProperties and pass this movie object, we should see the string properties of our movie object.
Goal Output:
title a
director b
Student Pause Point: "So pause the video, do the exercise and when you're done come back and continue watching."
Solution & Explanation
1. Iterating Properties
Here we need to use the for...in loop to iterate over the properties of this object.
for (let key in object) {
    // Logic goes here
}
In each iteration, this key will hold the name of one of these properties. Let's have a quick look here using console.log.
Code Check:
for (let key in object)
    console.log(key);
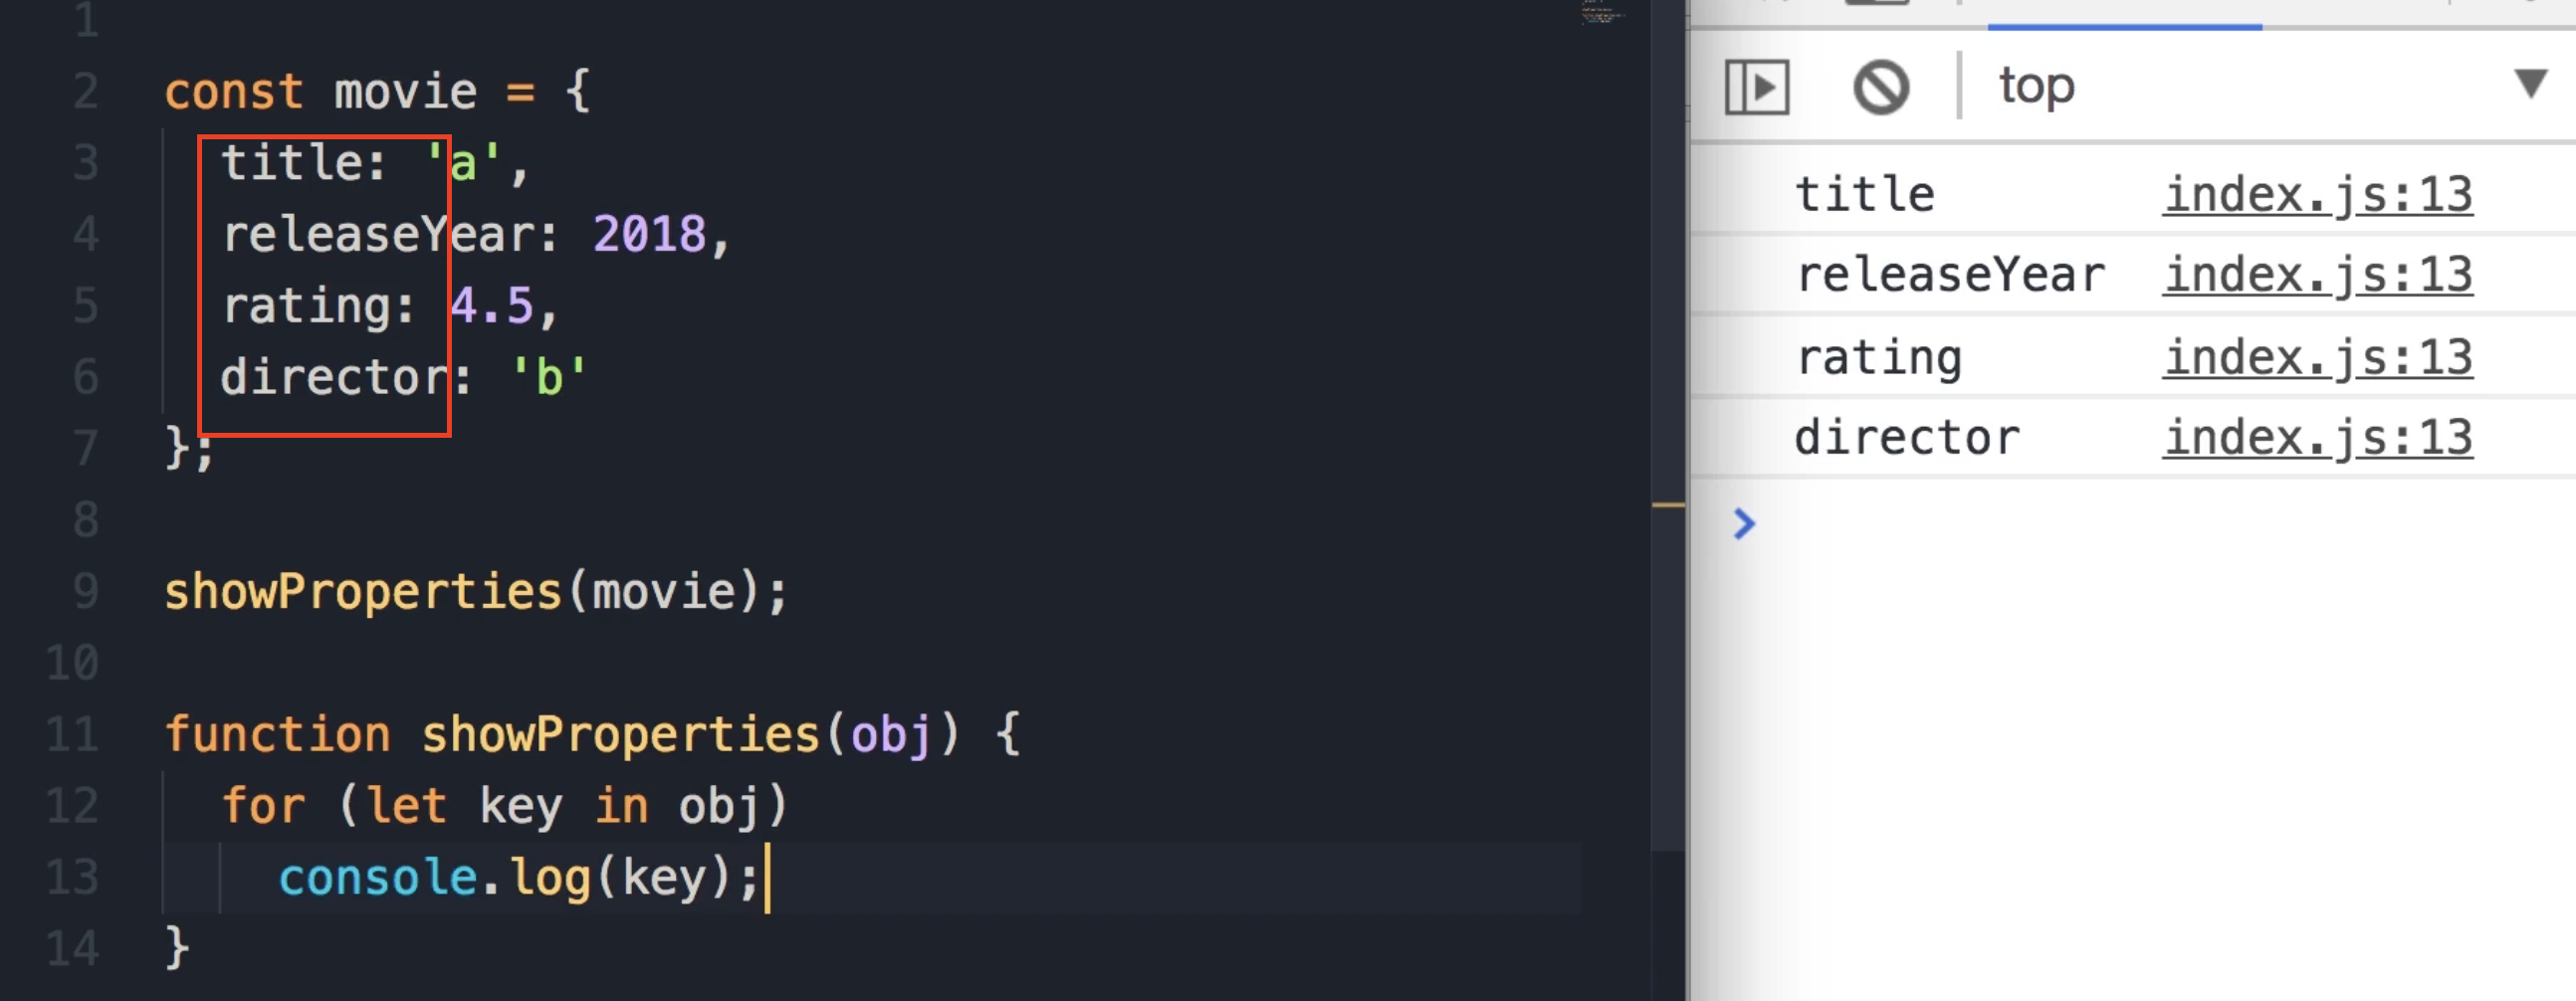
2. Checking Value Types
Now we need to get the value of each of these properties and then check the type of that value.
-
Get the Value: To get the value of this property, we use the bracket notation:
object[key]. -
Check the Type: To check the type of this value, we use the
typeofoperator. -
Condition: We put this in an
ifstatement. If the type is a string, then we'll display the property and its value.
const movie = {
title: 'a',
releaseYear: 2018,
rating: 4.5,
director: 'b'
};
showProperties(movie);
function showProperties(obj) {
for (let key in obj) {
if (typeof obj[key] === 'string')
console.log(key, obj[key]);
}
}
Expected Output:
title a
director b
Exercise 8: Sum of Multiples of 3 and 5
Here is another simple but great exercise that trains your programming brain.
Exercise Description
I want you to create a function called sum. We give it a limit, and this function will return the sum of all the multiples of 3 and 5 from 0 up to this limit.
Example Scenario:
What are the multiples of 3 and 5 between 0 and 10?
-
Multiples of 3: 3, 6, and 9
-
Multiples of 5: 5 and 10 (We are including the number passed as the limit)
If you add these numbers together (3 + 6 + 9 + 5 + 10), the result will be 33. That is the goal of this function.
Solution:
1. Initialize the Loop
We need to start with a for loop. Let i equal 0. As long as i is less than or equal to the limit, we want to increment i.
for (i=0;i<=limit;i++){
// logic goes here
}
2. check for Multiples
Now, we want to check to see if i is a multiple of 3 or 5 using the modulus operator (%).
-
If
i % 3 === 0OR (||) -
If
i % 5 === 0
3. Calculate the Sum
If the condition is met, we need to take i and add it to our sum. To do this, we first need to declare a variable sum and set it to 0.
4. Return the Result
Finally, we return the sum.
console.log(sum(10));
function sum(limit) {
let sum = 0;
for (let i = 0; i <= limit; i++) {
if (i % 3 === 0 || i % 5 === 0)
sum += i;
}
return sum;
}
Expected Output:
33
Note: If we save the changes with a limit of 10, we get 33 in the console.
Best Practice: Code Formatting and Readability
Now, pay attention to how I have formatted this code.
I have added extra vertical line breaks to separate the initialization from the actual logic, and from the return value.
function sum(limit) {
let sum = 0; // Initialization
// <--- Vertical Break
for (let i = 0; i <= limit; i++) {
if (i % 3 === 0 || i % 5 === 0)
sum += i; // Logic
}
// <--- Vertical Break
return sum; // Return Value
}
Why do we do this?
If we didn't have these vertical breaks, this code would look a little bit squashed, and it becomes a little bit hard to read.
As a best practice, it's always good to separate the last line—the return statement.
To understand the concept behind (&&) and (||)
The reason we use the OR (
||) operator instead of the AND (&&) operator comes down to exactly which numbers we want to include in our sum.Here is the breakdown:
1. The Goal
We want to find numbers that belong to either group:
The group of numbers divisible by 3 (e.g., 3, 6, 9...)
The group of numbers divisible by 5 (e.g., 5, 10...)
2. Why
||(OR) worksThe
||operator returnstrueif at least one side is true.
Take the number 3:
Is it divisible by 3? Yes.
Is it divisible by 5? No.
Result: Since one is true, we keep it.
Take the number 5:
Is it divisible by 3? No.
Is it divisible by 5? Yes.
Result: Since one is true, we keep it.
3. Why
&&(AND) would failThe
&&operator returnstrueonly if BOTH sides are true simultaneously.
Take the number 3 again:
Is it divisible by 3? Yes.
Is it divisible by 5? No.
Result:
True && Falseis False. The number 3 would be skipped.If you used
&&, you would only sum numbers that are multiples of 15 (because $3 \times 5 = 15$). So, between 0 and 10, your result would be 0 because no number in that range is divisible by both 3 and 5 at the same time.
Exercise 9 : Grade Calculator
In this exercise, we want to calculate the grade of a student based on their marks in different subjects. We pass an array of marks to a function called calculateGrade.
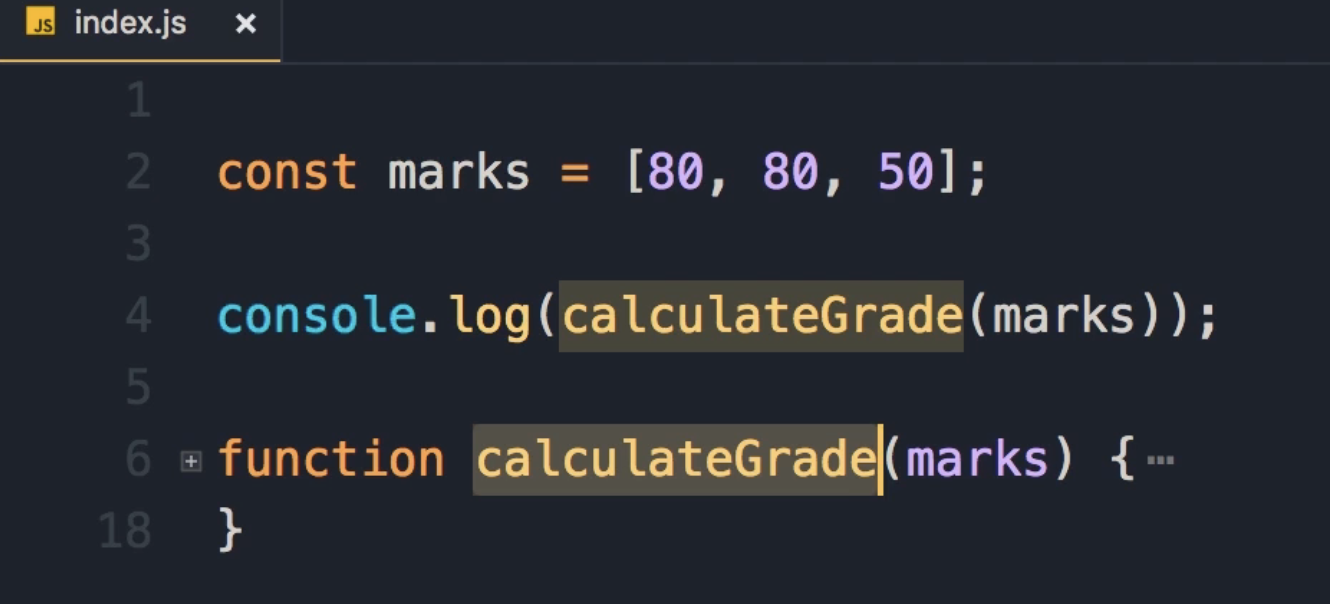
The Logic
First, the function calculates the average grade.
-
Example Calculation:
-
Marks: 80, 80, 50
-
Sum: 80 + 80 + 50 = 210
-
Average: 210 / 3 = 70
-
Next, we need a table to see what grade this average corresponds to:
-
0 - 59: F
-
60 - 69: D
-
70 - 79: C
-
80 - 89: B
-
90 - 100: A
Student Pause Point: Spend 5 to 10 minutes on this exercise. When you are done, come back and continue reading to see the solution.
Solution:
Phase 1: Calculating the Average
To calculate the average, we first need to calculate the sum of all the marks.
-
Declare a variable like
sumand initialize it to 0. -
Use a
for...ofloop to iterate over the array of marks. -
In every iteration, get the
markand add it tosum.
function calculateGrade(marks){
let sum = 0;
for (let mark of marks)
sum += mark;
}
Teaching Explanation: Now that we have the total, to get the average, we need to divide sum by the number of marks (which is marks.length).
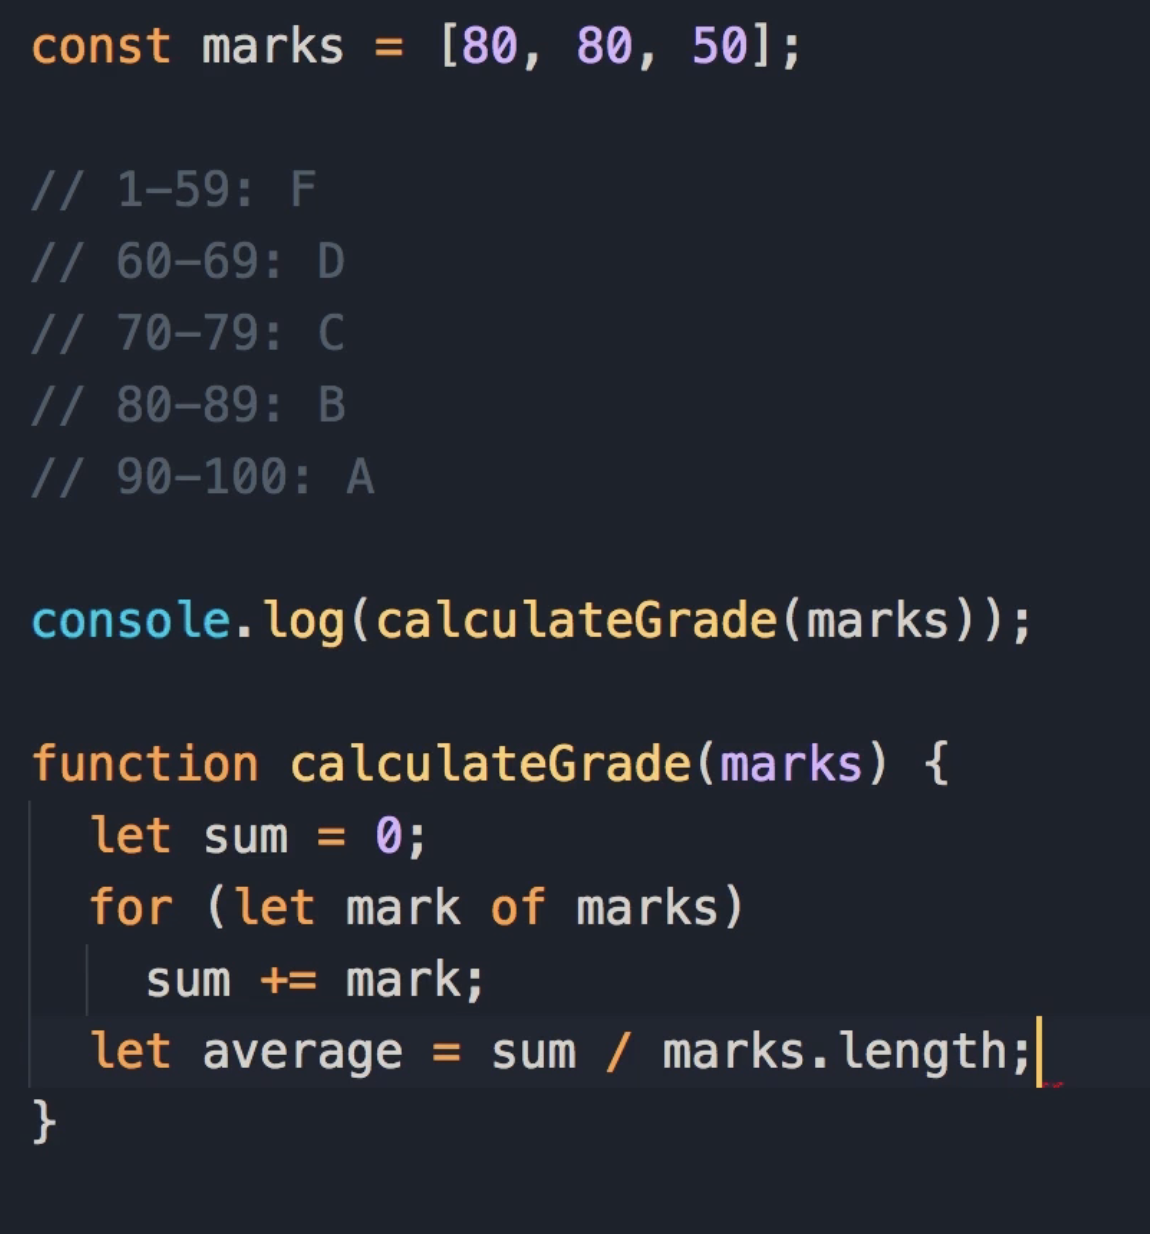
In JavaScript,
.lengthis a property that tells you how many items are in an array or how many characters are in a string.In the context of this exercise:
marks.lengthgives the total number of subjects (grades) inside themarksarray.It was used to calculate the average:
sum / marks.length(Total Score divided by the Number of Subjects).Example:
const marks = [80, 80, 50]; console.log(marks.length); // Output: 3
Phase 2: Mapping Average to Grade (Logic Optimization)
Now that we have the average, we need to map it to a grade using our table.
The "Noisy" Approach
One way to calculate the grade is using specific ranges with logical AND operators.
// Range 0 to 59
if (average >= 0 && average <= 59)
return 'F';

Instructor Critique:
This code is a little bit ugly. There is so much "noise" in this code. Instead of having two conditions along with the logical AND operator, we can simplify this expression.
The Simplified Approach
We can remove the lower bound check. Because the range for F is 0 to 59, as long as the average is less than 60, we get the same result. See the code below:
if (average < 60) return 'F'; // because the range is from 0 to 59
Leonardo Da Vinci Quote:
"Simplicity is the ultimate sophistication."
You should always aim for the simplest solution. Using this pattern, we can calculate the other grades by just checking the upper limit.
Revised Logic:
-
If
average < 60: Return F. -
If
average < 70: Return D. (If we get to this point, it means the average is at least 60. So we only check if it is between 60 and 69). -
If
average < 80: Return C. -
If
average < 90: Return B. -
If we get past these points, the average is at least 90, so we can simply return A. See the code below
if (average < 60) return 'F';
if (average < 70) return 'D';
if (average < 80) return 'C';
if (average < 90) return 'B';
return 'A';
Final Code:
function calculateGrade(marks){
let sum = 0;
for (let mark of marks)
sum += mark;
let average = sum/marks.length;
if (average < 60) return 'F';
if (average < 70) return 'D';
if (average < 80) return 'C';
if (average < 90) return 'B';
return 'A';
}
Phase 3: Refactoring (Single Responsibility Principle)
Now we can make this code even better. While the function is fairly simple (about 10 lines), it is doing two different things:
-
Calculating the average.
-
Mapping the average to a grade.
Key Concept: Single Responsibility Principle
Think of a restaurant.
-
The Chef: Responsible for cooking (doesn't take orders).
-
The Manager: Responsible for managing the restaurant at a high level.
Each person has a distinct role. We have the same concept in programming. Functions should be small and focused on only one thing.
Refactoring Steps
-
Extract the Logic: We can cut the average calculation logic and put it in a separate function.
-
Make it Generic:
-
Rename the parameter from
markstoarray. -
Rename the loop variable from
marktovalue.
-
IDE Tip: Put the cursor on the variable name and press F2 to rename it across the function.
This makes the function generic.
-
It can be an array of marks, temperatures, or anything else. (look at the code for calculateAverage function)
-
We can reuse this function in the future whenever we need to calculate the average of a bunch of numbers.
The Generic Average Function:
function calculateAverage(array) {
let sum = 0;
for (let value of array)
sum += value;
// We can return the expression result directly
return sum / array.length;
}
The Final Grade Function: Now we simply reuse our new function inside the original one.
function calculateGrade(marks) {
const average = calculateAverage(marks);
if (average < 60) return 'F';
if (average < 70) return 'D';
if (average < 80) return 'C';
if (average < 90) return 'B';
return 'A';
}
Key Takeaway
With this change, we now have two very simple functions, and each function is responsible only for one thing.
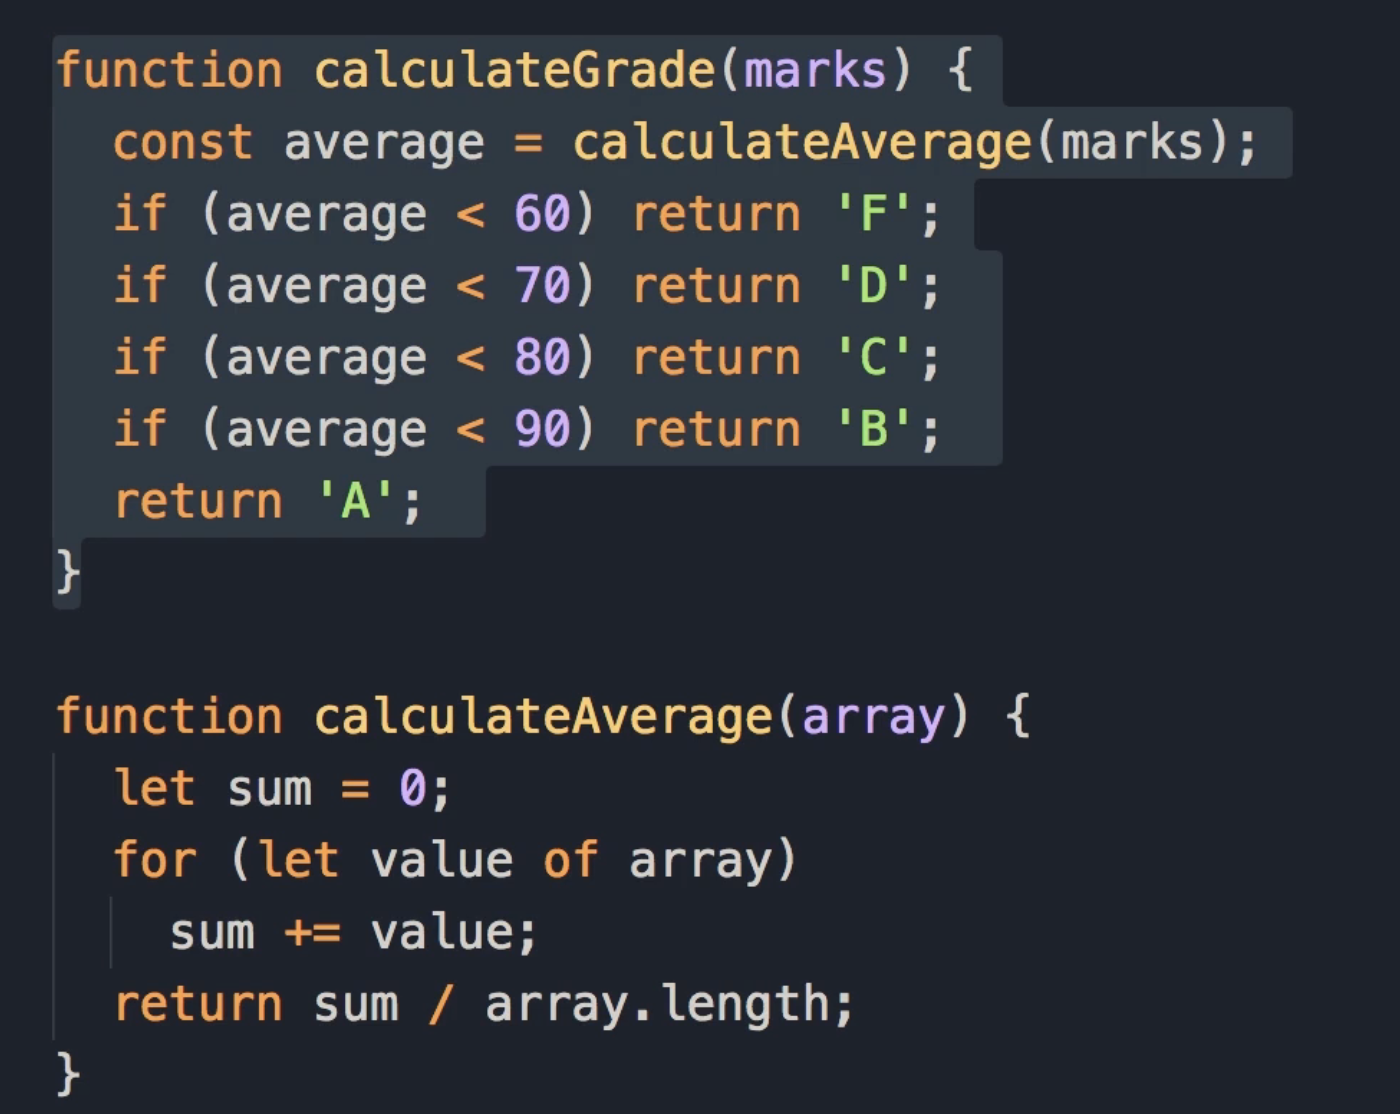
Exercise 10 : Show Stars
This is a very popular exercise for junior programmers involving a function called showStars with a parameter called rows.
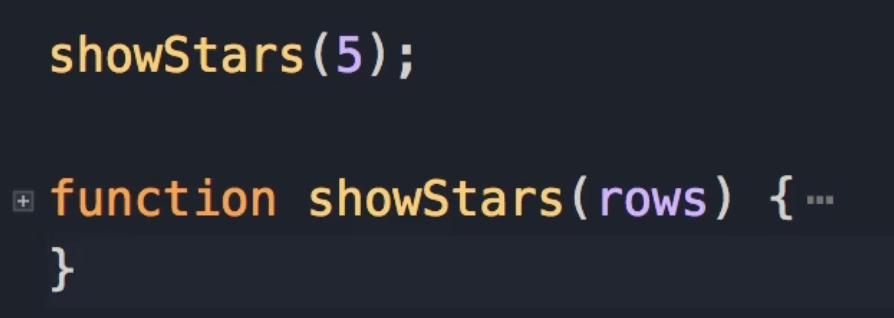
Exercise Description
We want to create a function where the number of stars in a row depends on the row we are in. When we call this function and pass a number (e.g., 5), see what we get on the console:
-
We get 5 rows.
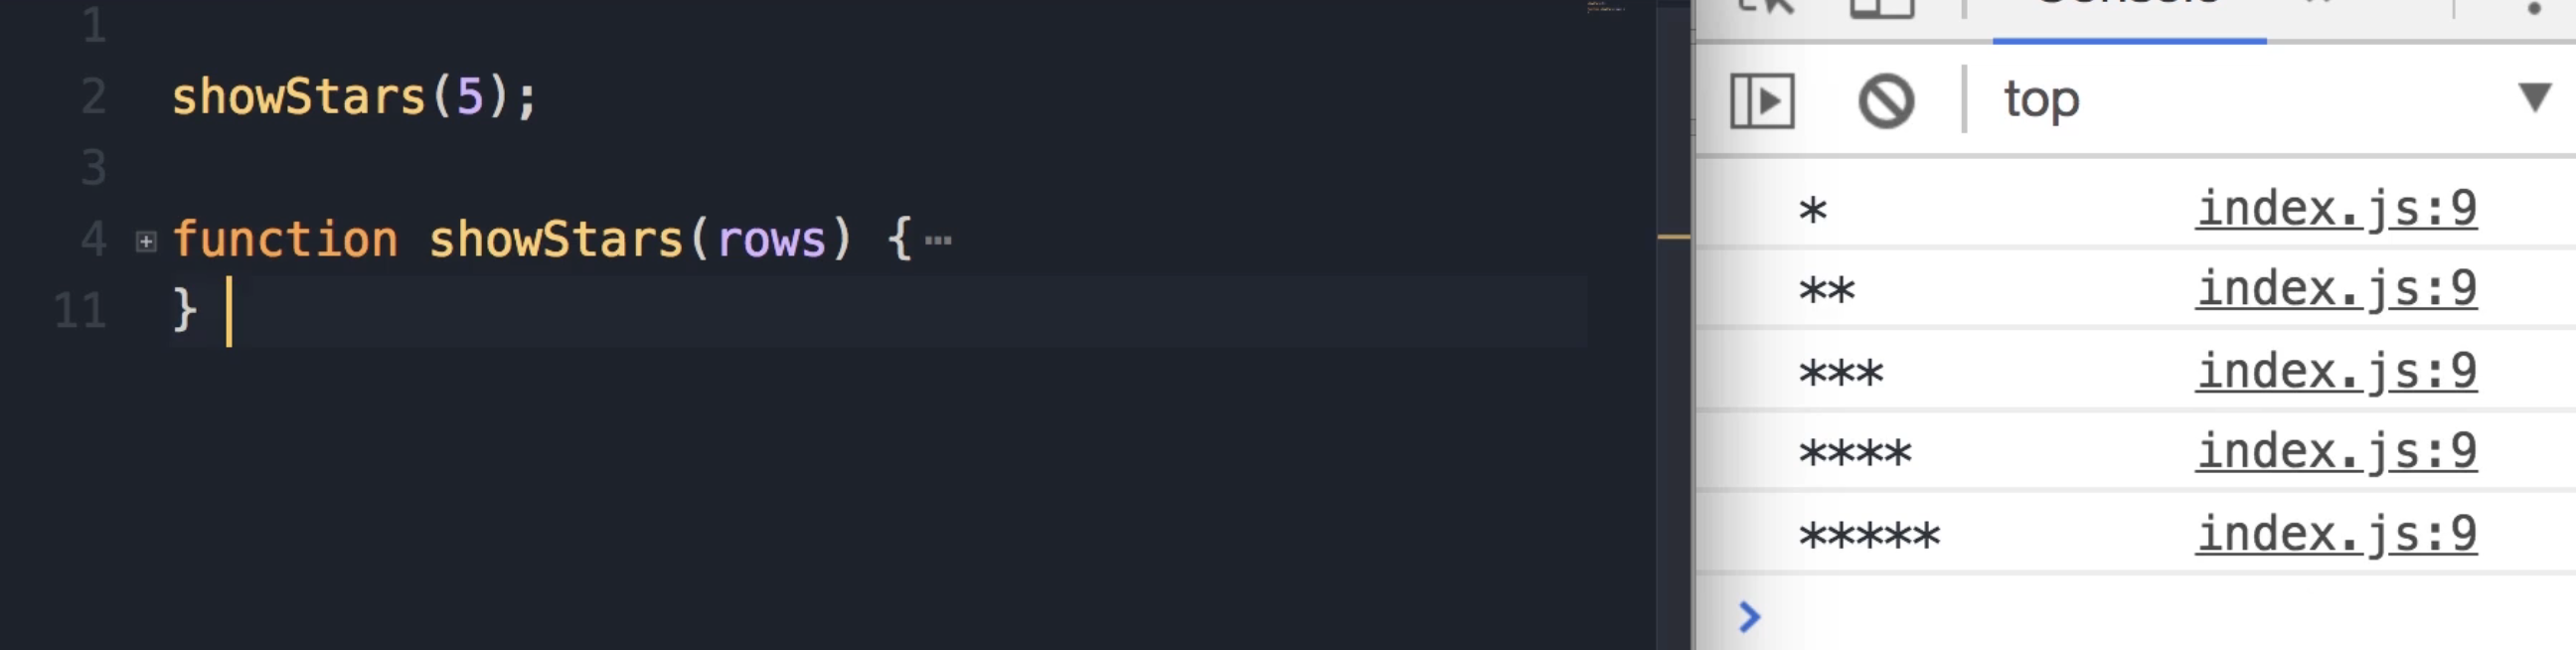
-
In the first row, we have one star.
-
In the second row, we have 2 stars, and so on.
-
If you call this function and pass 1, you get only a single star.
showStars(1) -
If we pass 2, we get 2 rows and 2 stars.
showStars(2)
Student Pause Point: "So go ahead and spend 5-10 minutes on this exercise, when you're done, come back and continue watching."
Solution:
-
Initialize the Outer Loop
We need to start with a for loop. We set our variable row to 1. As long as row is less than or equal to the number of rows (the parameter), we want to increment row. See the code below:
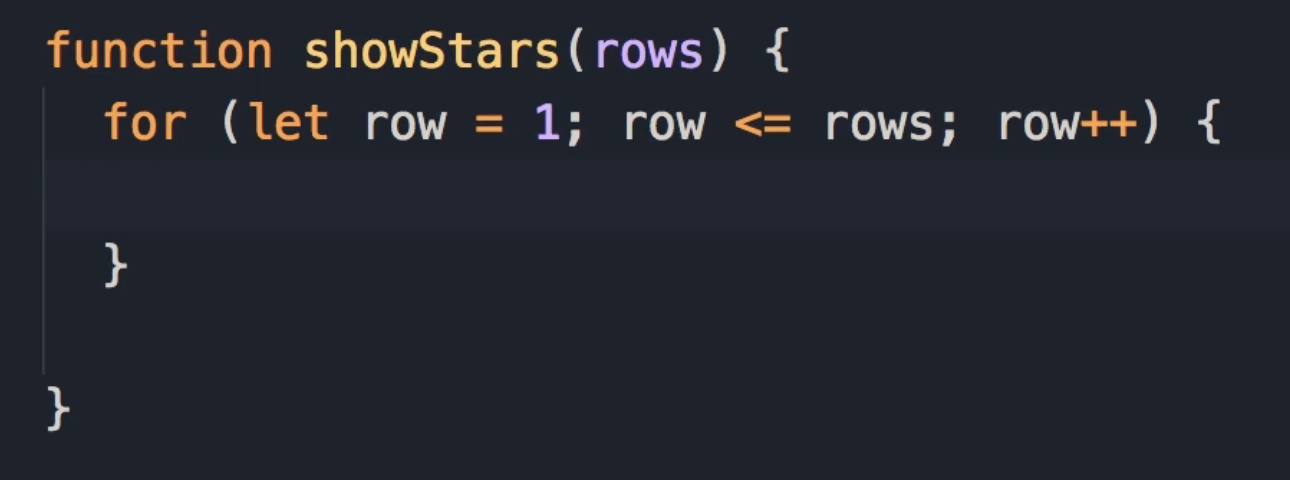
-
Initialize the Pattern Variable
-
Now, in each row, depending on the number of the row, we need to display one or more stars.
-
So here, I'm going to declare a variable called pattern and set it to an empty string ('').
-
Now, depending on the value of the row, we need to add one or more stars to this pattern.
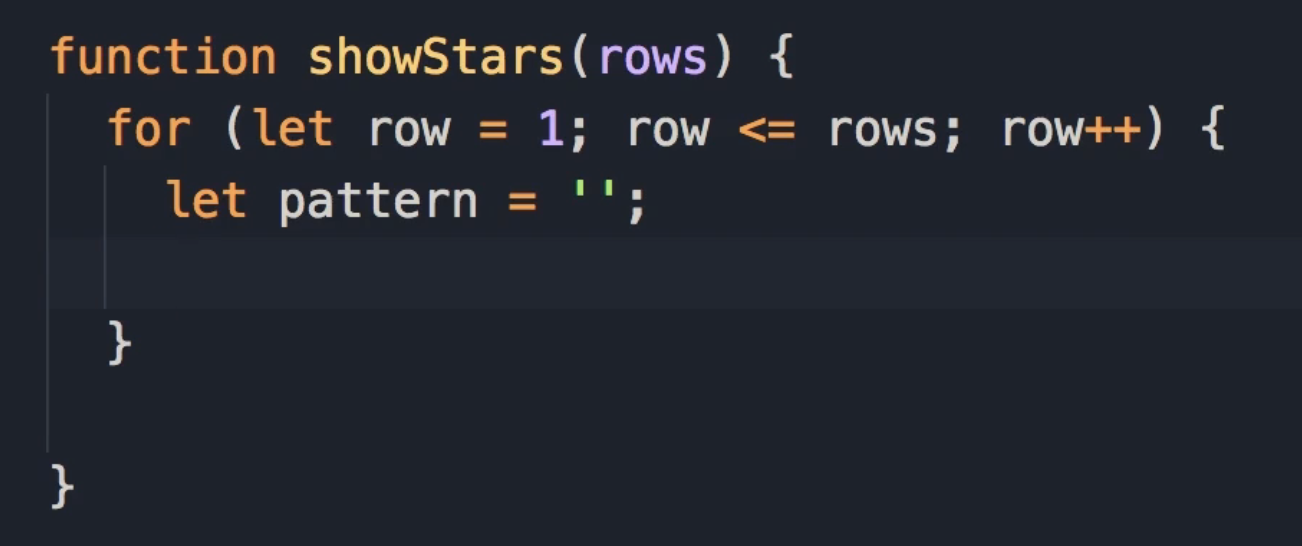
-
-
Create the Inner Loop
Here we need another for loop. Let's call the variable i and set it to 0. As long as i is less than row, we increment i.
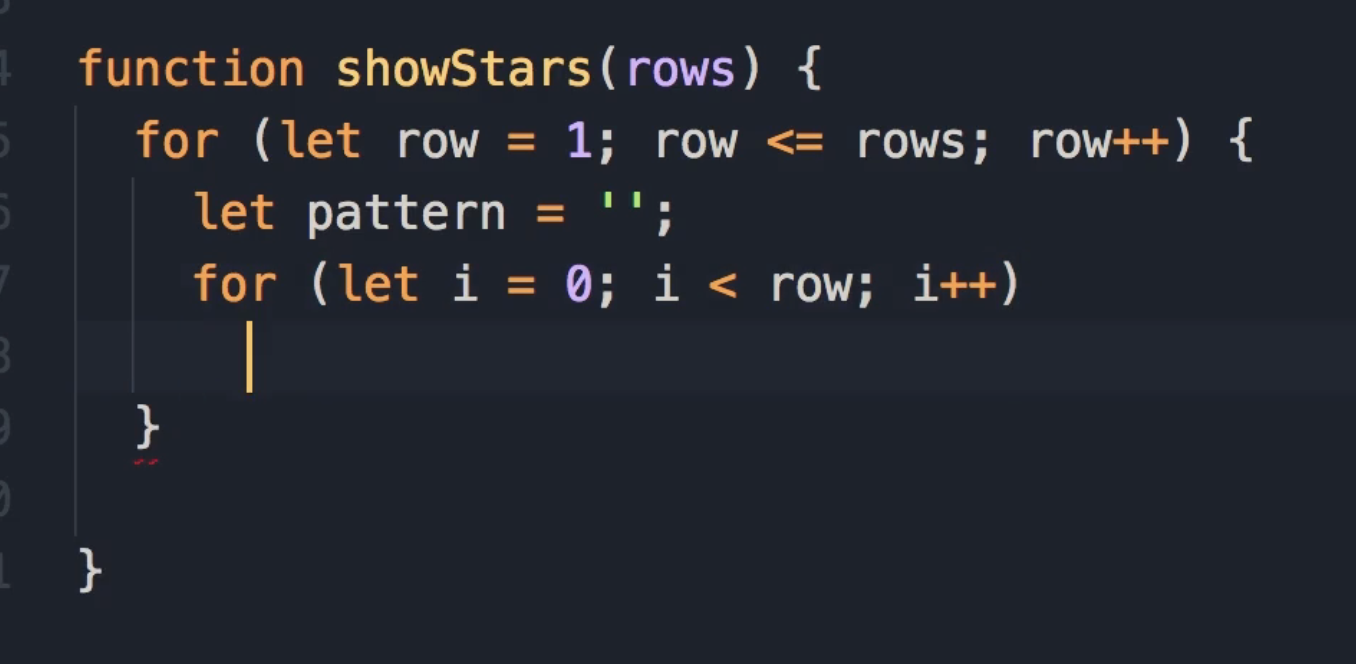
-
Accumulate Stars
Inside this inner loop, we add a star to the pattern, so pattern += '*'.

Why this works: If you're on row 5, this loop will execute 5 times because we've started from 0, and we run this while
iis less thanrow. This will execute 5 times, and each time we'll append one star to our empty string. So we'll end up with 5 stars. -
Log the Result
Finally, when we are done with this inner loop, we do a console.log(pattern). That's all we have to do.
Final Code
showStars(5);
function showStars(rows) {
for (let row = 1; row <= rows; row++) {
let pattern = '';
for (let i = 0; i < row; i++)
pattern += '*';
console.log(pattern);
}
}
Testing Methodology
Now, on the top, I'm going to change the input to 5 and save the changes.
*
**
***
****
*****
The algorithm works beautifully.
-
Test Case 1: If you pass 1, we get a single star.
-
Test Case 2: If we pass 2, we get 2 stars (2 rows).
Key Learning: Nested Loops
What we have here is what we call a nested loop. So, we have a loop inside of another loop. You may see this pattern inside a lot of algorithms.
Concept: Prime vs. Composite Numbers
Before starting the coding exercise, it is important to understand the mathematical concept of prime and composite numbers.
-
Prime Number: A number whose factors are only 1 and itself. It cannot be divided evenly into another number.
-
Example: 11 is prime because its only factors are 1 and 11.
-
Example: 13 is prime because it can only be divided evenly by 1 and 13.
-
-
Composite Number: A number that has many factors.
-
Example: 12 is a composite number.
-
Factors of 12: 1, 2, 3, 4, 6, and 12.
-
When we divide 12 by these numbers, we won't get any remainder (the remainder is 0).
-
Exercise: The showPrimes Function
Exercise Description: Create a function called showPrimes that takes a limit argument and shows all the prime numbers up to this limit.

Expected Output (for limit 20):
2
3
5
7
... (and so on)
Step 1: Implementing the Basic Logic
-
To implement this, we need a loop that starts from 2 (since the first prime number is 2) up to the limit.
-
Then, for each number, we need to check if it is prime or not using a nested loop.
Important Note on Variable Naming:
When writing nested loops, avoid using generic names like i and j because it becomes confusing for someone reading the code.
-
Outer Loop: Instead of
i, usenumber. This iterates through the numbers from 2 up to the limit. -
Inner Loop: Instead of
j, usefactor. This loop finds the factors of that specific number.
Initial Code Structure:
function showPrimes(limit) {
// Outer loop: iterates through numbers 2 to limit
for (let number = 2; number <= limit; number++) {
let isPrime = true;
// Inner loop: checks for factors
// We start factor at 2 and go up to (but not including) the number itself
for (let factor = 2; factor < number; factor++) {
// If number can be evenly divided by factor
if (number % factor === 0) {
isPrime = false;
break; // Optimization
}
}
if (isPrime) console.log(number);
}
}
Teaching Explanations:
-
The Inner Loop Logic: We want to see if the current
numberhas a factor other than 1 and itself.-
We do not include 1 in the loop because every number is divisible by 1.
-
We do not include the
numberitself because every number is divisible by itself.
-
-
The Modulus Operator:
if (number % factor === 0)checks if the remainder is 0. If it is, the number has a factor and is not prime. -
The
isPrimeVariable: We assume the number is prime (true) initially. If the condition in the inner loop is met, we setisPrimetofalse. -
Optimization with
break: If we find even one factor, the number is definitely not prime. There is no need to continue running the inner loop; it would just waste the computer's processing power. We use thebreakkeyword to jump out of the inner loop immediately.
Refactoring: Single Responsibility Principle
Student Pause Point: "Now here's another challenge for you. I want you to modify this code, extract a new function, and make sure each function is small and responsible for a single task. Pause the video, when you're done, come back and continue watching."
The Problem with the Previous Code:
If you look at the inner loop and the logic inside it, all we are doing is checking to see if a number is prime or not. This logic does not necessarily have to be part of the showPrimes function.
The Solution:
We should apply the Single Responsibility Principle. We want small functions where each function is responsible for a single task. We can extract the logic into a reusable function called isPrime.
Step 2: Creating the isPrime Function
We can extract the logic and make it cleaner and more elegant.
-
Optimization: Instead of breaking the loop and updating a variable (
isPrime), we can simplyreturn falseimmediately if we find a factor. -
Default Return: If the loop finishes and we haven't returned false, it means we didn't find any factors, so we
return true. -
Formatting: We can remove curly braces
{}for loops and if-statements that contain only a single statement to make the code less cluttered.
function isPrime(number) {
// Loop from 2 to almost the number
for (let factor = 2; factor < number; factor++)
if (number % factor === 0)
return false; // Found a factor, not prime
return true; // No factors found, is prime
}
Step 3: Updating showPrimes
Now, the showPrimes function becomes very simple. It only iterates through numbers and calls our new reusable function.
function showPrimes(limit) {
for (let number = 2; number <= limit; number++)
if (isPrime(number)) console.log(number);
}
Testing the Result:
If we pass 10 to this function:
showPrimes(10);
Output:
2
3
5
7
Key Learning Points
-
Code Clarity: With these changes, we now have two very simple functions. As Mosh says, "If you give this function to the dumbest person in the world they will understand it."
-
Nested Loops: Generally speaking, nested loops are a bit hard to understand.
-
Refactoring Indicator: Whenever you have a nested loop, that is probably an indication that you can extract the logic in the inner loop and put it somewhere else in a different function.